Netgear WGX102 WGX102v2 Reference Manual - Page 26
Plug and Play Installation, Default Factory Settings, on Configuring - setup
 |
View all Netgear WGX102 manuals
Add to My Manuals
Save this manual to your list of manuals |
Page 26 highlights
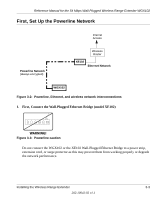
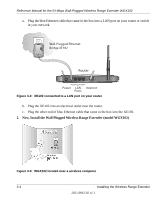
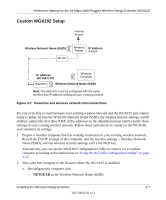
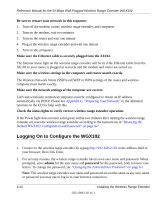
Reference Manual for the 54 Mbps Wall-Plugged Wireless Range Extender WGX102 • Plug and play installation: This option works when the wireless settings of your existing network are the same as the default WGX102. • Custom installation: Use this option when the wireless settings or IP address settings of your existing network are different from the default WGX102. Refer to "Default Factory Settings" on page 3-2. These procedures for using these two options are presented below. Plug and Play Installation If your network uses a NETGEAR wireless router with its default Wireless Network Name (NETGEAR) and you do not use security settings, then the WGX102 works immediately, and the installation is complete. If this is not the case, go to the following section, Custom WGX102 Setup. You can connect additional XE102 bridges to your network. If you want to change the default powerline passwords for increased security on your powerline network, see "Configuring the Powerline Network Password" on page 4-2. For information about setting up wireless security see "Understanding Basic Wireless Settings" on page 5-2, and the documentation for your wireless router. 3-6 Installing the Wireless Range Extender 202-10042-02 v1.1
-
 1
1 -
2
-
3
-
4
-
5
-
6
-
7
-
8
-
9
-
10
-
11
-
12
-
13
-
14
-
15
-
16
-
17
-
18
-
19
-
20
-
 21
21 -
 22
22 -
 23
23 -
 24
24 -
 25
25 -
 26
26 -
 27
27 -
 28
28 -
 29
29 -
 30
30 -
 31
31 -
32
-
33
-
34
-
35
-
36
-
37
-
38
-
39
-
40
-
41
-
42
-
43
-
44
-
45
-
46
-
47
-
48
-
49
-
50
-
51
-
52
-
53
-
54
-
55
-
56
-
57
-
58
-
59
-
60
-
61
-
62
-
63
-
64
-
65
-
66
-
67
-
68
-
69
-
70
-
71
-
72
-
73
-
74
-
75
-
76
-
77
-
78
-
79
-
80
-
81
-
82
-
83
-
84
-
85
-
86
-
87
-
88
-
89
-
90
-
91
-
92
-
93
-
94
-
95
-
96
-
97
-
98
-
99
-
100
-
101
-
102
-
103
-
104
-
105
-
106
-
107
-
108
-
109
-
110
-
111
-
112
-
113
-
114
-
115
-
116
-
117
-
118
-
119
-
120
-
121
-
122
-
123
-
124
-
125
-
126
-
127
-
128
-
129
-
130
-
131
-
132
-
133
-
134
-
135
-
136
-
137
-
138
-
139
-
140
-
141
-
142
-
143
-
144
-
145
-
146
-
147
-
148
-
149
-
150
-
151
-
152
-
153
-
154
-
155
-
156
-
157
-
158
-
159
-
160
-
161
-
162
-
163
-
164
-
165
-
166
-
167
-
168
-
169
 |
 |