Netgear WGX102 WGX102v2 Reference Manual - Page 88
Router Mode WAN Setup, Options on Adding a Custom, Service, Using Address Reservation
 |
View all Netgear WGX102 manuals
Add to My Manuals
Save this manual to your list of manuals |
Page 88 highlights
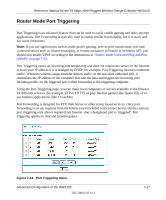
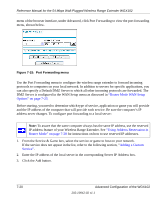
Reference Manual for the 54 Mbps Wall-Plugged Wireless Range Extender WGX102 menu of the browser interface, under Advanced, click Port Forwarding to view the port forwarding menu, shown below. Figure 7-15: Port Forwarding menu Use the Port Forwarding menu to configure the wireless range extender to forward incoming protocols to computers on your local network. In addition to servers for specific applications, you can also specify a Default DMZ Server to which all other incoming protocols are forwarded. The DMZ Server is configured in the WAN Setup menu as discussed in "Router Mode WAN Setup Options" on page 7-23. Before starting, you need to determine which type of service, application or game you will provide and the IP address of the computer that will provide each service. Be sure the computer's IP address never changes. To configure port forwarding to a local server: Note: To assure that the same computer always has the same IP address, use the reserved IP address feature of your Wireless Range Extender. See "Using Address Reservation in Router Mode" on page 7-28 for instructions on how to use reserved IP addresses. 1. From the Service & Game box, select the service or game to host on your network. If the service does not appear in the list, refer to the following section, "Adding a Custom Service". 2. Enter the IP address of the local server in the corresponding Server IP Address box. 3. Click the Add button. 7-20 Advanced Configuration of the WGX102 202-10042-02 v1.1
-
 1
1 -
2
-
3
-
4
-
5
-
6
-
7
-
8
-
9
-
10
-
11
-
12
-
13
-
14
-
15
-
16
-
17
-
18
-
19
-
20
-
21
-
22
-
23
-
24
-
25
-
26
-
27
-
28
-
29
-
30
-
31
-
32
-
33
-
34
-
35
-
36
-
37
-
38
-
39
-
40
-
41
-
42
-
43
-
44
-
45
-
46
-
47
-
48
-
49
-
50
-
51
-
52
-
53
-
54
-
55
-
56
-
57
-
58
-
59
-
60
-
61
-
62
-
63
-
64
-
65
-
66
-
67
-
68
-
69
-
70
-
71
-
72
-
73
-
74
-
75
-
76
-
77
-
78
-
79
-
80
-
81
-
82
-
 83
83 -
 84
84 -
 85
85 -
 86
86 -
 87
87 -
 88
88 -
 89
89 -
 90
90 -
 91
91 -
 92
92 -
 93
93 -
94
-
95
-
96
-
97
-
98
-
99
-
100
-
101
-
102
-
103
-
104
-
105
-
106
-
107
-
108
-
109
-
110
-
111
-
112
-
113
-
114
-
115
-
116
-
117
-
118
-
119
-
120
-
121
-
122
-
123
-
124
-
125
-
126
-
127
-
128
-
129
-
130
-
131
-
132
-
133
-
134
-
135
-
136
-
137
-
138
-
139
-
140
-
141
-
142
-
143
-
144
-
145
-
146
-
147
-
148
-
149
-
150
-
151
-
152
-
153
-
154
-
155
-
156
-
157
-
158
-
159
-
160
-
161
-
162
-
163
-
164
-
165
-
166
-
167
-
168
-
169
 |
 |
