Pfaff 125 Owner's Manual
Pfaff 125 Manual
 |
View all Pfaff 125 manuals
Add to My Manuals
Save this manual to your list of manuals |
Pfaff 125 manual content summary:
- Pfaff 125 | Owner's Manual - Page 1
IQ 11 _ . - Pfaff 125 | Owner's Manual - Page 2
mit Fadenabschneider 1 29 Stoffdruckerstange Parts of your sewing machine 100 Carrying handle 101 Hinged top cover 102 Hand wheel 103 Stop motion knob 104 Master switch 105 Finger-tip stitch buttons 106 Stitch length control 107 Detachable work support with accessory box and compartment 108 Needle - Pfaff 125 | Owner's Manual - Page 3
119 Capot couvrant le compartiment du crochet 120 Bras libre 121 Passagedufil 122 Tension du fil d'aiguille 123 Guide-fil de dévidoir 124 Levier releveur de fil 125 Guide-fil de dévidoir (escamotable) 126 Porte-bobine avec dérouleur 127 Deuxième porte-bobine (relevable) 128 Entrainement double - Pfaff 125 | Owner's Manual - Page 4
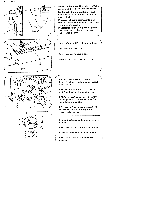
01/23/2008 Kofferhaube abheben. Lift off the cover. Enlever le couvercle de Ia valisette. Sollevare ii coperchio della valigetta. 4 N Tragegriff umklappen. Fold down the carrying handle. Rabattre Ia poignée. Ribaltare a maniglia. 4 N Klappdeckel 101 öffnen. Tilt cover 101 backwards. - Pfaff 125 | Owner's Manual - Page 5
switch P; the sewing light goes on. Operating the foot control: The farther you press the pedal down the faster the machine runs. Electronic foot a fondo si preme ii pedale, piü veloce cucirà Ia "Pfaff". Reostato elettronico (commutatore 0) Posizione = velocità finale dimezzata Posizione 14 = - Pfaff 125 | Owner's Manual - Page 6
und diese nach links schwenken. Bobbin winding preparations: Reach under the work support and swing it out toward the left. Preparer e bobinage: Passer Ia 104. Raise latch N and pull out the bobbin case. • Mettre Ia machine hors circuit a I'inter rupteur general 104. Lever le loquet N et retirer - Pfaff 125 | Owner's Manual - Page 7
116 e girarla finchè ii perno N si inserisce nella fessura 0. tN Nähwerk ausschalten: Handrad festhal ten und Scheibe 103 nach vorn dreher. Disengaging the sewing mechanism: Hold the hand wheel steady and turn knob 103 toward you. Débrayer le mécanisme; Retenir le volant et tourner le disque 103 - Pfaff 125 | Owner's Manual - Page 8
Winding the bobbin from a second spool: • Switch on master switch. Tilt spool pin 125 forward. Pull the thread into guide 123 and into guide 125 as shown in the drawing, making sure that the thread passes between the guide and tension spring N. Now wind the thread a few turns around the bobbin. Push - Pfaff 125 | Owner's Manual - Page 9
machine en circuit a /'interrup teurgénéra/. Bascuter le guide-fit 125 vers 'avant. Passer te fit par le guide-fit 123 puis, seton te dessin, dans te guide-fit 125, entre ce guide Handrad nach vorne drehen, bis es einrastet. Engaging the sewing mechanism: Hotd the hand wheel firmty and turn disk 103 - Pfaff 125 | Owner's Manual - Page 10
foot. The needle must be in its 'up' position. Place a bobbin on spindle 116. Disengage the sewing mechanism. Draw the needle thread under the sewing foot. up and into guide 125 (see drawing). Wind the thread around the bobbin a few times and push the bobbin toward the right. Press the foot control - Pfaff 125 | Owner's Manual - Page 11
fil d'aiguille: • Mettre ía machine en circuit a Iinterrup teur gen sous le pied presseur, vers a droite par le passe-fil 125 avant de l'enrouler de quelques tours sur Ia canette et de Handrad nach vorne drehen, bis es einrastet. Engaging the sewing mechanism: Hold the hand wheel firmly and turn disk - Pfaff 125 | Owner's Manual - Page 12
01/23/2008 Spule einlegen N (Faden nach hinten). Den Faden in den Schlitz 0 und bis zur Offnung P ziehen. Inserting the bobbin (N), with the thread unreeling toward the back. Draw the thread into slot 0 and into eye P. Mise en place de Ia canette (N), le fil se déroulant vers l'arrière. Tirer le - Pfaff 125 | Owner's Manual - Page 13
bobbin case onto stud 0 as far as it will go, making sure cutout P points upwards. Mise en place de Ia bolte a canette: • Mettre Ia machine hors circuit a /'inter rupteur général 104, Relever le loquet N et a glisser Ia boIte canette, l'ouverture P en haut, a fond sur le tourillon 0. Come inserire - Pfaff 125 | Owner's Manual - Page 14
the needle positioned at the top, raise the sewing foot. Draw the thread into slot N to the left past guide P, from below into slot 0 and take-up into the right thread guide on the needle holder. Press button B (see page 22). Passage du fil d'aiguille: • Mettre Ia machine hors circuit a /'interrup - Pfaff 125 | Owner's Manual - Page 15
01/23/2008 Einfädler nach vorn an die Ndet schwen ken. Push the threader forward against the needle. Basculer l'enfileur vers l'avant par l'aiguille. Far girare l'infilatore in avanti verso l'ago. J\ r N Den Faden von unten in den Haken R han gen. Place the thread in hook R from below. - Pfaff 125 | Owner's Manual - Page 16
l'alto con l'aiuto d fib superiore. Ober- und Unterfaden nach rechts untel den NähfuB legen. Place both threads toward the right und the sewing foot. Coucher es deux fibs vers I'arriere droite sous be pied presseur Porre i fibi superiore ed inferiore verrio destra sotto il piedino. 4 VerschluIklappe - Pfaff 125 | Owner's Manual - Page 17
support 107 back against the free arm. Remettre en place a boite de rangement 107 contre le bras. Avvicinare 1 piano variabile 107 alIa macchina. 4 • F/auptscha tIer 104 ausscha/ten, Stoff unter den NähfuB legen. • Switch off master switch 104. Place fabric under the sewing foot. • Mettre Ia machine - Pfaff 125 | Owner's Manual - Page 18
Pfaff. Operating the toot control: The more you press down the pedal, the faster the machine runs. Abaisser Ia pédale du rheostat. Plus Ia pédale sera abaissée, plus Ia Pfaff To check the tension, set the machine at the zigzag stitch. Sew a short seam. The threads should interlock in the middle of the - Pfaff 125 | Owner's Manual - Page 19
01/23/2008 Tensions des fils: Position de réglage normale dans a plage blanche, entre 3 et 5. Tension d'autant plus forte que le chiffre est élevé. ContrO a er raide du point zigzag. Coudre quel ques points. Les fils doivent se nouer dans l'épaisseur des tissus. Ctn$to *4 nh1* iIa4 ftk L aeimt n# - Pfaff 125 | Owner's Manual - Page 20
01/23/2008 Doppelter Stofftransport: Er verhindert das Verschieben der Stoff bahnen gegeneinander. Vor dem Em- oder Ausschalten den Näh ful, anheben. Dual fabric feed It prevents shifting of the fabric plies against each other. Before engaging or disengaging, raise the presser foot. EntraInement - Pfaff 125 | Owner's Manual - Page 21
Turn the control to set the number indicating the stitch length at mark N. Fig. 0 (bottom) shows how to set the stitch length control for sewing stretch stitches (white stitch symbols on push buttons). Reglage de Ia longueur du point: Les chiffres sur le disque 106 indiquent a longueur du point en - Pfaff 125 | Owner's Manual - Page 22
oJa!pui eons euqoow ei onwoid UW'J OTS1 I! 9q3u!J ELL OS 1 8JWJd :oioipui e sq ue fluGU!eW e enb sdwe6uoi issn jaui ue pnoo au!qoew ei ELL aqono ei issiq eJlJJe oqaiew u OJflflO3 spJeM)pq SMGs auiqoew aq uonq SRfl poq noA se 6uoi S( uonq SSJd BUIMOS aSJeAe SUM)j3flJ euapsg aip 4qeu palM - Pfaff 125 | Owner's Manual - Page 23
01/23/2008 N Tipptasten: A, 8, C Knopflochtasten Die Taste 8 st gleichzeitig die Aussohalt taste zum Läsen der getippten Tasten und linke Stichiage (siehe Seite 27). D Zickzackstich 2 mm Stretch-3fach-Zickzackstich 2 mm E Zickzackstich 3,5 mm Stretch-3fach-Zickzackstich 3,5 mm F Zickzackstich 5 mm - Pfaff 125 | Owner's Manual - Page 24
01/23/2008 Finger-tip controls A, B, C: Buttons for buttonholing Button B is also used as clearing button for releasing the pushed buttons and for setting the left stitch length (see page 27). D 2-mm zigzag stitch Elastic triple zigzag stitch, 2 mm E 3.5-mm zigzag stitch Elastic triple zigzag - Pfaff 125 | Owner's Manual - Page 25
01/23/2008 Touches: ALtoa, uBtco,huCecshTeeonuBfcohsneecsrétbeeosguaetltoenamndeiéenprteoartdeérblreapyoeirntesa gauche (voir page 27). D Point zigzag 2 mm Triple point zigzag elastique, 2 mm E Point zigzag 3,5 mm Triple point zigzag elastique, 3,5 mm F Point zigzag 5 mm Triple point zigzag - Pfaff 125 | Owner's Manual - Page 26
01/23/2008 I Nutzstiche einstellen: (graue Symbole) Taste tippen und die gewunschte Stich- lange zwischen 1 und 6 einstellen. AIIe Zickzack- und Nutzstiche werden durch zusätzliches Tippen der Taste G in der Breite halbiert. 4 Selecting utility stitches (grey symbols) Push the button required and - Pfaff 125 | Owner's Manual - Page 27
01/23/2008 4 Stretchstiche einstellen: (wei1e Symbole) Taste tippen und Stichlängen-Einsteller bis zum Anschlag auf Symbol stellen. Alle Stretchstiche werden durch zusätz liches Tippen der Taste G in der Brete halbiert. 4 Selecting stretch stitches (white symbols) Push the button required and turn - Pfaff 125 | Owner's Manual - Page 28
in the chart on the inside of the hinged top cover and at the end of this booklet, together with sewing instruc tions. For example, if you want to sew an elastic blindstitch, push buttons M and E and select a stitch length between 1 and 4. Points utilltaires et élastiques combines: Les combinaisons - Pfaff 125 | Owner's Manual - Page 29
01/23/2008 __ / C 1 D // ii-" N Stichlage einstellen bei Geradstich: Stichlage links: Taste B tippen Stichiage Mitte: Taste G tippen Stichlage rechts: Taste H und I tippen 4 N Selecting the needle position for straight stitching Left needle position: push button B Central needle position: - Pfaff 125 | Owner's Manual - Page 30
4 JS!UiS osjeA o 1 isods B O),OS p qiie ouid I! BJBPUBJd Bt4Dfl6 l SJBf !O-BHBO Ja40A!d aJiej e juBwo6ueJ ap aoq ei SflOS wew ieSSd ijaj Bin JMO flO ii 6U!MS pu 3ioddns )JoM Bq4 iapun pee ueuOMqDS S)$UiI esap pun ueJ!BJ6 BLO?IN?N P ieun 8OOIE/ LO - Pfaff 125 | Owner's Manual - Page 31
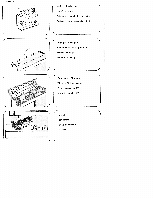
8 Lineal 4 Detachable work support and O Ordinary sewing foot accessories; 1 Fancy-stitch foot for top feed The work support N can be lifted out. au bord 5 pied a boutonnières 6 pied repriser 7 pied ourleur 8 guide-bord II piano di lavoro variabile e gli acces son: II piano di lavoro - Pfaff 125 | Owner's Manual - Page 32
sewing foot: Switch off master switch 104. Push the foot down from the front. Changement de Ia semelle du pied • presseur: Mettre Ia machine securing accesso ries. R is the sewing foot retaining screw. P et Q servent a fixer los accessoires. R est Ia vis de fixation du support de semelle. P e Q - Pfaff 125 | Owner's Manual - Page 33
feet (standard accessories) o Ordinary sewing foot 1 Fancy-stitching foot, for top feed 2 Fancy-stitching foot (without top feed) 3 Blindstitching and overlock foot 4 Zip- and edge-stitching foot 5 Buttonhole foot 6 Darning foot 7 Hemmer 8 Edge guide Semelles de pieds presseurs (accessoires courants - Pfaff 125 | Owner's Manual - Page 34
hrung Q bis zum Anschlag nach rechts drehen. Der Stoff Iäuft an der Fuhrungs kante R entlang. N Blindstitching and overlock foot Blindstitching (N): turn screw P to set guide Q at the left. The guide is then adjusted according to the needle penetra tions. The folded edge of the material runs along - Pfaff 125 | Owner's Manual - Page 35
trier P; il se pose sur Ia vis de maintien Q. Ensuite resserrer Ia vis 0. En reprisant de Ia lame, enfiler le fil de lame dans le guide S. 4 II piedino da rammendo: Alzare 'ago. Prernere a staffa P verso dietro e tenerla ferma. Inserire il perno del piedino nel foro N, Ia forcella R si aggan cia in - Pfaff 125 | Owner's Manual - Page 36
des gewünschten Abstan des Schraube P festdrehen. 4 Zipper foot (edge sewing foot N): The zipper foot is secured on the left or right, depending a gauche ou vers Ia droite et rencliqueter dans cette position. Guide-bord (0): Glisser le guide-bord dans le trou Q régler Ia distance souhaitée et - Pfaff 125 | Owner's Manual - Page 37
Nähgarn ver wenden. Buttonhole setting: Push button C. Set the needle thread ten sion at range 3 for buttonhole sewing. Attach the buttonhole foot. Set the stitch density at range N. Insert a thread in the sewing foot as shown in the illustra tion: Place the thread over the back ridge, and pull it - Pfaff 125 | Owner's Manual - Page 38
seam. 2 Push and hold down button B until 4 to 6 bartacking stitches are sewn, holding the workpiece firmly, then release the button. 3 Push button A. Sew the second but tonhole seam the same length as the first. 4 Push and hold down button B until 4 to 6 bartacking stitches are sewn, holding the - Pfaff 125 | Owner's Manual - Page 39
d'essai avant de commen cer a coudre es boutonnières sur le véte ment. Zeichnungen sind ohne NähfuB, Drawings do not show the sewing foot. Les illustrations ne montrent pas ía semelle du pied presseur. I disegni sono eseguiti senza piedino. N Confezionare occhielli: Spostare Ia feritoia in avanti - Pfaff 125 | Owner's Manual - Page 40
screw. Remplacement de l'aiguille (système 130/705 H): • Mettre Ia machine hors circuit a I'interrup teur general 104. Desserrer Ia vis N et retirer Push the dropfeed control toward P (feed dog dropped) or toward 0 (sewing position). Abaissement de Ia grifte: Ouvrir le cache 119 et deplacer le - Pfaff 125 | Owner's Manual - Page 41
0. Clean the feed dog and the parts in the sewing hook area with a soft brush. Do not oil the machine. Only apply a drop of oil in the hook raceway , net toyer Ia griffe et le compartiment du cro chet. Ne pas huiler Ia machine. Ne verser que de temps a autre une goutte d'huile dans Ia coursière - Pfaff 125 | Owner's Manual - Page 42
Close the hinged top cover and swing up the carrying handle. Insert the edge guide in cutout 0. push down the lamp housing and hold it there. Turn the P. Pousser l'ampoule vers le haut et a tourner vers 0. Enlever le guide-bord. \ 7Come sostituire Ia lampadina; Togliere a spina dalla presa a muro - Pfaff 125 | Owner's Manual - Page 43
üIe und die wichtigsten Programme oder Näharbeiten welche mit den einzelnen Füfen genäht werden. 4 Table of sewing feet The table indicates the sewing feet and the main programs or sewing operations that are sewn with these feet. Tableau des pieds presseurs Ce tableau montre es pieds presseurs et - Pfaff 125 | Owner's Manual - Page 44
01/23/2008 taJi s Die Wahi der richtigen Nadel garantiert eine bessere Verarbeitung des Nähmaterials Stoffqualitat leicht Nadel 60 70 75 Stoffqualitat mittel Nadel 80 90 Stoffqualitat schwer Nadel 100 110 120 Nade Ispitze n Bezeichnung 130/705 H Nadelstärke: 70/80 130/705 H-SIJK Nadelstärke: 70 - Pfaff 125 | Owner's Manual - Page 45
01/23/2008 Bezeichnung 130/705HZWI Stärke: 80 130/705 H-ZWI Stärke: 80 Stärke: 90 Stärke: 100 Stlchlange 2,5mm 2,5mm 2,5mm 2,5mm 3,0 mm Stichbrelte - - NadeI entfernung 1,6mm 2,0 mm 2,5 mm 3,0mm 4,0 mm Geelgnet tar it normaleBiesen I normale Biesen breite Biesen extra breite Biesen - Pfaff 125 | Owner's Manual - Page 46
SKF 70, 110 130/705 H-J 90-110 -- Medium ball point Heavy ball point 1 Acute round point Stretch-fabric needle developed especially for Pfaff. Particularly suitable for delicate stretch and knitted fabrics. Wide-meshed corsetry, Lycra, Simplex and Lastex. Twill, workwear, heavy linen, blue jeans - Pfaff 125 | Owner's Manual - Page 47
mm 4.0mm Sultablefor I Medium-wide cording Wide cording Extra-wide cording Extra-wide cording Decorative Before you designs sewn with twin needles start sewing, turn the handwheel and check to make sure the needles stitch into the fabric properly. In this way, needle breakage can be - Pfaff 125 | Owner's Manual - Page 48
maille, tissus maille, Lastex, Interlock, Quiana, Simplex pointe blue moyenne grande pointe bille Aiguille Stretch, spécialement développée pour machines Pfaff. Convient tout particuliè rement pour tissus stretch et maille délicats. Lycra grande maille (gaines, combines, etc.> Lycra, Simplex - Pfaff 125 | Owner's Manual - Page 49
01/23/2008 Designation 1 Longueur de point Largeur de point 130/705 H-ZW1 2,5 mm - Grosseur: 80 2,5 mm - • 1 130/705 H-ZWI Grosseur: 80 2,5 mm - Grosseur: 90 2,5 mm - Grosseur: 100 3,0mm - Espacenient des aiguifles 1,6 mm 2,0mm Utilisatlons nervures normales 2,5 mm 3,0 mm 4,0mm - Pfaff 125 | Owner's Manual - Page 50
01/23/2008 I 4IJ '.,I IA .A I• fl• La scelta dell'ago giusto garantisce una migliore lavorazione del materiale da cucire. Qualitã della stofta leggera ago 60/70/75 Qualitá deflastoffa media ago 80/90 Qualitá della stoffa - pesante ago 100/110/120 Le punte degli aghi Denominazione Protilo - Pfaff 125 | Owner's Manual - Page 51
01/23/2008 I I4.II(.4 %AII 4I II punto 130/705 H-ZWI 2,5mm Grossezza: 80 1 2,5 mm 130/750H-ZWI Grossezza: 80 Grossezza: 90 Grossezza: 100 2,5 mm 2,5 mm 3,0 mm punto - - - distanza aghi Indicato per 1,6mm 2,0 mm iervature normali neature normali 2,5 mm 3,0 mm 4,0 mm nervature iarghe - Pfaff 125 | Owner's Manual - Page 52
01/23/2008 Nähstorungen und ihre Beseitigung Ursache: 1. Die Maschine Iäft Stiche aus Die Nadel 1st nicht richtig eingesetzt. Es st eine falsche Nadel eingesetzt. Die Nadel 1st verbogen oder stumpf. Die Maschine st nicht richtig eingefadelt. Die Nadel ist für das Garn zu fein. Beseitigung: Nadel - Pfaff 125 | Owner's Manual - Page 53
01/23/2008 Ursache: Beseitigung: 5. Die Maschine transportiert nicht oder nur unregeIma(ig Zwischen den Transporteur-Zahnreihen hat sich Nähstaub festgepreIt. Stichplatte abnehmen, Nähstaub mit Pinsel entfernen. Transporteur ist versenkt. Versenkschieber nach links stellen. Versenkschieber - Pfaff 125 | Owner's Manual - Page 54
thread. Insert new needle and push it up as far as it will go. Insert new needle. Refer to needle table. Allow machine feed to work alone. Only guide the material lightly. When inserting the bobbin case, push it in as for as it will go. Check upper and lower tensions. Use - Pfaff 125 | Owner's Manual - Page 55
of feed dog. Feed dog dropped. (Drop-feed control is at right.) Remove needle plate and clean out lint. Set drop-feed control at left. 6. Machine runs with difficulty Thread ends in hook raceway Remove thread ends and put a drop of oil into hook raceway. 7. Important note: BNImf - Pfaff 125 | Owner's Manual - Page 56
fil se forment sur ou sous l'ouvrage. a Introduire a nouvelle aiguille fond. Remplacer l'aiguille. Tenir compte du tableau des aiguilles. Laisser Ia machine entralner seule. Guider legèrement l'ouvrage. Appuyer sur Ia bolte a canette a sa mise en place, jusqu'à I'emboitage perceptible. Verifier les - Pfaff 125 | Owner's Manual - Page 57
ée (levier de marche arrière Enlever Ia plaque è aiguille, Oter les bour res au pinceau. Placer le bouton abaisse-griffe a gauche. en position droite). 6. La machine est bloquée Des bribes de fil se sont prises dans Ia coursière du crochet. Enlever les bribes de fil et mettre une goutte d'huile - Pfaff 125 | Owner's Manual - Page 58
01/23/2008 Possibili inconvenienti e come ovviarli Inconveniente 1. La macchina salta punti Lago non è inserito bene. E stato inserito tin ago sbagliato. L'ago è storto a spuntato. La macchina non è infilata bene. Lago ê troppo tine per ii fib. 2. II fib superiore si rompe Vedi per i motivi - Pfaff 125 | Owner's Manual - Page 59
01/23/2008 Inconveniente Come ovviare 5. La macchina non trasporta o trasporta solo irregolarmente Tra i dentini del trasporto s è pressata della polvere di cucito. Togliere Ia placca deII'ago e pulire con un pennello. II trasporto e abbassato. II dispositivo per abbassare it trasporto si - Pfaff 125 | Owner's Manual - Page 60
01/23/2008 )as ich. Sonderzubehör st für spezielle Naharbeiten. Es ist bei threm Handler Das Zubehör ohne Bestellnummer st in Vorbereitung und kann noch gegen Berechnung erhält nicht erworben werden. 7 Zubehär Bestell-Nr. Naharbeit Apphkationsfu8 93-042 941 -91 zum Applizieren -j - Pfaff 125 | Owner's Manual - Page 61
01/23/2008 inhaltsverzeichnis Anlasser Doppelter Stofftransport Elektrischer Anschluf?, Fadenabschneider Garnrolle aufschieben Gluhlampe auswechsein Knopflochnähen Nadel auswechseln Nadeltabelle Nahfuge Nähfü1a auswechseln NähfuL,tabeIIe Nähstärungen und ihre Beseitigung Nähwerk ausschalten Nähwerk - Pfaff 125 | Owner's Manual - Page 62
70) Cording blade (2 ea.l 93 035 952-45 - Fringe sewing foot 93 042 943-9 1 For sewing fringes and for basting Straight-stitch foot Needle plate with round hole 98-694 821-00 98 694 822-00 For topstitching and sewing very delioate and soft fabrics )slk jersey. etc.) Felling foot, 4_S - Pfaff 125 | Owner's Manual - Page 63
feet Checking the bobbin thread tension Checking the needle thread tension Cleaning and oiling Detachable work support and accessory box Disengaging the sewing mechanism Drawing up bobbin thread Dropping the feed dog Dual fabric feed Electrical connection Fault finding Firiger.tip controls Foot - Pfaff 125 | Owner's Manual - Page 64
Pfaff contre factu a ration. Les pièces sans référence sont en preparation. Elles seront livrables une date ultérieure, 7 Accessoires Références Operations Pied pour applications 93-042 941 -91 applications Bordeur (enlever support de volants, etc. Pied guide-cordonnet -- ------ -- a - Pfaff 125 | Owner's Manual - Page 65
01/23/2008 Table des matières Abaissement de Ia gritfe Accessoires spéciaux Boltes de rangement et accessoires Branchement electrique Causes de derangements et remédes Changement de l'ampoule Changement do Ia semelle du pied presseur Coupe-fit Couture en marche arrière Deport du point droit - Pfaff 125 | Owner's Manual - Page 66
01/23/2008 Gli accessori fuori corredo servono per avon di cucito speciali. Si possono acquistare presso ii vostro coricessionario Pfaff coritro pagamento. Accessori senza numero di catalogo non sono ancora disponibili in quanto in via di preparazione, Accessorio N. d'ordtne Lavoro di - Pfaff 125 | Owner's Manual - Page 67
01/23/2008 Indice Abbassare II trasporto Accessori fuori corredo Bobinare attraverso l'ago Bobinare da un secondo rocchetto Collegamento elettrico Combinazione del punti, utili e flexi (stretch) Confezionare occhielli Controllo della tensione superiore Controllo del fib iriferiore Cucire indietro - Pfaff 125 | Owner's Manual - Page 68
01/23/2008 )ie labelle zeigt die I'rogrammnummer len dazugehärenden Stich und darunter lie Einstellung der Maschine. Bei den rrogrammen LI-4S St der ticflIangen Einsteller his zum Anschlag auf zu dre hen. Bei allen ubrigen ist die Stichlange 01 / / ,, / 02 03 04050607 I/ / cc c c c - \ - Pfaff 125 | Owner's Manual - Page 69
01/23/2008 i Wunsch zu wahien. In der Iexttae sind Bezeichnung und Anwendung cier etnzeinen t-'rogramme angegeueri. 08 09 10 17 ,::::: I I I ZZ' I .J I / ' ..-. I 12 - I ) \/ 13 74 15 16 17 18 19 20 21 - -, \ \ - \ I -' '. c' _ I , I ' \ , - I - i' '' r1 - \ S-' ' ' K H HO - Pfaff 125 | Owner's Manual - Page 70
01/23/2008 ___ __ 22 I 1,7 II in 23 24 25 26 27 28 29 30 31 32 33 34 , \-!,\..- - \i \-i- - "ii - iIi_/-\ c' i/\ II- i_,, - i\i 'Ni '%i /-\-,i 'Ni '% 17 \\ ii \\, 4, ii '-- D I G EF M MD ME MF MG I IF IG KD K KD Nr. Bezeichnung 22 Stretch-3fachGeradstich 23 Stretch- - Pfaff 125 | Owner's Manual - Page 71
01/23/2008 I 3536373839404142434445464748 Li- S7 9 s7 \i N,! \i/ I\ II, f -, V\ N-ii,, -_I, \# -Il \ - i'4 ,\ ' \'/ " -K . \q k? I\i "u I\ )(:I I ,, \\i ' -" ' )ç )c L LL L KG KM H HD HG L L D L F LI L K DK El MK GK r. Bezeichnung Anwendung s5 Overiockstich schmal 6 - Pfaff 125 | Owner's Manual - Page 72
stitch Edge finishing, appliqué work, inserting lace, button sewing, satin stitching, embroidering, darning etc. I 03 Buttonholes -_______ 04 I Shell-edge stitch, narrow 05 Elastic stitch Just press the respective buttons of the machine and the buttonhole is finished. The stitch density can be - Pfaff 125 | Owner's Manual - Page 73
___I _- _ _ _ _ __ 01/23/2008 I-. '• '' •" h as desired. The individual stitch -ams and their applications are __ _ _ _ _ below _ _ __ __ _ 08 09 10 11 r c' I eI / __7 ç ç I I I 12 13 14 15 16 17 18 - ' \ - \ -. 'z \ ' I - - \ _I \ I ' \ I - 4 4 \ \ ', ''. _I 'N - Pfaff 125 | Owner's Manual - Page 74
Covering folded fabric edges with a fancy seam. 30 Pennant stitch 31 Closed overlock stitch, narrow Decorative joining seam for sewing on borders. -4 Sewing on dainty lace. 3hish stitch Topstitching patches. 33 Overlock stitch, wide Elastic assembly and edge finishing seams on knitted fabrics - Pfaff 125 | Owner's Manual - Page 75
01/23/2008 35 36 37 38 39 40 41 42 43 44 45 46 47 48.' '- L'I Li- 'Ni," \g \ii ,' '7 # -7i -11 ' \lI -i, -i, \i, .-,, i" 'Ni, \ii \i, ' ' 4 "s' ' -u \ ' N \ )c L KG KM H HD HG L L D L F LI L K DK ' 4, ii, " )c:7 LL L El MK GK No. Stitch Application 35 Overlock stitch, 36 Knurl - Pfaff 125 | Owner's Manual - Page 76
/23/2008 Le tableau indique le numéro du pro gramme, le schema du point correspon dant et les différents réglages a effectuer sur Ia machine. Pour les programmes 22-48, le bouton réglant a longueur du point est a tourner a fond Pour les autres 01 I/ /I 02 03 - - ) - \ -- 04050607 I' - - Pfaff 125 | Owner's Manual - Page 77
01/23/2008 ammes, Ia longueur du point peut hoisie a volonté. Dans le tableau riptif figurent les designations et les applications des ditterents points 08 09 10 11 12 13 14 15 16 17 18 19 20 21 , I 1 S ' I -, I j N ' ç- ,' I- .. I - I ' / -S ' \ - -, " \ -.' \ I - " I '. ' . I % r- - Pfaff 125 | Owner's Manual - Page 78
01/23/2008 22 23 24 25 26 27 28 29 30 31 32 33 34 /1 I II € I I , '% /\, /\ \I\ - '%% ,', -_,_- \I\ '4 ,', -_I_- \I\ \I\ . -1 N -7/ ' II\ IL- i 7 I\, I_-, \, KK)) ic.7 ::,:,' '44/ I'__\,i \\ ! Ii -- \\j I f_-, \\ II Ii D G EF M MD ME MF MG I I IF IG KD K KD 4 N0 22 - Pfaff 125 | Owner's Manual - Page 79
01/23/2008 _--_ ____ _ 35 36 37 38 39 40 4142 43 44 45 46 47 49. ,y c' c' i ' #c? 3d hi Li ç' /\ N,7!1 -N \ll -ii \ll KG KM H HD HG s'% / L LD .-K LF I\i \n )I \\_ s'S' ,- Jr \ L LL L LI LK DK El MK GK N0__DegnaondespoIntsUtisations 35 Point overlock étroit 36 Point de corde 37 - Pfaff 125 | Owner's Manual - Page 80
01/23/2008 La tabella indica it programma, it relativo punto e, sotto, quali tasti occorre premere. Nei programmi 22-48 occorre regolare it regolatore del punto fino all'arresto su 01 02 //I I// I / I \ \N G HI DDEE F 03 AB 04050607 ; s- .-. ,- CKGMKDL Descrizione 01 punto diritto - Pfaff 125 | Owner's Manual - Page 81
_ 01/23/2008 tti gil attn punti Si puo regolare (a iezza del punto a volontà. Neila tabella e descritto clenominazione e appiicazioni dei singoli programmi. 08 09 10 11 I c'S I I I / ç I I 12 13 14 15 16 17 18 19 20 21 > -\ -) s I - % .' - I_I s_i ' 'N • - 'N N , 'N 'N S K H HD - Pfaff 125 | Owner's Manual - Page 82
01/23/2008 __ 22 23242526272829303132 3334 I I \. '' '\, I I, /4' c• q- ç /\, /, -I. \i', -_,_- \i', /ç' ,__\ !c7 ç ' )i /Ni iD rNi ci '\i \\ t -I II \\ '4% -,II i\j !__, Ii '_- ,-- U G EF M MD ME MF MG I I IF IG KU K KU No Descrizione 22 cucitura tripla flexi Applicazione - Pfaff 125 | Owner's Manual - Page 83
01/23/2008 35 36 37 38 39 40 41 42 43 44 45 46 47 48. IL- I! Ii- _N -ff \II \ll i' Nlli, -71 \ii \-'a-I ' i - N-,l, -"N \ll -'N \si ' ' ' 4_K (I /sj \..)$ L KGKM H HDHG L LD LF LI LK.0K ':;q ,W )ç / li LL L El MK GI( No Descrizione 35 punto overlock stretto 36 punto corda 37 - Pfaff 125 | Owner's Manual - Page 84
01/23/2008 3fety rules lid for United Kingdom only e wires in this mains lead are coloured cording to following code: ue: Neutral rown: Live s the colours of the wires in the mains ad of this appliance may not correspond ith the colour coding of the terminals in ur plug, proceed as follows: the wire - Pfaff 125 | Owner's Manual - Page 85
SOOt/EU [0 - Pfaff 125 | Owner's Manual - Page 86
-Ci.--vn 0 t'.J -' U) a', c-in N) 0 0 C 41 0 fl Ii IL 1t 4
-
 1
1 -
 2
2 -
 3
3 -
 4
4 -
 5
5 -
 6
6 -
 7
7 -
8
-
9
-
10
-
11
-
12
-
13
-
14
-
15
-
16
-
17
-
18
-
19
-
20
-
21
-
22
-
23
-
24
-
25
-
26
-
27
-
28
-
29
-
30
-
31
-
32
-
33
-
34
-
35
-
36
-
37
-
38
-
39
-
40
-
41
-
42
-
43
-
44
-
45
-
46
-
47
-
48
-
49
-
50
-
51
-
52
-
53
-
54
-
55
-
56
-
57
-
58
-
59
-
60
-
61
-
62
-
63
-
64
-
65
-
66
-
67
-
68
-
69
-
70
-
71
-
72
-
73
-
74
-
75
-
76
-
77
-
78
-
79
-
80
-
81
-
82
-
83
-
84
-
85
-
86
 |
 |

IQ
11
_