Pfaff hobby 307 Owner's Manual - Page 17
girándolo
 |
View all Pfaff hobby 307 manuals
Add to My Manuals
Save this manual to your list of manuals |
Page 17 highlights
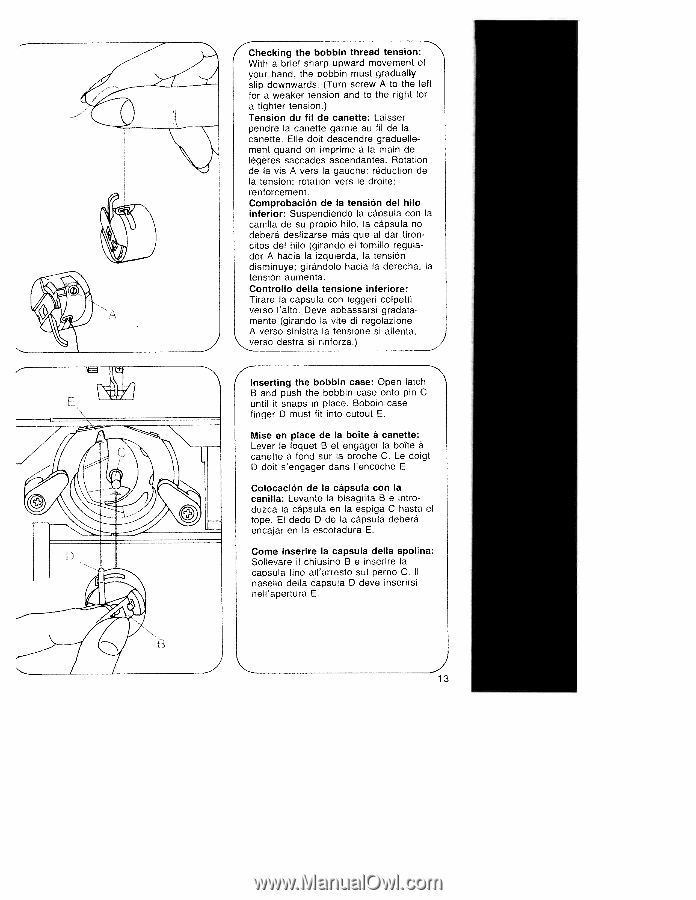
Checking the bobbin thread tension: With a brief sharp upward movement of your hand, the bobbin must gradually slip downwards. (Turn screw A to the left for a weaker tension and to the right for a tighter tension.) Tension du fil de canette: Laisser pendre Ia canette garnie au fil de Ia canette. Elle doit descendre graduelle ment quand on imprime a Ia main de légères saccades ascendantes. Rotation de Ia vis A vers Ia gauche: reduction do Ia tension; rotation vers le droite: renforcement. Comprobación de Ia tension del hilo inferior: Suspendiendo Ia cápsula con Ia canilla de su propio hilo, Ia cápsula no deberá deslizarse más que al dar tiron citos del hilo (girando el tornillo regula dor A hacia Ia izquierda, Ia tensiOn disminuye; girándolo hacia Ia derecha. a tensiOn aumenta. Controllo della tensione inferiore: Tirare Ia capsula con leggeri colpetti verso 'alto. Deve abbassarsi gradata mente (girando Ia vite di regolazione A verso sinistra a tensione si allenta, verso destra si rinforza.) ) Inserting the bobbin case: Open latch B and push the bobbin case onto pin C until it snaps in place. Bobbin case finger D must fit into cutout E. Mise en place de Ia bolte a canette: Lever le loquet B et engager Ia bolte a a canette fond sur Ia broche C. Le doigt D doit s'engager dans l'encoche E. ColocaciOn de Ia cãpsula con Ia canilla: Levante Ia bisagrita B e intro duzca Ia capsula en Ia espiga C hasta el tope. El dedo D de Ia cápsula deberã encajar en Ia escotadura E. Come inserire Ia capsula della spolina: Sollevare il chiusino B e inserire Ia capsula fino allarresto sul perno C. II nasello della capsula D deve inserirsi nell'apertura E. B J 13
-
 1
1 -
2
-
3
-
4
-
5
-
6
-
7
-
8
-
9
-
10
-
11
-
 12
12 -
 13
13 -
 14
14 -
 15
15 -
 16
16 -
 17
17 -
 18
18 -
 19
19 -
 20
20 -
 21
21 -
 22
22 -
23
-
24
-
25
-
26
-
27
-
28
-
29
-
30
-
31
-
32
-
33
-
34
-
35
-
36
-
37
-
38
-
39
-
40
-
41
-
42
-
43
-
44
-
45
-
46
-
47
-
48
-
49
-
50
-
51
-
52
-
53
-
54
-
55
-
56
-
57
-
58
-
59
-
60
-
61
-
62
-
63
-
64
-
65
-
66
-
67
-
68
-
69
-
70
-
71
-
72
-
73
-
74
 |
 |