Pfaff hobby 307 Owner's Manual - Page 42
l'extérieur
 |
View all Pfaff hobby 307 manuals
Add to My Manuals
Save this manual to your list of manuals |
Page 42 highlights
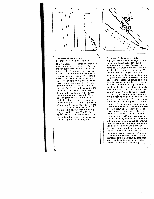
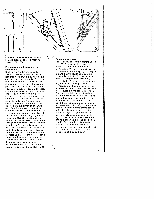
4 Seamlike zipper closure: For machine setting see page 36. How the zipper is prepared and inserted: Press the edges of the placket. Fold out the left seam allowance (Fig. A). Place the left side of the open zip in position so that its teeth protrude a little beyond the pressed edge (Fig. B). The seam is sewn along this edge. Move the zipper foot to the middle so that the needle stit ches into the middle opening. The zip teeth run into the left guiding groove in the foot (Fig. C). At the beginning of the seam lift up the teeth a little to feed them into the guiding groove. Sew the seam to the end and secure it. Close zip. Pin other side of zip to material at beginning of seam (Fig. D). Open zip. Remove the pin, turn out the right seam allowance with the zip tape, and pin the latter to the fabric, as shown in Fig. E. The zip teeth now run into the right gui ding groove in the foot (Fig. F). Finish sewing the zip. Now sew down the zip tape letting the zip teeth run along the guiding edge of the foot (Fig. G). 38 4 Fermeture a glissiere invisible: Reglage de Ia machine voir page 36. Voici comment il faudra procéder pour insérer Ia fermeture ft glissière: Repasser les bords de Ia braguette. Replier le relarge gauche du tissu vers l'extérieur (fig. A). Ouvrtr Ia fermeture ft glissiere et mettre Ia bande gauche en place, comme le montre Ia figure B, les dents dépassant quelque peu le bord repassé. La piqüre se trouve dans Ia cassure. Aligner le pied presseur au milieu de sorte que laiguille pique exactement dans le trou d'aiguille median. Les dents de Ia fermeture ft glis sière s'engagent dans Ia rainure gauche du pied (fig. C). Au debut de Ia couture, afin d'introduire es dents dans Ia rainure, les dresser quelque peu. Terminer Ia cou ture et coudre quelques points de fixation. Fermer Ia fermeture ft glissiere. Epingler Ia deuxième partie de Ia fermeture ft glis sière au debut de a couture (fig. D) et ouvrir a fermeture ft glissiere. Replier le relarge droit du tissu avec Ia bande de Ia fermeture vers l'extérieur, mais enlever d'abord les epingles et comme le montre Ia figure E, epingler Ia bande de Ia ferme ture ft glissiere sur le relarge de couture. Les dents de Ia fermeture ft glissiere s'engagent dans Ia rainure droite du pied (fig. F). Terminer l'insertion de Ia fer meture ft glissiere. Surpiquer Ia bande de Ia fermeture ft glissiere ft une distance correspondant ft Ia largeur du pied pres a seur. Les dents de Ia fermeture glissiere a ongent Ia barrette l'extérieur (fig. G). )
-
 1
1 -
2
-
3
-
4
-
5
-
6
-
7
-
8
-
9
-
10
-
11
-
12
-
13
-
14
-
15
-
16
-
17
-
18
-
19
-
20
-
21
-
22
-
23
-
24
-
25
-
26
-
27
-
28
-
29
-
30
-
31
-
32
-
33
-
34
-
35
-
36
-
 37
37 -
 38
38 -
 39
39 -
 40
40 -
 41
41 -
 42
42 -
 43
43 -
 44
44 -
 45
45 -
 46
46 -
 47
47 -
48
-
49
-
50
-
51
-
52
-
53
-
54
-
55
-
56
-
57
-
58
-
59
-
60
-
61
-
62
-
63
-
64
-
65
-
66
-
67
-
68
-
69
-
70
-
71
-
72
-
73
-
74
 |
 |
