Pfaff hobby 307 Owner's Manual - Page 40
Pfaff hobby 307 Manual
 |
View all Pfaff hobby 307 manuals
Add to My Manuals
Save this manual to your list of manuals |
Page 40 highlights
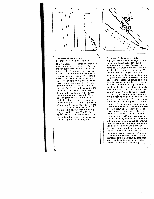
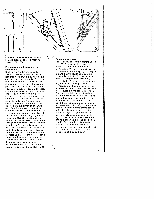
Sewing in zippers: Sewing foot: zipper sewing foot Stitch length: 2 to 3 Stitch: Straight stitch, middle needle position Thread: sewing thread This is how the zipper foot is engaged: Insert the foot with the back pin in the back groove E and push the shoe of the foot upwards, until the front pin F snaps in. The zipper foot can be pushed to the positions: left, right, or centre. Completely concealed zip closure: Baste in zip by hand first. Push the zipper foot to the left as far as it will go. Place the open zip under the foot so that its teeth run along the right guiding edge on the sole of the foot (Fig. B). Sew about half the length of the zip at the required width. Leave the needle down in the material, raise the zipper toot and close the zip (Fig. C). Lower the zipper foot again, continue the seam and then sew across the end. Sew the other side of the zip at the same margin. Shortly before the end of the seam leave the needle down in the material, raise the zipper toot and open the zip (Fig. D). Lower the zipper foot again and sew to the end. I 36 Insertion de fermetures a glissiere: Pied presseur: Pied a fermeture a glissiere Longueur de point: 2 a 3 mm Point: Point droit en position médiane Fil: Fil a coudre Mise en place du pied a fermeture a glissiere: Accrocher le pied avec sa tige arrière dans Ia rainure arrière E et faire remon ter Ia semelle jusqu'a ce que Ia tige avant F s'accroche a son tour. Le pied presseur peut étre glissO a droite, a gauche (fig. A) ou au milieu. Insertion d'une fermeture a glissiere couverte: Bãtir tout d'abord Ia fermeture a glissiere. Faire glisser le pied presseur vers Ia gau che jusqu'a a butée: poser Ia fermeture a glissiere ouverte sous le pied presseur de sorte que es dents longent Ia barrette droite (fig, B). Surpiquer Ia fermeture a glissiere jusqu'au milieu environ a Ia distance voulue. L'aiguille restant dans I'ouvrage. remonter le pied presseur et fermer Ia termeture a glissiere (fig. C). Rabaisser le pied presseur, continuer a coudre jusqu'a I'extrémité de Ia fermeture a glissiere et faire Ia couture transver sale. Coudre parallelement Ia deuxième bande de Ia termeture a glissiere a distance egale. Peu avant Ia fin de Ia couture. laisser I'aiguille dans le tissu, remonter le pied presseur et ouvrir Ia fermeture a glissiere (fig. D). Rabaisser le pied presseur et terminer Ia couture.
-
 1
1 -
2
-
3
-
4
-
5
-
6
-
7
-
8
-
9
-
10
-
11
-
12
-
13
-
14
-
15
-
16
-
17
-
18
-
19
-
20
-
21
-
22
-
23
-
24
-
25
-
26
-
27
-
28
-
29
-
30
-
31
-
32
-
33
-
34
-
 35
35 -
 36
36 -
 37
37 -
 38
38 -
 39
39 -
 40
40 -
 41
41 -
 42
42 -
 43
43 -
 44
44 -
 45
45 -
46
-
47
-
48
-
49
-
50
-
51
-
52
-
53
-
54
-
55
-
56
-
57
-
58
-
59
-
60
-
61
-
62
-
63
-
64
-
65
-
66
-
67
-
68
-
69
-
70
-
71
-
72
-
73
-
74
 |
 |
