Pfaff hobby 307 Owner's Manual - Page 44
dépassante - machine a coudre
 |
View all Pfaff hobby 307 manuals
Add to My Manuals
Save this manual to your list of manuals |
Page 44 highlights
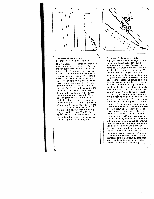
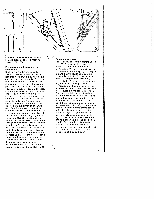
N ITI 4 Zippers in ladies' slacks: For machine setting see page 30. Move the zipper foot to the left as far as it will go. Press the edges of the placket. Baste the closed zip to the right edge of the placket on the wrong side so that its teeth are still visible. Pin facing strip D to the underside and stitch it down at the same time as you sew the zip. The zip teeth run along the right guiding edge of the foot (Fig. A). Shortly before the end of the seam leave the needle down in the fabric, raise the zipper foot, open the zip, lower the zipper foot again and finish sewing the seam. Close the zip. Pin the overlapping edge along the intended seam line. Baste left zip edge (Fig. B). Open zip. Attach the edge guide and position it for the desired seam margin so that it moves along the edge of the fabric (Fig. C). Shortly before the end of the seam leave the needle down in the fabric, raise the zipper foot and close the zip. Lower the zipper foot and finish sewing the seam. Secure the end of the zip seam with a bartack. -Q Fermeture a glissiere pour pantalon dame: Reglage de a machine voir page 30. a Glisser le pied fermeture glissiere vers a Ia gauche jusqu'à Ia butée. Repasser les bords de Ia braguette. Bátir Ia fermeture glissiere fermée sous le bord droit de Ia fente de manieère que les dents de Ia fermeture soient encore visibles. Epingler Ia sous-patte D et assembler le tout par une couture. Les dents de Ia a fermeture glissiere longent Ia barrette droite, comme le montre Ia figure A. Peu avant Ia fin de Ia couture, laisser l'aiguille dans le tissu. relever le pied a presseur, ouvrir la fermeture glissiere, rabaisser le pied presseur et terminer Ia a couture, Fermer Ia fermeture glissiere. Epingler Ia sous-patte dépassante selon le trace de Ia couture. Bátir Ia partie gauche de Ia fermeture a glissiere a (fig. B). Ouvrir a fermeture glissiere. Mettre en place et aligner le guide-droit sur Ia largeur de Ia piqOre de sorte que le guide-droit longe le bord du tissu (fig. C). Peu avant Ia fin de a couture, laisser laiguille dans le tissu, remonter a le pied presseur et fermer a fermeture glissiere. Rabaisser le pied presseur et terminer Ia couture. A Ia fin de Ia cou ture, coudre un arrèt. 40
-
 1
1 -
2
-
3
-
4
-
5
-
6
-
7
-
8
-
9
-
10
-
11
-
12
-
13
-
14
-
15
-
16
-
17
-
18
-
19
-
20
-
21
-
22
-
23
-
24
-
25
-
26
-
27
-
28
-
29
-
30
-
31
-
32
-
33
-
34
-
35
-
36
-
37
-
38
-
 39
39 -
 40
40 -
 41
41 -
 42
42 -
 43
43 -
 44
44 -
 45
45 -
 46
46 -
 47
47 -
 48
48 -
 49
49 -
50
-
51
-
52
-
53
-
54
-
55
-
56
-
57
-
58
-
59
-
60
-
61
-
62
-
63
-
64
-
65
-
66
-
67
-
68
-
69
-
70
-
71
-
72
-
73
-
74
 |
 |
