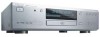
Philips DVDR985A User manual - Page 19
Quick Recording - dvdr985 - dvd recorder
 |
UPC - 037849922774
View all Philips DVDR985A manuals
Add to My Manuals
Save this manual to your list of manuals |
Page 19 highlights
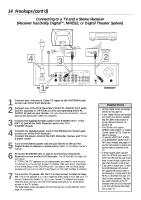
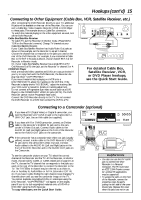
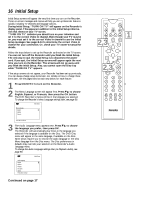
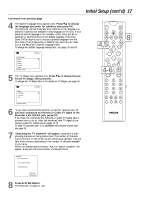
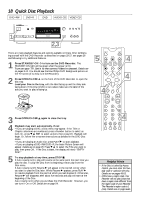
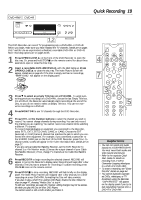
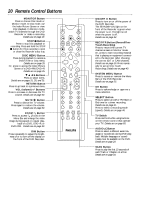
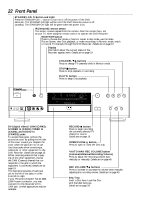
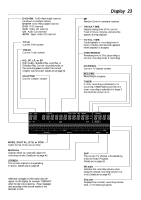
DVD+RW DVD+R DVDR985 DVD RECORDER RECORD Quick Recording 19 1,2 The DVD Recorder can record TV programming onto a DVD+RW or DVD+R. Before you begin, make sure you have installed the TV channels. Details are on pages 16-17 and 36. Use an unprotected, unfinalized, recordable DVD+RW or DVD+R. More recording options are on pages 40-46. 1 Press OPEN/CLOSE A on the front of the DVD Recorder to open the disc tray. Or, press and hold STOP C on the remote control for about three seconds to open or close the Disc tray. 2 Insert a recordable DVD+RW/DVD+R, with the label facing up. Press OPEN/CLOSE A to close the disc tray. The Index Picture Screen will appear. Details are on page 35. If the Disc is empty and has no recordings, "EMPTY DISC" will appear on the display panel. POWER ON/OFF 3 Press 9 to select an empty Title box on a DVD+RW. To avoid overwriting previous recordings on a DVD+RW, choose the last Empty Title box. On a DVD+R, the Recorder automatically starts recording at the end of the Disc, so you do not need to select an Empty Title box. You can not overwrite recordings on a DVD+R. 4 Press MONITOR to see TV channels through the DVD Recorder. 5 Press CH+/- or the Number buttons to select the channel you wish to record. You cannot change channels during recording. You can only record the channel you are watching. You cannot record one channel while watching a different TV channel. To record material playing on equipment you connected to the Recorder, select EXT1, EXT2, EXT3, CAM1, CAM2, or CAM3. Choose the EXT (External) or CAM (Camera) channel that matches the jack to which you connected the other equipment. For example, if you connected a camcorder to the S-VIDEO CAM1 jack on the front of the DVD Recorder, press CH+/- to choose CAM1. CAM1 will appear in the Tuner Information Box. Details are on page 27. If you are using a Cable Box/Satellite Receiver, set the DVD Recorder to channel 3 or 4 in Monitor mode. (Choose the output channel of your Cable Box/Satellite Receiver.) Then, change TV channels at the Cable Box/Satellite Receiver. 6 Press REC/OTR to begin recording the selected channel. RECORD will appear in red on the Recorder's display panel. Recording will begin after a few seconds. (The Disc has to prepare for recording.) To pause recording, press PAUSE k once on the remote control. 7 Press STOP C to stop recording. RECORD will flash briefly on the display panel. The Index Picture Screen will reappear after a few seconds. On a brief recording on a new DVD+RW, formatting the Disc will take a minute. If you plan to play a DVD+R on another DVD Player, finalize the Disc. Follow the steps on page 47, choosing "Finalize Disc" at step 4. To edit your recordings, see page 48. However, editing changes may not be accessible when you play the Disc on other DVD Players. You cannot record or edit a DVD+R after you finalize it. MONITOR ON/OFF 4 PREVIOUS REC/OTR NEXT REVERSE PAUSE SLOW FORWARD STOP FSS 6PLAY 7 CLEAR SELECT TIMER 3VOL CH MUTE 5 T/C A/CH Helpful Hints • You can not record only Audio (sound) to a DVD+RW/DVD+R. You must record both audio and video (sound and picture). • Refer to the separate Quick Start Guide for details on recording from a VCR or Camcorder (copying videotapes to a DVD+R or DVD+RW). • To erase a recording, see "Erase this title" details on page 44. • You cannot duplicate copyrighted DVDs, videotapes, or TV broadcasts using the Recorder. "COPY PROTECT" will appear on the display panel if you try to dub copyrighted material onto a DVD+R or DVD+RW.
-
 1
1 -
2
-
3
-
4
-
5
-
6
-
7
-
8
-
9
-
10
-
11
-
12
-
13
-
 14
14 -
 15
15 -
 16
16 -
 17
17 -
 18
18 -
 19
19 -
 20
20 -
 21
21 -
 22
22 -
 23
23 -
 24
24 -
25
-
26
-
27
-
28
-
29
-
30
-
31
-
32
-
33
-
34
-
35
-
36
-
37
-
38
-
39
-
40
-
41
-
42
-
43
-
44
-
45
-
46
-
47
-
48
-
49
-
50
-
51
-
52
-
53
-
54
-
55
-
56
-
57
-
58
-
59
-
60
-
61
-
62
-
63
-
64
-
65
-
66
-
67
-
68
 |
 |
