Philips DVDR985A User manual - Page 22
Front Panel - dvdr985
 |
UPC - 037849922774
View all Philips DVDR985A manuals
Add to My Manuals
Save this manual to your list of manuals |
Page 22 highlights
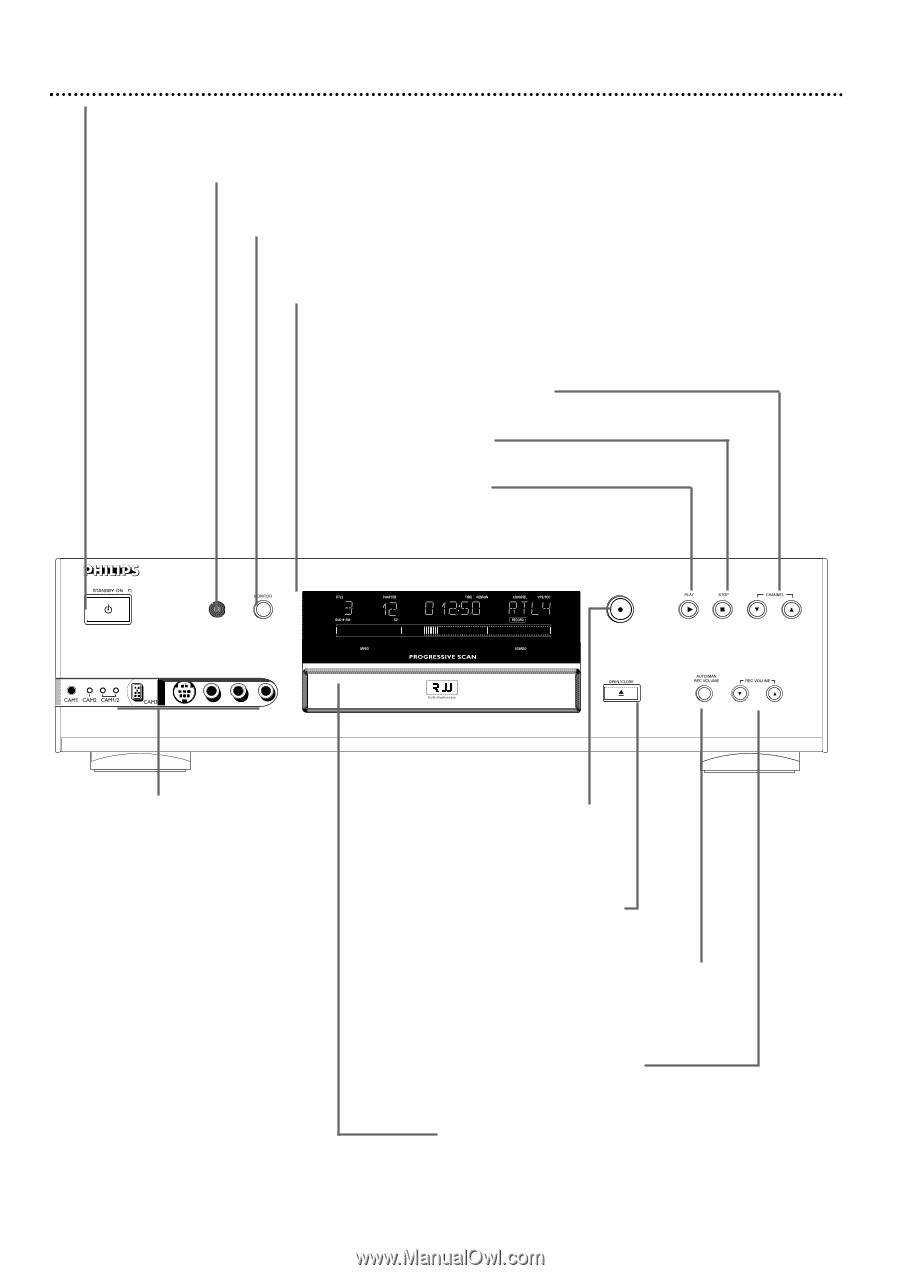
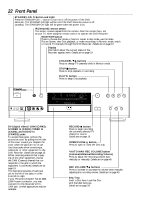
22 Front Panel STANDBY-ON y Button and Light Press the STANDBY-ON y button to turn on or off the power of the DVD Recorder. The STANDBY-ON light will be red if the DVD Recorder power is off (standby). The STANDBY-ON light will be green when the power is on. IR (infrared) remote sensor The sensor receives signals from the remote. Point the remote here, not at your TV, when using the remote control to operate the DVD Recorder. MONITOR button Press to choose disc mode or Monitor mode. In disc mode, use the Index Picture Screen, view Disc playback, or make recordings. In Monitor mode, watch or record TV channels through the DVD Recorder. Details are on page 19. Display Information about the current status of the Recorder appears here. Details are on page 23. CHANNEL 98 buttons Press to change TV channels while in Monitor mode. STOP C button Press to stop playback or recording. PLAY : button Press to begin Disc playback. DVDR985 DVD RECORDER RECORD S-VIDEO VIDEO L AUDIO R DV DV (digital video) i-LINK (CAM3); S-VIDEO In (CAM1); VIDEO In (CAM2); and AUDIO In (CAM1/2) jacks To access these jacks, remove the protective cover by pulling the left side of the cover toward you. Replace the cover when the jacks are not in use. Use these jacks when connecting a camcorder or other equipment to the DVD Recorder. Details are on page 15. When recording material that is playing on the other equipment, choose the CAM (Camera) channel that corresponds to the jack to which the equipment is connected. Details are on page 19. The descriptions/names of each jack are to the left of the jacks, in order from left to right. If your Personal Computer has an IEEE 1394 Firewire connector, you may connect it to the Recorder's DV iLINK jack. Limited applications may be available. RECORD I button Press to begin recording the currently selected TV channel or source. Details are on page 19. OPEN/CLOSE A button Press to open or close the Disc tray. *AUTO MAN REC VOLUME button (Automatic/Manual Recording Volume) Press to adjust the recording volume automatically or manually. Details are on page 45. REC VOLUME 98 buttons Press to increase or decrease the volume when manually adjusting the recording volume. Details are on page 45. Disc Tray Insert a Disc here. Load the Disc with the label facing up. Details are on page 18.
-
 1
1 -
2
-
3
-
4
-
5
-
6
-
7
-
8
-
9
-
10
-
11
-
12
-
13
-
14
-
15
-
16
-
 17
17 -
 18
18 -
 19
19 -
 20
20 -
 21
21 -
 22
22 -
 23
23 -
 24
24 -
 25
25 -
 26
26 -
 27
27 -
28
-
29
-
30
-
31
-
32
-
33
-
34
-
35
-
36
-
37
-
38
-
39
-
40
-
41
-
42
-
43
-
44
-
45
-
46
-
47
-
48
-
49
-
50
-
51
-
52
-
53
-
54
-
55
-
56
-
57
-
58
-
59
-
60
-
61
-
62
-
63
-
64
-
65
-
66
-
67
-
68
 |
 |