Philips DVDR985A User manual - Page 55
Picture Settings
 |
UPC - 037849922774
View all Philips DVDR985A manuals
Add to My Manuals
Save this manual to your list of manuals |
Page 55 highlights
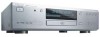
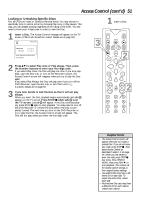
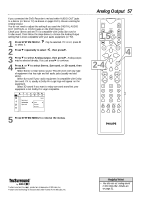
1 Press SYSTEM MENU. to select it. may be selected. If it is not, press ; 2 Press 9 to select , then press :. 3 Press 89 to select TV Shape, Black level shift, Video shift, or Optimize video output. Then, press : and follow step 4 according to your choice. 4 q If you selected TV Shape, press 89 to select 4:3 letterbox, 4:3 panscan, or 16:9, then press OK. Select 4:3 letterbox if you have a regular TV and want to see the picture with black bars at the top and bottom of the screen. This looks like the picture you see when watching movies in a theater. This setting is possible only if the DVD contains letterbox material. Select 4:3 panscan if you have a regular TV and want both sides of the picture to be trimmed, or formatted to fit your TV screen. This setting is possible only if the DVD contains pan & scan material. Select 16:9 if you connected the DVD Recorder to a widescreen TV. q If you selected Black level shift, press 89 to select On or Off, then press OK. Set Black level shift to On during playback of NTSC Discs. This will improve the color contrast during Disc play- back. Black level shift has no effect on PAL Disc playback. Z Y d Z Y q If you sdelected Video shift, press ; : to center the picture on your TV screen - or "shift" the video. When you are sat- isfied with the position of the picture, press OK. q If you selected Optimize video output, press 89 to select Interlaced or Progressive Scan, then press OK. Select Progressive Scan if you used the PROG SCAN OUT jacks on the DVD Recorder to connect the Recorder to the TV. Details are on page 10. Otherwise, choose Interlaced. Choosing Progressive Scan, when applicable, will sharpen the image of a paused or still picture or DVD menu. W X YZ a W X YZ a ~ 1 2 1en off no off ~ 1 2 1en off no off Picture G TV Shape Black level shift s 4:3 letterbox L 4:3 panscan r Video shift 16:9 Optimize video output TV Shape G Black level shift s On r Video shift Off Optimize video output Picture L W X YZ a W X YZ a ~ 1 2 1en off no off ~ 1 2 1en off no off G TV Shape Black level shift r Video shift Optimize video output Picture s B OK to exit Picture TV Shape G Black level shift r Video shift Optimize video output s Interlaced L Progressive Scan 5 Press SYSTEM MENU to remove the menus. Picture Settings 55 MONITOR ON/OFF PREVIOUS REC/OTR NEXT 1,5 REVERSE PAUSE SLOW STOP FSS FORWARD PLAY 2-4CLEAR TIMER SELECT VOL CH MUTE 4 T/C A/CH ZOOM ANGLE SUBTITLE AUDIO DIM REPEAT REPEAT SCAN Helpful Hints • The format you select must be available on the Disc. If it is not, the settings for TV Shape will not affect the picture during playback. • Some widescreen TVs may show only part of the DVD Recorder's menu. Adjust the screen mode on your TV. See your TV owner's manual for details.
-
 1
1 -
2
-
3
-
4
-
5
-
6
-
7
-
8
-
9
-
10
-
11
-
12
-
13
-
14
-
15
-
16
-
17
-
18
-
19
-
20
-
21
-
22
-
23
-
24
-
25
-
26
-
27
-
28
-
29
-
30
-
31
-
32
-
33
-
34
-
35
-
36
-
37
-
38
-
39
-
40
-
41
-
42
-
43
-
44
-
45
-
46
-
47
-
48
-
49
-
 50
50 -
 51
51 -
 52
52 -
 53
53 -
 54
54 -
 55
55 -
 56
56 -
 57
57 -
 58
58 -
 59
59 -
 60
60 -
61
-
62
-
63
-
64
-
65
-
66
-
67
-
68
 |
 |