Philips DVDR985A User manual - Page 60
Using Your Recorder's Remote Control with Your TV
 |
UPC - 037849922774
View all Philips DVDR985A manuals
Add to My Manuals
Save this manual to your list of manuals |
Page 60 highlights
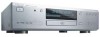
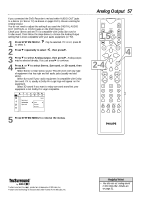
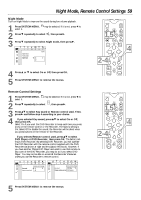
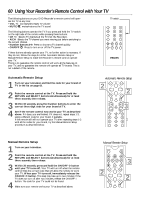
60 Using Your Recorder's Remote Control with Your TV The following buttons on your DVD Recorder's remote control will operate the TV at any time: • VOL +/- increases/decreases TV volume • MUTE H mutes/restores the TV sound The following buttons operate the TV if you press and hold the TV switch on the right side of the remote while pressing these buttons: • CH +/- Selects TV channels at the TV (not the Recorder). • A/CH Selects the TV channel you were viewing just before switching to the current channel. • Number buttons 0-9 Press to choose a TV channel quickly. • ON/OFF 2 Press to turn on or off the TV power. If these buttons already operate your TV, no further action is necessary. If they do not, follow the steps for either Automatic Remote Setup or Manual Remote Setup to make the Recorder's remote control operate your TV. There is no guarantee the remote control will work all the features on your TV, and no guarantee the remote will operate all TV brands. This is not a defect of the remote. TV switch T/C A/CH ZOOM ANGLE SUBTITLE AUDIO DIM REPEAT REPEAT SCAN Automatic Remote Setup 1 Turn on your television and find the code for your brand of TV in the list on page 61. 2 Point the remote control at the TV. Press and hold the RETURN and SELECT buttons simultaneously for at least three seconds, then release. 3 Within 30 seconds, press the Number buttons to enter the correct three-digit code for your brand of TV. 4 See if the remote control now works your TV as described above. If it does, you are finished. If it does not, repeat steps 1-3, using a different code for your brand, if available. If the remote still will not operate your TV after repeating steps 1-3 with all the codes for your brand, try the Manual Remote Setup procedure as described below. Automatic Remote Setup 2 2 CLEAR VOL TIMER SELECT CH MUTE 3 T/C A/CH Manual Remote Setup 1 Turn on your television. 2 Point the remote control at the TV. Press and hold the RETURN and SELECT buttons simultaneously for at least three seconds, then release. 3 Within 30 seconds, press and hold the ON/OFF y button until your TV turns off. Your TV will turn off when the remote control finds the correct code that will allow the remote to work your TV. When your TV turns off, immediately release the ON/OFF y button. This step may take up to two minutes. If the TV does not turn off after two minutes, release the ON/OFF y button. The code for your TV could not be found. 4 Make sure your remote works your TV as described above. Manual Remote Setup MONITOR ON/OFF PREVIOUS REC/OTR NEXT REVERSE PAUSE SLOW FORWARD STOP FSS PLAY 3 2 2 CLEAR VOL TIMER SELECT CH
-
 1
1 -
2
-
3
-
4
-
5
-
6
-
7
-
8
-
9
-
10
-
11
-
12
-
13
-
14
-
15
-
16
-
17
-
18
-
19
-
20
-
21
-
22
-
23
-
24
-
25
-
26
-
27
-
28
-
29
-
30
-
31
-
32
-
33
-
34
-
35
-
36
-
37
-
38
-
39
-
40
-
41
-
42
-
43
-
44
-
45
-
46
-
47
-
48
-
49
-
50
-
51
-
52
-
53
-
54
-
 55
55 -
 56
56 -
 57
57 -
 58
58 -
 59
59 -
 60
60 -
 61
61 -
 62
62 -
 63
63 -
 64
64 -
 65
65 -
66
-
67
-
68
 |
 |