Philips DVDR985A User manual - Page 41
Timer Recording
 |
UPC - 037849922774
View all Philips DVDR985A manuals
Add to My Manuals
Save this manual to your list of manuals |
Page 41 highlights
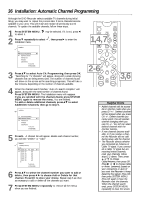
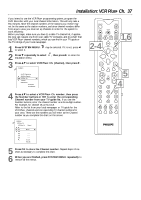
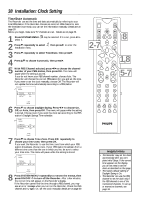
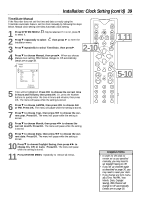
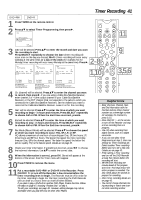
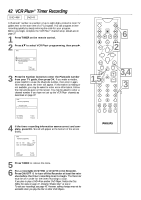
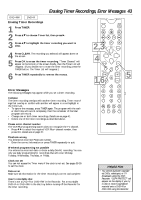
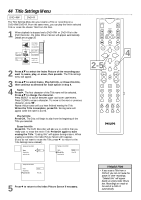
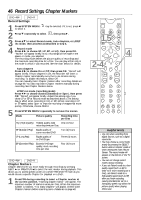
Timer Recording 41 DVD+RW DVD+R 1 Press TIMER on the remote control. 2 Press 89 to select Timer Programming, then press :. Timer K VCR Plus+ programming uB Timer Programming B L Timer List MONITOR ON/OFF PREVIOUS REC/OTR NEXT REVERSE PAUSE SLOW FORWARD STOP FSS PLAY 11 To exit Press TIMER 3 Date will be selected. Press 89 to enter the month and date you want the recording to start. 9 Press SELECT repeatedly to choose: the date (timer recording will occur once on the day you choose); Mo-Fr (timer recording will occur every 2-8 weekday at the same time); or a day of the week (for example, Mo for Monday; timer recording will occur every Monday at the same time). Press :. CLEAR TIMER SELECT Timer Timer Programming Rec Date Ch. Start End Mode 10/24 122 09:00AM 09:30AM EP Timer Timer Programming Rec Date Ch. Start End Mode Mo-Fr 122 09:00AM 09:30AM EP Timer Timer Programming Rec Date Ch. Start End Mode Th 122 09:00AM 09:30AM EP VOL CH MUTE 1,10 3,5,6 Mo-Fr/Weekly Press SELECT To store Press OK Press SELECT once. Recording will happen one time on the day you chose. Mo-Fr/Weekly Press SELECT To store Press OK Press SELECT again. Recording will happen every day, Monday-Friday, starting on the day you chose. Mo-Fr/Weekly Press SELECT To store Press OK Press SELECT again. Recording will happen on the same day every week, starting the day you chose. 4 Ch. (channel) will be selected. Press 89 to enter the channel you want to record, then press :. If you are using a Cable Box/Satellite Receiver, enter channel 3 or 4 (the output channel of your Cable Box/Satellite Receiver) or the EXT channel (that corresponds to the jacks to which you connected the Cable Box/Satellite Receiver). Set the channel you want to record at the Cable Box/Satellite Receiver. Leave it on for the recording. 5 Start will be selected. Press 89 to enter the time at which you want recording to begin - in hours and minutes. Press SELECT repeatedly to choose AM or PM. When the start time is correct, press :. 6 End will be selected. Press 89 to enter the time at which you want recording to stop - in hours and minutes. Press SELECT repeatedly to choose AM or PM. When the End time is correct, press :. 7 Rec Mode (Record Mode) will be selected. Press 89 to choose the speed at which you want recording to occur: HQ, SP, LP, or EP. HQ allows a maximum of one hour of recording per Disc; SP, two hours; LP, three hours; and EP, four hours. The slower the speed, the more recording time per Disc. EP is the slowest speed. The faster the speed, the better the picture quality. HQ is the fastest speed. Details are on page 46. 8 Check your timer information. If something is incorrect, press ; : to choose the incorrect information. Use 89 to enter the correct data. 9 When the information is correct, press OK. Stored will appear at the bottom of the screen, then the Timer menu will reappear. 10Press TIMER to remove the menu. 11Put a recordable DVD+RW or DVD+R in the Recorder. Press ON/OFF y to turn off the Recorder a few minutes before the timer recording is set to begin. The Recorder must be off in order for the timer recording to begin. For the timer recording, the DVD Recorder will turn itself on, record, then turn itself off when finished. If you plan to play a DVD+R on another DVD Player, finalize the Disc. Follow the steps on page 47, choosing "Finalize Disc" at step 4. To edit your recordings, see page 48. However, editing changes may not be accessible when you play the Disc on other DVD Players. T/C A/CH Helpful Hints • Enter the Date, Channel, Start, and End information with the Number buttons. Enter channel numbers as a three-digit number. For example, for channel 15, press 0,1,5. • Press ON/OFF y on the remote to turn off the Recorder and stop a timer recording that is in progress. • Use HQ when recording from digital sources, such as a digital camcorder. • If you can not select Timer Programming at step 2, there are already six Timer recordings set. Delete another Timer recording before you try to set a new one. Details are on page 43. • Finish setting a Timer recording and turn off the DVD Recorder at least five minutes before the recording will start. • Set the timer recording one minute ahead of the program start time. This helps ensure the entire program is recorded. The Disc needs about 30 seconds to prepare for recording. • More Timer recording details are on page 43. • You cannot change channels during recording or watch one channel while recording another.
-
 1
1 -
2
-
3
-
4
-
5
-
6
-
7
-
8
-
9
-
10
-
11
-
12
-
13
-
14
-
15
-
16
-
17
-
18
-
19
-
20
-
21
-
22
-
23
-
24
-
25
-
26
-
27
-
28
-
29
-
30
-
31
-
32
-
33
-
34
-
35
-
 36
36 -
 37
37 -
 38
38 -
 39
39 -
 40
40 -
 41
41 -
 42
42 -
 43
43 -
 44
44 -
 45
45 -
 46
46 -
47
-
48
-
49
-
50
-
51
-
52
-
53
-
54
-
55
-
56
-
57
-
58
-
59
-
60
-
61
-
62
-
63
-
64
-
65
-
66
-
67
-
68
 |
 |
