Philips DVDR985A User manual - Page 31
Sound, Still Picture/Frame-by-Frame Playback
 |
UPC - 037849922774
View all Philips DVDR985A manuals
Add to My Manuals
Save this manual to your list of manuals |
Page 31 highlights
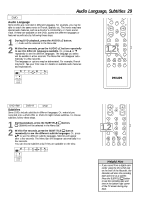
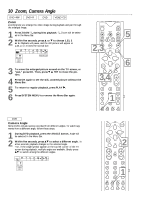
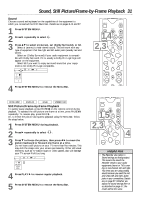
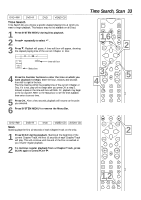
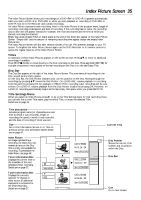
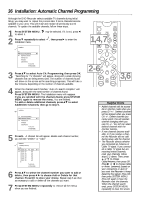
Sound, Still Picture/Frame-by-Frame Playback 31 Sound Choose a sound setting based on the capabilities of the equipment to which you connected the DVD Recorder. Details are on pages 9-14 and 57. 1 Press SYSTEM MENU. 2 Press : repeatedly to select d. 3 Press 89 to select st (stereo), sur (Dolby Surround), or 3d. q Select st (stereo) to hear stereo sound. This will work with any type of equipment that has right and left audio jacks (usually red and white). q Select sur (Dolby Surround) if your audio equipment is compatible with Dolby Surround. If it is, usually a Dolby Pro Logic logo will appear on the equipment. q Select 3d if you want to enjoy surround sound but your equipment is not Dolby Pro Logic compatible. d sB st K L LC RW stop 5 HE 4 Press SYSTEM MENU to remove the Menu Bar. MONITOR ON/OFF PREVIOUS REC/OTR NEXT 1,4REVERSE PAUSE SLOW STOP FSS FORWARD PLAY 2,3 CLEAR VOL TIMER SELECT CH MUTE DVD+RW DVD+R DVD VIDEO CD Still Picture/Frame-by-frame Playback To quickly pause playback, press PAUSE k on the remote control during playback. To advance the still picture one frame at a time, press PAUSE k repeatedly. To resume play, press PLAY :. Or, to freeze the picture during Disc playback using the Menu Bar, follow the steps below. 1 Press SYSTEM MENU during playback. 2 Press : repeatedly to select . 3 Press 9 to freeze the picture, then press ; : to move the picture backward or forward one frame at a time. Do not leave a still picture on your TV more than five minutes. This may etch the image onto your screen permanently. Other still visual elements, such as TV station logos or video games, also will damage your TV screen if left too long. d HE st LB o e RW pause 0:29:40 0:00:07 4 Press PLAY : to resume regular playback. 5 Press SYSTEM MENU to remove the Menu Bar. MONITOR ON/OFF PREVIOUS REC/OTR NEXT 1,5 REVERSE PAUSE SLOW STOP FSS FORWARD PLAY 2,3 4 CLEAR SELECT Helpful Hint • The Recorder also refers to Sound settings as Analog output. This means the sound the Recorder sends to your audio equipment (stereo or TV) is analog, or two-channel, left and right. You know you are using analog sound because you used the red and white, left and right, Audio jacks in your connections. Details are on page 57. Whether you adjust the sound settings here or as described on page 57, the results will be the same.
-
 1
1 -
2
-
3
-
4
-
5
-
6
-
7
-
8
-
9
-
10
-
11
-
12
-
13
-
14
-
15
-
16
-
17
-
18
-
19
-
20
-
21
-
22
-
23
-
24
-
25
-
 26
26 -
 27
27 -
 28
28 -
 29
29 -
 30
30 -
 31
31 -
 32
32 -
 33
33 -
 34
34 -
 35
35 -
 36
36 -
37
-
38
-
39
-
40
-
41
-
42
-
43
-
44
-
45
-
46
-
47
-
48
-
49
-
50
-
51
-
52
-
53
-
54
-
55
-
56
-
57
-
58
-
59
-
60
-
61
-
62
-
63
-
64
-
65
-
66
-
67
-
68
 |
 |
