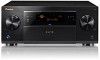
Pioneer SC-55 Owner's Manual
Pioneer SC-55 Manual
 |
View all Pioneer SC-55 manuals
Add to My Manuals
Save this manual to your list of manuals |
Pioneer SC-55 manual content summary:
- Pioneer SC-55 | Owner's Manual - Page 1
57 SC55 SC- - Pioneer SC-55 | Owner's Manual - Page 2
important operating and maintenance (servicing) instructions in the literature accompanying Reorient or relocate the receiving antenna. - Increase the separation between the equipment and receiver. - Connect the on this product or cords associated with accessories sold with the product may expose you - Pioneer SC-55 | Owner's Manual - Page 3
without annoying blaring or distortion and, most importantly, without affecting your sensitive hearing. Sound can be deceiving. Over time, your hearing "comfort level" adapts to higher volumes of sound, so what sounds "normal" can actually be loud and harmful to your hearing. Guard against this - Pioneer SC-55 | Owner's Manual - Page 4
LAN interface 28 Connecting optional Bluetooth ADAPTER 29 Connecting an iPod 29 Connecting a USB device 29 Connecting an HDMI-equipped component to the front panel input 29 Connecting to a wireless LAN 29 Connecting an IR receiver 30 Operating other Pioneer components with this unit's sensor - Pioneer SC-55 | Owner's Manual - Page 5
56) ! Setting the Video options (page 58) j 12 Other optional adjustments and settings ! Control with HDMI function (page 53) ! The Advanced MCACC menu (page 69) ! The System Setup and Other Setup menus (page 76) j 13 Making maximum use of the remote control ! Operating multiple receivers (page 63 - Pioneer SC-55 | Owner's Manual - Page 6
Blu-ray Disc player control. iControlAV2 is free from the App Store. % Air Jam App compatible For the SC-57 and SC-55, the optional AS-BT200 Bluetooth adapter works together with Pioneer's exclusive Air Jam application. Available free in the App Store, Air Jam allows up to 4 iPhone, iPod touch or - Pioneer SC-55 | Owner's Manual - Page 7
completed easily simply by following the instructions on the screen to make the connections and settings. There are also other features enabling easy use of various functions, including an Interactive Manual that operates in association with the receiver, updating of various types of software, and - Pioneer SC-55 | Owner's Manual - Page 8
. These instructions are included in the AVNavigator Interactive Manual's menus. Refer to them when using MCACC Application. ! Software Update - Allows various types of software to be updated. ! Settings - Used to make various AVNavigator settings. ! Detection - Used to detect the receiver. Note - Pioneer SC-55 | Owner's Manual - Page 9
the remote control for the receiver. 1 2,3 4 5 6 7 8 9 10 RECEIVER MULTI OPERATION SOURCE RCU SETUP BDR BD DVD DVR HDMI SAT TV CD HMG ADPT USB iPod OPTION TUNER SIRIUS INPUT SELECT TV CTRL RECEIVER INPUT MASTER VOLUME TV CONTROL CH VOL MUTE AUDIO PARAMETER LIST VIDEO PARAMETER - Pioneer SC-55 | Owner's Manual - Page 10
ALC ATT STEREO S.RTRV SOUND UP MIX OVER MONO XR MSTR CD TUNER SIRIUS PHONO iPod DVD TV VIDEO HMG USB BD DVR HDMI [ 2 ] [ Sound Retriever function is active (page 56). 20 Character display Displays various system information. 21 Remote control mode indicator Lights to indicate the receiver's remote - Pioneer SC-55 | Owner's Manual - Page 11
HDMI - Blinks when connecting an HDMIequipped component; lights when the component is connected (page 23). ! iPod iPhone iPad - Lights to indicate iPod/ iPhone/iPad is connected (page 29). 4 Character display See Display on page 10 . 5 Remote sensor Receives there is no sound output from the speakers - Pioneer SC-55 | Owner's Manual - Page 12
explanations in this manual. Also refer to the operating instructions of the respective devices. Important Illustration shows the SC-57, however connections for the SC-55 are the same except where noted. Rear panel SC-57 IN 1 IN 2 HDMI ASSIGNABLE 16 ASSIGNABLE Y COMPONENT VIDEO PB PR IN - Pioneer SC-55 | Owner's Manual - Page 13
one speaker layout/usage pattern before connecting the speakers. For instructions on connections, see Installing your speaker system on page 17 two subwoofers increases the bass sound to achieve more powerful sound reproduction. In this case, the same sound is output from the two subwoofers. - Pioneer SC-55 | Owner's Manual - Page 14
surround back channels with ZONE 2 connections, see [D]. It is not possible to produce sound simultaneously from the front height speakers and the front wide speakers. The speakers from which sound is output can be switched using the SPEAKERS button. For details, see Switching the speaker terminals - Pioneer SC-55 | Owner's Manual - Page 15
sound quality with 5.2-channel surround sound. Front Bi-Amp SR SL [I] 5.2 channel surround system & Front and Surround Bi-amping connection (High quality surround) SC will give you the best sound experience when using the Home THX modes (page 44). Some tips for improving sound quality Where you put - Pioneer SC-55 | Owner's Manual - Page 16
on the receiver comprises a sound to achieve more powerful sound reproduction. In this case, the same sound is output severely damage the amplifier. See your speaker manual for more information. ! If your speakers have can also be bi-wired if they support bi-amping. ! With these connections, the - Pioneer SC-55 | Owner's Manual - Page 17
MONITOR SIGNAL IN OUT GND IN 1 IN 2 IN 1 IN 2 IN 3 (DVD) (CD) (TV/SAT) (DVR/BDR) (VIDEO) ADAPTER PORT (OUTPUT 5 V 0.1 A MAX) OUT AC IN IN 2 (DVR/ BDR) IN 3 (VIDEO) MONITOR OUT ZONE 2 ZONE 3 DVD TV/SAT VIDEO OUT OUT IN IN IN DVR/BDR OUT IN PHONO IN CD IN FRONT 1 SUBWOOFER 2 SURROUND - Pioneer SC-55 | Owner's Manual - Page 18
MONITOR SIGNAL IN OUT GND IN 1 IN 2 IN 1 IN 2 IN 3 (DVD) (CD) (TV/SAT) (DVR/BDR) (VIDEO) ADAPTER PORT (OUTPUT 5 V 0.1 A MAX) OUT AC IN IN 2 (DVR/ BDR) IN 3 (VIDEO) MONITOR OUT ZONE 2 ZONE 3 DVD TV/SAT VIDEO OUT OUT IN IN IN DVR/BDR OUT IN PHONO IN CD IN FRONT 1 SUBWOOFER 2 SURROUND - Pioneer SC-55 | Owner's Manual - Page 19
MONITOR SIGNAL IN OUT GND IN 1 IN 2 IN 1 IN 2 IN 3 (DVD) (CD) (TV/SAT) (DVR/BDR) (VIDEO) ADAPTER PORT (OUTPUT 5 V 0.1 A MAX) OUT AC IN IN 2 (DVR/ BDR) IN 3 (VIDEO) MONITOR OUT ZONE 2 ZONE 3 DVD TV/SAT VIDEO OUT OUT IN IN IN DVR/BDR OUT IN PHONO IN CD IN FRONT 1 SUBWOOFER 2 SURROUND - Pioneer SC-55 | Owner's Manual - Page 20
MONITOR SIGNAL IN OUT GND IN 1 IN 2 IN 1 IN 2 IN 3 (DVD) (CD) (TV/SAT) (DVR/BDR) (VIDEO) ADAPTER PORT (OUTPUT 5 V 0.1 A MAX) OUT AC IN IN 2 (DVR/ BDR) IN 3 (VIDEO) MONITOR OUT ZONE 2 ZONE 3 DVD TV/SAT VIDEO OUT OUT IN IN IN DVR/BDR OUT IN PHONO IN CD IN FRONT 1 SUBWOOFER 2 SURROUND - Pioneer SC-55 | Owner's Manual - Page 21
MONITOR SIGNAL IN OUT GND IN 1 IN 2 IN 1 IN 2 IN 3 (DVD) (CD) (TV/SAT) (DVR/BDR) (VIDEO) ADAPTER PORT (OUTPUT 5 V 0.1 A MAX) OUT AC IN IN 2 (DVR/ BDR) IN 3 (VIDEO) MONITOR OUT ZONE 2 ZONE 3 DVD TV/SAT VIDEO OUT OUT IN IN IN DVR/BDR OUT IN PHONO IN CD IN FRONT 1 SUBWOOFER 2 SURROUND - Pioneer SC-55 | Owner's Manual - Page 22
, however, make sure that the component connected to this receiver also supports the corresponding format. ! Use a High Speed HDMI® cable. If an HDMI cable other than a High Speed HDMI® cable is used, it may not work properly. ! When an HDMI cable with a built-in equalizer is connected, it may - Pioneer SC-55 | Owner's Manual - Page 23
Connecting your DVD player with no HDMI output on page 23 ). ! If you want to listen to the sound of the TV over the receiver, connect the receiver and TV with audio cables. - When the TV and receiver are connected by HDMI connections, if the TV supports the HDMI ARC (Audio Return Channel) function - Pioneer SC-55 | Owner's Manual - Page 24
on the receiver. Do not use an HDMI cable to input video signals. Depending on the video component, it may not be possible to output signals connected by HDMI and other methods simultaneously, and it may be necessary to make output settings. Please refer to the operating instructions supplied with - Pioneer SC-55 | Owner's Manual - Page 25
box is equipped with an HDMI output terminal, we recommend connecting it to the receiver's HDMI IN 1 or IN 2 terminal. When doing so, also connect the receiver and TV by HDMI (see Connecting using HDMI on page 23 ). IN 1 IN 2 HDMI ASSIGNABLE 16 ASSIGNABLE COMPONENT VIDEO Y PB PR IN 1 (DVD - Pioneer SC-55 | Owner's Manual - Page 26
output, connect it to the SURR BACK L jack on this receiver. ! To use a 5.1-channel speaker set, use the surround speakers for the surround channel, not the surround back channel. ! The sound IN 3 (DVD) (CD) (TV/SAT) (DVR/BDR) (VIDEO) ADAPTER PORT (OUTPUT 5 V 0.1 A MAX) OUT AC IN ONO IN CD IN - Pioneer SC-55 | Owner's Manual - Page 27
whichever works best for you. MULTI-ZONE listening options The following table shows the signals that can be output to ZONE 2 and ZONE 3: Sub Zone ZONE 2 ZONE 3 Input functions available DVD, TV/SAT, DVR/BDR, VIDEO, HOME MEDIA GALLERY, iPod/USB, CD, TUNER, ADAPTER PORT, SIRIUS (Outputs analog - Pioneer SC-55 | Owner's Manual - Page 28
illustration. 2 Connect a TV monitor to the VIDEO ZONE 3 OUT jack on this receiver. Sub zone (ZONE 3) Main zone VIDEO IN L R IN 1 IN 2 HDMI ASSIGNABLE 16 ASSIGNABLE Y COMPONENT VIDEO PB PR IN 1 (DVD) DC(INVOIDU4TEPOU)T WIRELESS LAN (OUTPUT 5 V 0.6 A MAX) AD LAN (10/100) GNABLE - Pioneer SC-55 | Owner's Manual - Page 29
/BDR) (VIDEO) ADAPTER PORT (OUTPUT 5 V 0.1 A MAX) OUT AC IN Important ! Do not move the receiver with the Bluetooth ADAPTER connected. Doing so could cause damage or faulty contact. % Switch the receiver into standby and connect Bluetooth ADAPTER to the ADAPTER PORT. ! For instructions on playing - Pioneer SC-55 | Owner's Manual - Page 30
), the IR receiver's remote sensor takes priority over the remote sensor on the front panel. 1 Connect the IR receiver sensor to the IR IN jack on the rear of this receiver. Closet or shelving unit Pioneer component Non-Pioneer component CONTROL IR IN OUT IN IN 1 IN 2 HDMI ASSIGNABLE 16 - Pioneer SC-55 | Owner's Manual - Page 31
that this will only work with components that have HDMI OUT is switched. For details, see HDMI Setup on page 53 . Plugging in the receiver Only plug in after you have connected all your components to this receiver ask your nearest Pioneer authorized independent service company for a replacement - Pioneer SC-55 | Owner's Manual - Page 32
instructions are for when English is selected for the GUI screen. 1 Press u RECEIVER to switch on the receiver and your TV. Make sure that the TV's video input is set to this receiver (for example, if you connected this receiver to the VIDEO sound Professional menu in the Manual MCACC setup (page - Pioneer SC-55 | Owner's Manual - Page 33
sure to disconnect the microphone from this receiver upon completion of the Full Auto MCACC Setup. The settings made in the Full Auto MCACC Setup should give you excellent surround sound from your system, but it is also possible to adjust these settings manually using The Advanced MCACC menu on page - Pioneer SC-55 | Owner's Manual - Page 34
GAL- LERY iPod/USB CD COAX-2 TUNER ADAPTER PORT PHONO MULTI CH IN k SIRIUS k a With Control with HDMI set to ON, assignments cannot be made (see Control with HDMI function on page 53 ). b SC-57 only Operation Mode Setup This receiver is equipped with a great number of functions - Pioneer SC-55 | Owner's Manual - Page 35
Operable functions/ items Descriptions Page Software Update Updates to the latest version of the software. 81 Network Checks the receiver's IP Information address. 80 Pairing Pairs with a Bluetooth Bluetooth device using AS-BT100 or 41 Setup AS-BT200. Audio Parameters MCACC (MCACC - Pioneer SC-55 | Owner's Manual - Page 36
dial on the front panel or by pressing HDMI on the remote control repeatedly. ! Set the HDMI parameter in Setting the Audio options on page 56 to THROUGH if you want to hear HDMI audio output from your TV (no sound will be heard from this receiver). ! If the video signal does not appear on your TV - Pioneer SC-55 | Owner's Manual - Page 37
playback controls This receiver's remote control buttons can be used for basic playback of files stored on an iPod. ! Press iPod USB to switch the remote control to the iPod/USB operation mode. AUDIO PARAMETER LIST VIDEO PARAMETER TUNE TOOLS TOP MENU BAND T.EDIT GUIDE PRESET ENTER PRESET - Pioneer SC-55 | Owner's Manual - Page 38
function of this receiver supports the following file Supported/Supported a "MPEG Layer-3 audio decoding technology licensed from Fraunhofer IIS and Thomson multimedia." b Files encoded using Windows Media Codec 9 may be playable but some parts of the specification are not sup- ported; specifically - Pioneer SC-55 | Owner's Manual - Page 39
, press MPX to switch the receiver into mono reception mode. This should improve the sound quality and allow you to enjoy Best of XM" programming to the SIRIUS service. The "Best of XM" service is not available to SIRIUS Canada subscribers at this time. Please check with SIRIUS Canada for any updates - Pioneer SC-55 | Owner's Manual - Page 40
to the manual for the SiriusConnectTM Home tuner for antenna placement recommendations). ! If after pressing SIRIUS the display shows Antenna Error, try disconnecting the antenna and reconnecting. If the display shows Check Sirius Tuner, check the connection of the AC adapter and this receiver to - Pioneer SC-55 | Owner's Manual - Page 41
audio transmitter (sold commercially) Music data This receiver Bluetooth® ADAPTER INPUT SELECTOR STANDBY /ON ADVANCED MCACC FL OFF HDMI iPod iPhone iPad MASTER VOLUME Remote control operation Wireless music play When the Bluetooth ADAPTER (AS-BT100 or AS-BT200) is connected to this unit - Pioneer SC-55 | Owner's Manual - Page 42
to a source, set the remote control to the receiver operation mode, then press ADV SURR repeatedly to select SOUND RETRIEVER AIR. The Bluetooth® word mark and logos are registered trademarks owned by Bluetooth SIG, Inc. and any use of such marks by PIONEER CORPORATION is under license. Other - Pioneer SC-55 | Owner's Manual - Page 43
on this). ! When listening to the ADAPTER PORT input, the SOUND RETRIEVER AIR feature is selected automatically. ALC - In the Auto level control (ALC) mode, this receiver equalizes playback sound levels. Also, the low and high frequency sounds, dialogs, surround effects, etc., that are difficult - Pioneer SC-55 | Owner's Manual - Page 44
adjust: C.WIDTH,DIMENSION and PANORAMA. See like. 1 Press mode. to the receiver operation 2 Press ADV SURR (ADVANCED SOUND RETRIEVER AIR - Suitable for listening to the sound from a Bluetooth wireless technology device. The SOUND RETRIEVER AIR listening mode can only selected when the ADAPTER - Pioneer SC-55 | Owner's Manual - Page 45
(page 22) and set the signal input to DIGITAL. ! Some DVD players don't output DTS signals. For more details, refer to the instruction manual supplied with your DVD player. 1 Press mode. to the receiver operation 2 Press SIGNAL SEL to select the input signal corresponding to the source component - Pioneer SC-55 | Owner's Manual - Page 46
sound against high-frequency sound) during audio signal playback. This receiver analyzes the frequency-phase characteristics of the speakers by measuring test signals output dimension on your PC. For details, refer to the operating instructions on. - When the HDMI audio output parameter is set to - Pioneer SC-55 | Owner's Manual - Page 47
manual supplied with your network component. ! To listen to Internet radio stations, you must sign a contract with an ISP (Internet Service Provider) beforehand. ! Photo or video the receiver or remote control. Using AirPlay on iPod touch, iPhone, iPad, and iTunes This receiver supports AirPlay audio - Pioneer SC-55 | Owner's Manual - Page 48
the following list: ! Internet Radio - Internet radio ! Rhapsody - Rhapsody music broadcast service ! Sirius - Internet radio that supports Sirius ! Pandora - Internet radio that supports Pandora ! Server Name - Server components on the network ! Favorites - Favorite songs currently being registered - Pioneer SC-55 | Owner's Manual - Page 49
account in order to listen to songs using Pandora Internet Radio. Select Pandora, then follow the instructions on the screen to make the account settings. Also see Checking about the Accounts on page 49 . ! As of April 2011, the Pandora service is only offered in the United States. ! Some - Pioneer SC-55 | Owner's Manual - Page 50
WMDRM protected content can only be played on media servers supporting WMDRM. Content owners use WMDRM technology to protect their intellectual property, AND NON-INFRINGEMENT. PIONEER DOES NOT GUARANTEE, REPRESENT, OR WARRANT THAT CONTENT SERVICES WILL BE FREE FROM ERRORS, INTERRUPTION, LOSS, - Pioneer SC-55 | Owner's Manual - Page 51
If there are problems within the network For best Pioneer is not responsible for any malfunction of the player and/or the Home Media Gallery features due to communication error receiver supports server. Check with your server to ensure the compatibility of file formats supported by your server - Pioneer SC-55 | Owner's Manual - Page 52
bit FLAC .flac FLAC Channel 2 ch Bitrate - VBR/CBR - a "MPEG Layer-3 audio decoding technology licensed from Fraunhofer IIS and Thomson multimedia." b Only streaming data from servers is concerned, so there is no extension. 52 En - Pioneer SC-55 | Owner's Manual - Page 53
HDMI-compatible Pioneer TV or Blu-ray Disc player or with a component of another make that supports the Control with HDMI functions are possible when the component is connected to the receiver using an HDMI cable. ! The receiver's volume can be set and the sound can be muted using the TV's remote - Pioneer SC-55 | Owner's Manual - Page 54
function is connected to a TV of a brand other than Pioneer that supports the Control with HDMI function. (Depending on the TV, however, some of the Control with HDMI functions may not work.) ! When the TV's power is set to standby, the receiver's power is also set to standby. (Only when the input - Pioneer SC-55 | Owner's Manual - Page 55
Smoother Link These are automatic functions allowing you to output optimum audio and video signals from the receiver using the Control with HDMI function. When a player supporting the respective function is connected to the receiver by HDMI, the sound/picture is optimized for the compressed audio - Pioneer SC-55 | Owner's Manual - Page 56
delay, you can adjust the sound to match the presentation of the video. c 0.0 to 10.0 ( sound quality. ON Also, when a player supporting the Auto Sound Retriever Link function is connected to the receiver by HDMI to 32 bit. Switches the AUDIO DAC (Digital Audio Converter) digital filter type - Pioneer SC-55 | Owner's Manual - Page 57
, but if the sound distorts, it is best to switch the gain setting back to 0dB. f ! The HDMI Audio setting cannot be switched while performing synchronized amp mode operations. ! The synchronized amp mode must be turned on in order to play the receiver's HDMI audio and video input signals from the - Pioneer SC-55 | Owner's Manual - Page 58
this receiver or when any of the stereo, Front Stage Surround Advance, Sound Retriever output resolution of the video signal (when video input signals are output at the HDMI supporting Stream Smoother and connected to this unit by HDMI (assuming that integrated operation with the Control with HDMI - Pioneer SC-55 | Owner's Manual - Page 59
(monitor) connected by HDMI. When PURE is selected, the signals are output with the same resolution as when input (see About the video converter on page 22 output. ! SP: OFF - No sound is output from the speakers. When you select 7.1ch + Speaker B, you can select from: ! SP: A ON - Sound is output - Pioneer SC-55 | Owner's Manual - Page 60
OUT is switched. For details, see Switching the HDMI output on page 61 . ! The subwoofer output depends on the settings you made in Manual speaker setup on page 76 . However, if SP: B ON is selected above, no sound is heard from the subwoofer (the LFE channel is not downmixed). ! All speaker systems - Pioneer SC-55 | Owner's Manual - Page 61
OFF indicator lights. Switching the HDMI output Set which terminal to use when outputting video and audio signals from the HDMI output terminals. The HDMI OUT 1 terminal is compatible with the Control with HDMI function. % Press to the receiver operation mode, then press HDMI OUT. Please wait - Pioneer SC-55 | Owner's Manual - Page 62
HDMI output HDMI OUT ALL Control ON Control Mode PQLS Display Power Off NO Audio playback Power On Level LAST Volume Limit OFF Mute Level FULL Phase Control ON Auto Sound Retriever iPod/USB, HOME MEDIA GALLERY, ON ADAPTER PORT input function Other input functions OFF Sound - Pioneer SC-55 | Owner's Manual - Page 63
from the factory. See Resetting the remote control settings on page 66 . Change RC mode If you have multiple Pioneer receivers, amplifiers, etc the proper preset code, or the codes for the manufacturer in the remote control will not work for the model that you are using. If you can't find a - Pioneer SC-55 | Owner's Manual - Page 64
Pioneer format only). Certain buttons represent operations that cannot be learned from other remote controls. The buttons available are shown below: RECEIVER MULTI OPERATION SOURCE RCU SETUP BDR BD DVD DVR HDMI one input function, and restores the factory default. This function is handy for - Pioneer SC-55 | Owner's Manual - Page 65
of convenience and battery service life. 1 Press and work with components that have a standby mode. ! Some remote HDMI and TV CTRL settings cannot be made. For other settable input functions, see Setting the remote receiver to switch on or off. This is done automatically. With Pioneer components - Pioneer SC-55 | Owner's Manual - Page 66
SOURCE RCU SETUP BDR BD DVD DVR HDMI SAT TV CD HMG ADPT USB iPod OPTION TUNER SIRIUS INPUT SELECT TV CTRL RECEIVER INPUT MASTER VOLUME TV CONTROL CH VOL MUTE AUDIO PARAMETER LIST VIDEO PARAMETER TUNE TOOLS TOP MENU BAND T.EDIT GUIDE PRESET ENTER PRESET CATEGORY RETURN HOME - Pioneer SC-55 | Owner's Manual - Page 67
ENTER TOOLS/ GUIDE/EPG USER MENU TOOLS GUIDE - i/j/k/l i/j/k/l i/j/k/l i/j/k/l - ENTER ENTER ENTER ENTER - GUIDE i/j/k/l ENTER OUTPUT RESOLUTION +/- CH +/- - - - - - d e g m n - - AUDIO - CH +/- RETURN Red Green Yellow Blue d e g m n o p AUDIO DISPLAY/ INFO CH +/- Audio/Video - Pioneer SC-55 | Owner's Manual - Page 68
(Projector) POWER ON MOVIE STANDARD DYNAMIC USER1 USER2 USER3 COLOR+ SHARP+ GAMMA COLOR- SHARP- COLOR TEMP EXIT INFO i/j/k/l ENTER TEST HIDE MENU HDMI1 HDMI2 COMP. VIDEO S-VIDEO BRIGHT- BRIGHT+ POWER OFF ASPECT CONTRAST+/- 68 En - Pioneer SC-55 | Owner's Manual - Page 69
section describes how to calibrate the sound field automatically and fine-adjust the sound field data manually. 1 Press u RECEIVER to switch on the receiver and your TV. Make sure that the TV's video input is set to this receiver. 2 Press on the remote control, then press HOME MENU. A Graphical - Pioneer SC-55 | Owner's Manual - Page 70
the instructions on-screen. 70 En 6 Wait for the Auto MCACC Setup to finish outputting test tones. A progress report is displayed on-screen while the receiver outputs test tones to determine the speakers present in your setup. Try to be as quiet as possible while it's doing this. ! With error - Pioneer SC-55 | Owner's Manual - Page 71
Problems when using the Auto MCACC Setup on page 33 for notes regarding high background noise levels and other possible interference. ! If you're using a subwoofer, switch it on and turn up the volume to the middle position. 1 Select 'Manual MCACC' from the Advanced MCACC menu. See Making receiver - Pioneer SC-55 | Owner's Manual - Page 72
sources using the HDMI connection. 1 Select 'Standing Wave' from the Manual MCACC setup menu subwoofer channel level (to compensate for the difference in output post-filter). ! Freq / Q / ATT - excluding the subwoofer). It works by measuring the acoustic on the direct sound coming from the - Pioneer SC-55 | Owner's Manual - Page 73
results on-screen. See Professional Calibration EQ graphical output on page 87 for troubleshooting information. 4 If you selected 'Reverb View', Manual MCACC measurements, then performing the adjustment described here without moving the microphone. ! The adjustment here is for adjusting for an error - Pioneer SC-55 | Owner's Manual - Page 74
Manual MCACC setup on page 71 , you can check your calibrated settings using the GUI screen. 1 Press on the remote ! Channel Level - Used to check the output level of the different speakers. See Channel calibrated speaker group delay results. See Better sound using Phase Control and Full Band Phase - Pioneer SC-55 | Owner's Manual - Page 75
a video game on the remote control, then Manual MCACC setup on page 71 ), we recommend copying your current settings to an unused MCACC preset. Instead of just a flat EQ curve, this will give you a reference point from which to start. ! The settings made in Automatically conducting optimum sound - Pioneer SC-55 | Owner's Manual - Page 76
Pioneer component supporting Control with HDMI (page 53). ! Other Setup - Makes customized settings to reflect how you are using the receiver (see The Other Setup menu on page 80 ). Manual speaker setup This receiver allows you to make detailed settings to optimize the surround sound 60 ). SC-57 only - Pioneer SC-55 | Owner's Manual - Page 77
SMALL. 1 Select 'Speaker Setting' from the Manual SP Setup menu. 2 Choose the set of output from the subwoofer when YES is selected. Choose the PLUS setting if you want the subwoofer to output bass sound sounds best. If you're having problems, the easiest option is to route all the bass sounds - Pioneer SC-55 | Owner's Manual - Page 78
Manual SP Setup menu. Note ! You can change the channel levels by press to the receiver operation mode, then press CH LEVEL, and then using k/l on the remote control. Speaker Distance For good sound ULTRA2 for the SC-57, SELECT2 for the SC-55. 1 Select 'THX Audio Setting' from the Manual SP Setup - Pioneer SC-55 | Owner's Manual - Page 79
manually. You must set up the network as described below only when you have connected this receiver to a broadband router without a DHCP server adapter is directly connected to this receiver, services. Also set the password accompanying the usage restrictions. ! Upon shipment from the factory - Pioneer SC-55 | Owner's Manual - Page 80
Update - Use to update the receiver's software and check the version. ! EXTENSION Setup - Allows the CU-RF100 to be used even when the receiver is in the standby mode (page 81). ! Pairing Bluetooth Setup - Use to pair a Bluetooth ADAPTER and Bluetooth wireless technology device (page 41). ! SC - Pioneer SC-55 | Owner's Manual - Page 81
no operation has been performed for a specific amount of time with no audio or video signals being input to the receiver. When using ZONE 2 or ZONE 3, hard to see, try changing this setting. Note that the resolution in this setting only affects the GUI screen; it has no influence on the video output - Pioneer SC-55 | Owner's Manual - Page 82
file must first be inserted into the USB port on the receiver's front panel. ! If an update file is provided on the Pioneer website, download it onto your computer. When downloading an update file from the Pioneer website onto your computer, the file will be in ZIP format. Unzip the ZIP file before - Pioneer SC-55 | Owner's Manual - Page 83
Do not try switching the receiver on. Unplug the receiver from the wall and call a Pioneer authorized independent service company. An error has arisen in the 12 V trigger jacks. Reconnect accurately then turn the power back on. No sound Symptom Remedy No sound is output when an input function is - Pioneer SC-55 | Owner's Manual - Page 84
output is set to On. If the source component has a digital volume control, make sure this is not turned down. If the HDMI input function is selected, sound is muted until exiting the Home Menu. Other audio problems Symptom Remedy Speaker switching sound (clicking sound) is heard from receiver - Pioneer SC-55 | Owner's Manual - Page 85
. Reset the pairing. Check that the profile is correct. Use a Bluetooth wireless technology device that supports A2DP profile and AVRCP profile. Video Symptom No image is output when an input is selected. Can't record video. Remedy Check the video connections of the source component. For HDMI - Pioneer SC-55 | Owner's Manual - Page 86
an error. Remedy The ambient noise level may be too high. Keep the noise level in the room as low as possible (see also Problems when using the Auto MCACC Setup on page 33 ). If the noise level cannot be kept low enough, you will have to set up the surround sound manually (page - Pioneer SC-55 | Owner's Manual - Page 87
7 ). Check that there are no obstacles between the receiver and the remote control. Make sure that there is no fluorescent or other strong light shining on to the remote sensor. Check the connections of the CONTROL IN jacks (see Operating other Pioneer components with this unit's sensor on page 30 - Pioneer SC-55 | Owner's Manual - Page 88
connect using the component or composite video jacks between source and receiver. If the problem still persists when connecting your HDMI component directly to your monitor, please consult the component or monitor manual or contact the manufacturer for support. If video images do not appear on your - Pioneer SC-55 | Owner's Manual - Page 89
AVNavigator to redetect the receiver. When the operating instructions Either refresh the page's work, try restarting your PC, and starting the installer (AVNV_XXX_xxx.exe) with no other applications active. Software updating does not operate well. There may be a problem with your Internet Service - Pioneer SC-55 | Owner's Manual - Page 90
specifications are not played back on this receiver (page 37). Connect the USB memory device and switch on this receiver (page 29). A USB hub is currently being used. This receiver does not support USB hubs (page 37). This receiver server. Refer to the operation manual supplied with your server. - Pioneer SC-55 | Owner's Manual - Page 91
control. Press HMG to set the remote control to the Home Media Gallery mode (page 48). SIRIUS radio messages Status messages Antenna Error Check Sirius Tuner Acquiring Signal Subscription Updating Updating Channels Invalid Channel Firmware Updating Causes Remedy The SIRIUS antenna is not - Pioneer SC-55 | Owner's Manual - Page 92
WLAN POW ERR is still displayed after repeating the above procedure several times, there is a problem with the receiver or the USB cable. Unplug the receiver from the wall and call a Pioneer authorized independent service company. The LAN cable is not firmly connected. ! Firmly connect the LAN cable - Pioneer SC-55 | Owner's Manual - Page 93
Error Track Not Found Server Error Server Disconnected empty Preset Not Stored Out of Range License Error full. Speaker Setting Guide In order to , on this receiver it is possible sound field will seem cramped. Testing by the Pioneer Multi-channel Research Group has shown that a good sense of sound - Pioneer SC-55 | Owner's Manual - Page 94
bass sound output from the problem instructions for more on audio connections. Set the display volume to minimum when using this configuration. Note ! If your display only has one HDMI terminal, you can only receive HDMI video from the connected component. ! Depending on the component, audio output - Pioneer SC-55 | Owner's Manual - Page 95
position. Adaptive Decorrelation slightly changes one surround channel's time and phase relationship with respect to the other surround channel. This expands the listening position and creates-with only two speakers- the same spacious surround experience as in a movie theatre. In case of SC-55 THX - Pioneer SC-55 | Owner's Manual - Page 96
Level is that certain sound elements can be lost that an electronic accessory has been designed to connect specifically to iPod, accessory with iPod, iPhone, or iPad may affect wireless performance. Apple, AirPlay, the AirPlay subsidiaries. All rights reserved. Service not available in Alaska and - Pioneer SC-55 | Owner's Manual - Page 97
Additional information 13 Auto Surround, ALC and Stream Direct with different input signal formats The following charts show what you will hear with different input signal formats, depending on the Stream Direct mode (see Using Stream Direct on page 44 ) you have selected. Stereo (2 channel) - Pioneer SC-55 | Owner's Manual - Page 98
by which signals can be transferred over HDMI cables. DTS-ES DTS-ES (the .1 channel surround sound from any matrixed stereo source (such as video or TV) sound field/ Improving the sound quality Phase Control The Phase Control technology incorporated into this receiver's design provides coherent sound - Pioneer SC-55 | Owner's Manual - Page 99
HDMI-compatible Pioneer TV or Blu-ray Disc player or with a component of another make that supports the Control with HDMI functions are possible when the component is connected to the receiver using an HDMI cable. ! The receiver's volume can be set and the sound can be muted using the TV's remote - Pioneer SC-55 | Owner's Manual - Page 100
instructions of your Bluetooth wireless technology device. ! Pairing is required when you first use the Bluetooth wireless technology device and Bluetooth ADAPTER. ! To enable Bluetooth communication, pairing should be done with both your system and Bluetooth wireless technology device. Receiver - Pioneer SC-55 | Owner's Manual - Page 101
48 . Pandora See Playback with Home Media Gallery on page 48 . DLNA See About network playback on page 50 . AirPlay See Using AirPlay on iPod touch on page 38 . Bluetooth ADAPTER See Bluetooth ADAPTER for Wireless Enjoyment of Music on page 41 . ARC (Audio Return Channel) See HDMI Setup on page 53 - Pioneer SC-55 | Owner's Manual - Page 102
lb) SC-55 17.4 kg (38.4 lb) Number of Furnished Parts MCACC Setup microphone 1 Remote control unit 1 AAA size IEC R03 dry cell batteries 2 iPod cable 1 AM loop antenna 1 FM wire antenna 1 Warranty card 1 Power cord CD-ROM (AVNavigator) These operating instructions Note ! Specifications and - Pioneer SC-55 | Owner's Manual - Page 103
code that matches the component you want to control, you can still teach the remote individual commands from another remote control (see Programming signals from other remote controls on page 64 ). TV Pioneer 0004, 0006, 0113, 0115, 0116, 0117, 0119, 0122, 0123 Admiral 0001, 0014 Adventura 0012 - Pioneer SC-55 | Owner's Manual - Page 104
2085 Lenoxx 2074, 2090 LG 2019, 2051, 2061, 2082, 2087 Liquid Video 2075 Liteon 2025, 2092 Magnavox 2067, 2076, 2091 Memorex 2066 Microsoft 2077 to conduct operations with the preset codes for the DVD, DVR (BDR, HDR). Pioneer 2159, 2160 Denon 2147, 2148, 2149 Hitachi 2144, 2145, 2146 JVC 2127, - Pioneer SC-55 | Owner's Manual - Page 105
Videosonic 1002 Viewsonic 1017 Voodoo 1017 Wards 1002, 1003, 1004, 1005 Yamaha 1000, 1001 Zenith 1013, 1018 ZT Group 1017 Satellite Set Top Box Pioneer 0126, 6097, 6098, 6145 Echostar 6002, 6089, 6036, 6005, 6003, 6004, ADB 6035, 6001 Akai 6102 Alba 6005, 6013, 6011 Allsat 6102 Alltech 6011 - Pioneer SC-55 | Owner's Manual - Page 106
13 Additional information CD (SACD) Pioneer 5065, 5066 AKAI 5043 Asuka 5045 Denon 5019 Fisher 5037 Technics 5041 Victor 5014 Yamaha 5024, 5025, 5038, 5046, 5047 CD-R Pioneer 5067 Philips 5054 Yamaha 5055 Cassete Deck Pioneer 5058, 5059, 5070 Digital Tape Pioneer 5069 MD Pioneer 5068 106 En - Pioneer SC-55 | Owner's Manual - Page 107
Additional information 13 En 107 - Pioneer SC-55 | Owner's Manual - Page 108
To register your product, find the nearest authorized service location, to purchase replacement parts, operating instructions, or accessories, please go to one of following URLs : Pour enregistrer votre produit, trouver le service après-vente agréé le plus proche et pour acheter des pièces de
-
 1
1 -
 2
2 -
 3
3 -
 4
4 -
 5
5 -
 6
6 -
 7
7 -
8
-
9
-
10
-
11
-
12
-
13
-
14
-
15
-
16
-
17
-
18
-
19
-
20
-
21
-
22
-
23
-
24
-
25
-
26
-
27
-
28
-
29
-
30
-
31
-
32
-
33
-
34
-
35
-
36
-
37
-
38
-
39
-
40
-
41
-
42
-
43
-
44
-
45
-
46
-
47
-
48
-
49
-
50
-
51
-
52
-
53
-
54
-
55
-
56
-
57
-
58
-
59
-
60
-
61
-
62
-
63
-
64
-
65
-
66
-
67
-
68
-
69
-
70
-
71
-
72
-
73
-
74
-
75
-
76
-
77
-
78
-
79
-
80
-
81
-
82
-
83
-
84
-
85
-
86
-
87
-
88
-
89
-
90
-
91
-
92
-
93
-
94
-
95
-
96
-
97
-
98
-
99
-
100
-
101
-
102
-
103
-
104
-
105
-
106
-
107
-
108
 |
 |

SC-
57
SC-
55