Pioneer SC-55 Owner's Manual - Page 94
Important information, regarding the HDMI, connection, Cleaning the unit
 |
View all Pioneer SC-55 manuals
Add to My Manuals
Save this manual to your list of manuals |
Page 94 highlights
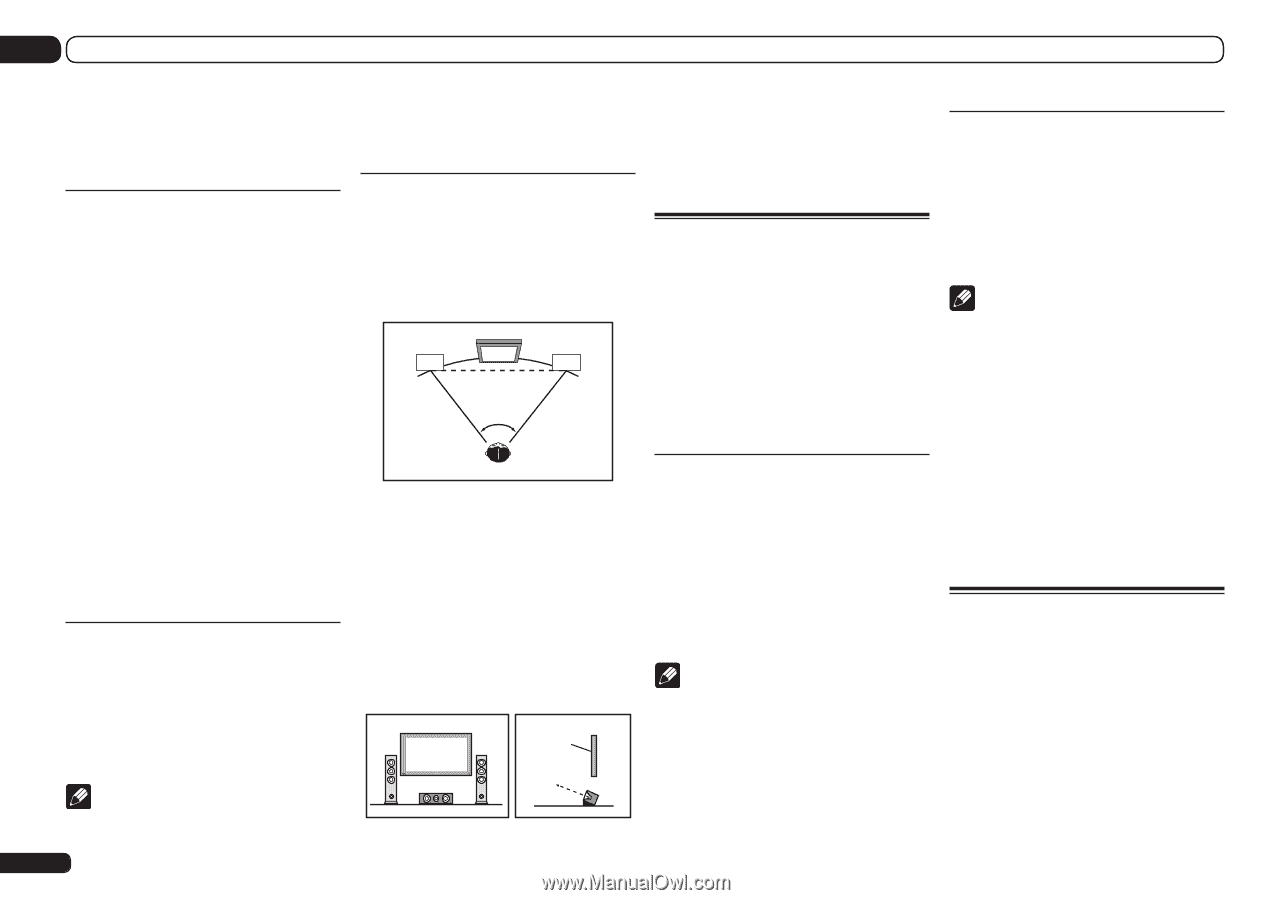
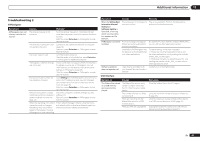
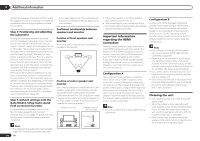
13 Additional information method the speakers will be pointed too inward. We suggest you use this example of installation as reference when trying out different installation methods. Step 4: Positioning and adjusting the subwoofer Placing the subwoofer between the center and front speakers makes even music sources sound more natural (if there is only one subwoofer, it doesn't matter if it is placed on the left or right side). The low bass sound output from the subwoofer is not directional and there is no need to adjust the height. Normally the subwoofer is placed on the floor. Put it in a position at which it will not cancel out the bass sound output from the other speakers. Also note that placing it near a wall may result in sympathetic vibrations with the building that could excessively amplify the bass sound. If the subwoofer must be installed near a wall, place it at an angle so that it is not parallel to the wall surface. This can help reduce any sympathetic vibrations, but depending on the shape of the room this could result in standing waves. However, even if standing waves are generated, their influence on the sound quality can be prevented using the Auto MCACC's standing wave control function (page 72). Step 5: Default settings with the Auto MCACC Setup (auto sound field correction) function It is more effective to perform the Full Auto MCACC Setup (page 32) and Precision Distance (SC-57 only) (page 73) procedure once the adjustments described above have been completed. Note ! The distance to the subwoofer may be slightly larger than the distance actually measured 94 En with a tape measure, etc. This is because this distance is corrected for electric delay, and is not a problem. Positional relationship between speakers and monitor Position of front speakers and monitor The front speakers should be as equidistant as possible to the monitor. L TV R 45° to 60° Position of center speaker and monitor Since mostly dialogs are output from the center speaker, keeping the center speaker as close as possible to the screen makes the overall sound more natural. For TVs using Braun tubes, however, when installing the center speaker on the floor, adjust its angle of elevation to point it towards the listening position. Installation on floor (Diagram as seen from the side) Monitor ! If the center speaker is not of the shielded type, install it away from the TV. ! When installing the center speaker on top of the monitor, place it facing slightly downwards towards the listening position. Important information regarding the HDMI connection There are cases where you may not be able to route HDMI signals through this receiver (this depends on the HDMI-equipped component you are connecting-check with the manufacturer for HDMI compatibility information). If you aren't receiving HDMI signals properly through this receiver (from your component), please try one of the following configurations when connecting up. Configuration A Use component video cables to connect the video output of your HDMI-equipped component to the receiver's component video input. The receiver can then convert the analog component video signal to a digital HDMI signal for transmission to the display. For this configuration, use the most convenient connection (digital is recommended) for sending audio to the receiver. See the operating instructions for more on audio connections. Note ! The picture quality will change slightly during conversion. Configuration B Connect your HDMI-equipped component directly to the display using an HDMI cable. Then use the most convenient connection (digital is recommended) for sending audio to the receiver. See the operating instructions for more on audio connections. Set the display volume to minimum when using this configuration. Note ! If your display only has one HDMI terminal, you can only receive HDMI video from the connected component. ! Depending on the component, audio output may be limited to the number of channels available from the connected display unit (for example audio output is reduced to 2 channels for a monitor with stereo audio limitations). ! If you want to switch the input function, you'll have to switch functions on both the receiver and your display unit. ! Since the sound is muted on the display when using the HDMI connection, you must adjust the volume on the display every time you switch input functions. Cleaning the unit ! Use a polishing cloth or dry cloth to wipe off dust and dirt. ! When the surface is dirty, wipe with a soft cloth dipped in some neutral cleanser diluted five or six times with water, and wrung out well, and then wipe again with a dry cloth. Do not use furniture wax or cleansers. ! Never use thinners, benzene, insecticide sprays or other chemicals on or near this unit, since these will corrode the surface.
-
 1
1 -
2
-
3
-
4
-
5
-
6
-
7
-
8
-
9
-
10
-
11
-
12
-
13
-
14
-
15
-
16
-
17
-
18
-
19
-
20
-
21
-
22
-
23
-
24
-
25
-
26
-
27
-
28
-
29
-
30
-
31
-
32
-
33
-
34
-
35
-
36
-
37
-
38
-
39
-
40
-
41
-
42
-
43
-
44
-
45
-
46
-
47
-
48
-
49
-
50
-
51
-
52
-
53
-
54
-
55
-
56
-
57
-
58
-
59
-
60
-
61
-
62
-
63
-
64
-
65
-
66
-
67
-
68
-
69
-
70
-
71
-
72
-
73
-
74
-
75
-
76
-
77
-
78
-
79
-
80
-
81
-
82
-
83
-
84
-
85
-
86
-
87
-
88
-
 89
89 -
 90
90 -
 91
91 -
 92
92 -
 93
93 -
 94
94 -
 95
95 -
 96
96 -
 97
97 -
 98
98 -
 99
99 -
100
-
101
-
102
-
103
-
104
-
105
-
106
-
107
-
108
 |
 |