Samsung CLP-510 User Manual (ENGLISH)
Samsung CLP-510 - Color Laser Printer Manual
 |
UPC - 635753700404
View all Samsung CLP-510 manuals
Add to My Manuals
Save this manual to your list of manuals |
Samsung CLP-510 manual content summary:
- Samsung CLP-510 | User Manual (ENGLISH) - Page 1
- Samsung CLP-510 | User Manual (ENGLISH) - Page 2
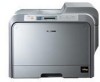
Step 1. Unpacking 3 Step 2. Understanding Your Printer 5 Step 3. Installing the Transfer Belt and Toner Cartridges 7 Step 4. Loading Paper 14 Step 5. Connecting a Printer Cable 17 For Local Printing 17 For Network Printing 18 Step 6. Turning the Printer On 19 Step 7. Printing a Demo Page - Samsung CLP-510 | User Manual (ENGLISH) - Page 3
CD-ROM Optimum Setup Guide SyncThru CD-ROM (CLP-510N only) SyncThru Quick Guide (CLP-510N only) NOTES: • If any items are missing or damaged, notify your dealer immediately. • Components may differ from one country to another. • The CD-ROM contains the printer driver, the User's Guide, and the - Samsung CLP-510 | User Manual (ENGLISH) - Page 4
surface - Away from direct airflow of air conditioners, heaters, or ventilators - Free of temperature, sunlight, and humidity extremes or fluctuations - Clean, dry, and free of dust CAUTION: You must place your printer on a level surface. If you do not, print quality problems can occur. 4 SETUP - Samsung CLP-510 | User Manual (ENGLISH) - Page 5
Top Cover (Open to install the transfer belt.) Paper Output Tray Output Support Top Cover Release Button Handle (Use it to lift the printer. Lifting handles are located at the lower edge of both sides of the printer.) Left Cover (Open fully to install toner cartridges and to press the top cover - Samsung CLP-510 | User Manual (ENGLISH) - Page 6
network card is not supplied with the printer. It is an option that must be purchased and installed separately. ** The network port is fitted as standard on the CLP-510N. CLP-510 users can purchase and install an optional network card separately. For details, see the User's Guide of the printer - Samsung CLP-510 | User Manual (ENGLISH) - Page 7
English Step 3. Installing the Transfer Belt and Toner Cartridges 1 Using the handle, completely open the left cover until it is at right angles to the main release button to unlatch the top cover and open it all the way. Remove the label on the transfer belt. Top cover release button SETUP GUIDE 7 - Samsung CLP-510 | User Manual (ENGLISH) - Page 8
3 Take the transfer belt out of the printer. NOTE: The image unit is already installed in your printer. 4 Remove the protective devices on both side of the transfer belt. 8 SETUP GUIDE - Samsung CLP-510 | User Manual (ENGLISH) - Page 9
expose the imaging unit to light for more than a few minutes. Close the top and left covers should the insallation need to be halted for any reason. 6 Holding the handle on the transfer belt, align it with the slots on either side of the inside of your printer. NOTE: Keep the transfer belt level. Do - Samsung CLP-510 | User Manual (ENGLISH) - Page 10
7 Slide the transfer belt down into the printer and press it firmly into place. 8 Firmly push the lock levers on each side toward the top cover, as shown below, to lock the transfer belt into place. CAUTION: If you leave the left cover open for more than a few minutes, the imaging unit can be - Samsung CLP-510 | User Manual (ENGLISH) - Page 11
that it is securely latched. CAUTION: Do not try to close the left cover with the top cover open. This may cause damage to the printer. 10 Take the toner cartridges out of their packages. CAUTION: Do not use sharp objects, such as a knife or scissors, to open the - Samsung CLP-510 | User Manual (ENGLISH) - Page 12
toner gets on your clothing, wipe it off with a dry cloth and wash it in cold water. Hot water sets toner into fabric. 13 On the right hand side of the toner cartridge slot is a label that identifies which color cartridge goes into each slot. K Black Y Yellow M Magenta C Cyan 12 SETUP GUIDE - Samsung CLP-510 | User Manual (ENGLISH) - Page 13
When printing text at 5% coverage, you can expect a toner cartridge life of about 3,000 pages or 7,000 pages for black and 2,000 pages or 5,000 pages for color. However, the toner cartridge that is shipped with the printer prints 3,000 pages for black and white, 2,000 pages for color. SETUP GUIDE 13 - Samsung CLP-510 | User Manual (ENGLISH) - Page 14
hold a maximum of 250 sheets of plain paper. You can use A4 and letter-sized paper. To load paper: 1 Pull the tray out of the printer. 2 Push down on the metal plate until it locks into position. 3 Flex the paper sheets back and forth to separate the pages and then fan - Samsung CLP-510 | User Manual (ENGLISH) - Page 15
English 4 Load paper with the print side facing up. Make sure that all four corners are flat in the tray and under the corner brackets, as shown below. 5 Do not exceed the maximum stack height. Overfilling the tray may cause a paper jam. SETUP GUIDE 15 - Samsung CLP-510 | User Manual (ENGLISH) - Page 16
it lightly touches the side of the stack. Do not press the guide too tightly against the edge of the paper as it will cause the the tray, refer to your printer's User's Guide on the CD-ROM. 7 Slide the tray back into the printer. NOTES: • Do not push the width guide far enough to cause the material - Samsung CLP-510 | User Manual (ENGLISH) - Page 17
on the back of the printer. 3 Connect the other end of the cable to the USB port on your computer. See your computer's User's Guide, if you need help. NOTE: To print using the USB interface, you must run Windows 98/Me/2000/2003/XP. See "Installing Printer Software in Windows" on page 22. SETUP - Samsung CLP-510 | User Manual (ENGLISH) - Page 18
You can attach your CLP-510 or CLP-510N printer to a network using an Ethernet cable (UTP cable with RJ.45 connector). The CLP-510N has a built-in network interface card. If you are a CLP-510 user, you need to install an optional network interface card. If you want to use the printer in both wired - Samsung CLP-510 | User Manual (ENGLISH) - Page 19
environment. For details about installing a wired/wireless network card, see your printer's User's Guide on the CD-ROM. NOTE: After connecting the printer, you need to configure the network parameters on the control panel. See your printer's User's Guide. You can use the software supplied with the - Samsung CLP-510 | User Manual (ENGLISH) - Page 20
button ( ) on the control panel for 2 seconds to print a demo page. A demo page showing the printer's features and capabilities is printed. Step 8. Changing the Display Language To change the language that is displayed on 6 Press the On Line/Continue button ( ) to return to ready mode. 20 SETUP GUIDE - Samsung CLP-510 | User Manual (ENGLISH) - Page 21
and Acrobat Reader to view the User's Guide. If you are printing from Windows: You can install the following printer software using the CD-ROM. • Printer driver for Windows. Use this driver to take full advantage of your printer's features. See page 22. • Status Monitor. Appears when printing errors - Samsung CLP-510 | User Manual (ENGLISH) - Page 22
4.0 are only supported on the CLP-510N. CAUTION: For the CLP-510N, to print a document in Windows 95 or Windows NT 4.0, you must install SyncThru and then add a network printer port. For details about installing SyncThru and adding a port, please refer to Network Management Software Quick Guide and - Samsung CLP-510 | User Manual (ENGLISH) - Page 23
the computer and turn the printer on. Then click Next. Windows XP If the printer is already connected and turned on, this screen will not appear. Skip to the next step. 3 Choose the installation type. •Typical: Installs the common software for your printer and User's Guide. This is recommended for - Samsung CLP-510 | User Manual (ENGLISH) - Page 24
Guide. If your computer doesn't have Adobe Acrobat, click on this option and it will automatically install Adobe Acrobat Reader for you. 4 After the installation is finished, a window a user of Samsung Printers in order to receive information from Samsung, select the checkbox and click Finish. You are now - Samsung CLP-510 | User Manual (ENGLISH) - Page 25
English Otherwise, just click Finish. NOTES: • If your printer doesn't work properly, reinstall the printer driver. • You can also print from Macintosh or Linux. For detailed information, refer to your printer's User's Guide on the CD-ROM. • After installation of the software, you can reinstall or - Samsung CLP-510 | User Manual (ENGLISH) - Page 26
fails. 1 From the Start menu, select Programs ➔ Samsung CLP- 510 Series. Or place the CD-ROM into the CD-ROM drive. 2 Select Maintenance. 3 Select Repair. NOTE: If your machine is not already connected to the computer, the following window will appear. • After connecting the machine, click Next - Samsung CLP-510 | User Manual (ENGLISH) - Page 27
. If you select Printer, the window asking you to print Samsung CLP- 510 Series. Or place the CD-ROM into the CD-ROM drive. 2 Select Maintenance. 3 Select Remove. You will see a component list so that you can remove components individually. If you want to uninstall the printer driver, check Printer - Samsung CLP-510 | User Manual (ENGLISH) - Page 28
. Changing the Display Language After installation of the software, you can change the display language. 1 From the Start menu, select Programs. 2 Select Samsung CLP-510 Series, and Language Selection. 3 Select the desired language from the language selection window and click OK. 28 SETUP GUIDE - Samsung CLP-510 | User Manual (ENGLISH) - Page 29
two-up page or article flow). You can also print the manual, if necessary. In Windows 1 From the Start menu, select Programs. 2 Select Samsung CLP-510 Series and View User's Guide. Adobe Acrobat automatically runs and then the User's Guide opens. NOTE: If your computer doesn't have Adobe Acrobat - Samsung CLP-510 | User Manual (ENGLISH) - Page 30
system, or try to read the User's Guide on a Windows system. 1. Click the icon at the bottom of the screen. When the terminal screen appears, type in: [root@local /root]# cd /mnt/cdrom(the CD-ROM directory) [root@local cdrom]# ./manual/acrobat4/INSTALL 2. After reading the license agreement, type - Samsung CLP-510 | User Manual (ENGLISH) - Page 31
- Samsung CLP-510 | User Manual (ENGLISH) - Page 32
or related to use of this manual. © 2004 Samsung Electronics Co., Ltd. All rights reserved. • CLP-510, CLP-510N, and Samsung logo are trademarks of Samsung Electronics Co., Ltd. • Centronics is a trademark of Centronics Data Computer Corporation. • Apple, TrueType, Laser Writer, and Macintosh are - Samsung CLP-510 | User Manual (ENGLISH) - Page 33
Country CANADA Customer Care Center 1-800-SAMSUNG (7267864) Web Site www.samsung.com/ca MEXICO 01-800-SAMSUNG (7267864) www.samsung.com/mx U.S.A 1-800-SAMSUNG (7267864) www.samsung.com ARGENTINE 0800-333-3733 www.samsung.com/ar BRAZIL 0800-124-421 www.samsung.com/br CHILE 800-726-7864 - Samsung CLP-510 | User Manual (ENGLISH) - Page 34
Site www.samsung.com/hu www.samsung.com/it www.samsung.lu www.samsung.com/nl www.samsung.com/no www.samsung.com/pl www.samsung.com/pt www.samsung.com/sk www.samsung.com/es www.samsung.com/se www.samsung.com/uk www.samsung.ru www.samsung.com/ur www.samsung.com/au www.samsung.com.cn www.samsung.com/hk - Samsung CLP-510 | User Manual (ENGLISH) - Page 35
of Control Panel Menus 2.6 Information Menu 2.6 Layout Menu 2.7 Printer Menu 2.8 Color Menu 2.9 Setup Menu 2.9 Network Menu 2.12 Chapter 3 : Using Print Materials Choosing Paper and the Tray 3.7 Using the Optional Tray 2 3.8 Using the Multi-purpose Tray 3.9 Using the Manual Feed 3.12 4 - Samsung CLP-510 | User Manual (ENGLISH) - Page 36
Card Stock or Custom-sized Materials ... 3.21 Chapter 4 : Printing Tasks Printer Driver Features 4.2 Printing a Document 4.3 Canceling a Print Job 4.4 Printer 5.17 Installing Status Monitor 5.17 Opening the Troubleshooting Guide 5.18 Changing the Status Monitor Program Setting ........ 5.18 5 - Samsung CLP-510 | User Manual (ENGLISH) - Page 37
the Waste Toner Container 6.11 Replacing the Imaging Unit 6.14 Replacing the Transfer Belt 6.22 Cleaning the Printer 6.29 Cleaning the Outside of the Printer 6.29 Cleaning the LSU Inside the Printer 6.29 Cleaning the Inside of the Printer 6.30 Replacement Parts 6.38 Managing the Printer from - Samsung CLP-510 | User Manual (ENGLISH) - Page 38
Method B.6 Uninstalling the Printer Driver B.7 Using the Configuration Tool B.8 Changing LLPR Properties B.10 Appendix C : Using Your Printer on a Network About Sharing the Printer on a Network C.2 Setting Up a Locally Shared Printer C.3 In Windows 95/98/Me C.3 In Windows NT 4.0/2000/2003/XP - Samsung CLP-510 | User Manual (ENGLISH) - Page 39
Appendix D : Installing Printer Options Installing Additional Printer Memory D.2 Removing a Memory DIMM D.6 Installing a Network Interface Card D.7 Installing an Optional Tray D.12 Appendix E : Specifications Printer Specifications E.2 Paper Specifications E.4 Overview E.4 Supported Sizes of - Samsung CLP-510 | User Manual (ENGLISH) - Page 40
above a Class I level during normal operation, user maintenance, or prescribed service condition. WARNING Never operate or service the printer with the protective cover removed from Laser/ Scanner assembly. The reflected beam, although invisible, can damage your eyes. When using this product - Samsung CLP-510 | User Manual (ENGLISH) - Page 41
need additional information about ozone, please contact your nearest Samsung dealer. Please recycle or dispose of packaging materials for purchase contract. This product should not be mixed with other commercial wastes for disposal. Mercury Safety LAMP(S) INSIDE THIS PRODUCT CONTAIN MERCURY AND - Samsung CLP-510 | User Manual (ENGLISH) - Page 42
comply with the limits for a Class B digital device, pursuant to Part 15 of the FCC rules. These limits are designed to provide reasonable energy and, if not installed and used in accordance with the instructions, may cause harmful interference to radio communications. However, there is no - Samsung CLP-510 | User Manual (ENGLISH) - Page 43
. United States of America Federal Communications Commission (FCC) Intentional emitter per FCC Part 15 wireless device (or devices), which may be embedded in your printer, is well below the RF exposure limits as set by the device. Wireless devices are not user serviceable. Do not modify them in any - Samsung CLP-510 | User Manual (ENGLISH) - Page 44
network (PSTN) in accordance with Directive 1999/5/EC. The product has been designed to work with the national PSTNs and compatible PBXs of the European countries: In the event of problems, you should contact the Euro QA Lab of Samsung present (embedded) in your printer system which is intended for - Samsung CLP-510 | User Manual (ENGLISH) - Page 45
wireless device or devices that may be embedded in you printer is well below the RF exposure limits as set by Netherlands, Portugal, Spain, Sweden and the United Accept EU Iceland, Liechtenstein, Norway and , and concerns for specific countries are listed in the specific country sections (or - Samsung CLP-510 | User Manual (ENGLISH) - Page 46
. In environments where the risk of interference to other devices or services is harmful or perceived as harmful, the option to use a device will void the authorization to use it. Please contact manufacturer for service. Only use drivers approved for the country in which the device will be used. See - Samsung CLP-510 | User Manual (ENGLISH) - Page 47
Color Laser Beam Printer (Product name) CLP-510, CLP-510N (Model Number) Manufactured at : 1) Samsung Electronics Co.,Ltd. #259, Gongdan-Dong, Gumi-City, Gyungbuk, KOREA. 730-030 2) Shandong Samsung is valid for all samples that are part of this declaration, which are manufactured according - Samsung CLP-510 | User Manual (ENGLISH) - Page 48
1 INTRODUCTION Congratulations on the purchase of your printer! This chapter includes: • Special Features • Printer Components - Samsung CLP-510 | User Manual (ENGLISH) - Page 49
at 6 ppm. • In duplex printing, your printer prints A4/Letter sized paper at 11.6 IPM (images per minute) for black & white and 6 IPM for color. Flexible paper handling • The Standard 250-sheet input tray (Tray1) and optional 500-sheet input tray (Tray2) supports A4/letter-sized paper. • The Multi - Samsung CLP-510 | User Manual (ENGLISH) - Page 50
You can also use an optional wireless network interface in both the CLP-510 and the CLP-510N. Print in various environments You can print in Windows 95/98/Me/NT 4.0/2000/2003/XP. Windows 95 and NT 4.0 are only supported on the CLP-510N. • Your printer is compatible with Macintosh and various Linux - Samsung CLP-510 | User Manual (ENGLISH) - Page 51
the transfer belt.) Paper Output Tray Output Support Top Cover Release Button Handle (Use it to lift the printer.) Left Cover (Open fully to install toner cartridges and to press the top cover release button.) Control Panel (See page 2.2.) Front Cover (Open to replace the waste toner container - Samsung CLP-510 | User Manual (ENGLISH) - Page 52
1 Right Side View Right Cover (Open to remove paper jams.) Muti-purpose Tray (Open to load special print materials.) Handle (Use it to lift the printer.) Optional Tray 2 Jam Cover (Open to remove jams from the optional tray 2.) INTRODUCTION 1.5 - Samsung CLP-510 | User Manual (ENGLISH) - Page 53
Port Power Receptacle * A wireless network card is not supplied with the printer. It is an option that must be purchased and installed separately. ** The network port is fitted as standard on the CLP-510N. CLP-510 users can purchase and install an optional network card separately. For details, see - Samsung CLP-510 | User Manual (ENGLISH) - Page 54
2 USING THE CONTROL PANEL This chapter describes how to use the printer's control panel. This chapter includes: • Understanding the Control Panel • Using Control Panel Menus - Samsung CLP-510 | User Manual (ENGLISH) - Page 55
is in Power Save mode, using less power. When a print job is received from the computer, or if any button is pressed, the printer switches to on-line. • To deactivate the Power Save mode or change the power-saving time, see page 2.9. See "Understanding Display Messages" on page 7.26 - Samsung CLP-510 | User Manual (ENGLISH) - Page 56
to ready mode. The color of the On Line/Continue button indicates the status of the printer. The printer is on-line and can problem is cleared, the printer resumes printing. If you want to ignore this warning, press this button. • The printer is off-line and cannot print. Off • The printer - Samsung CLP-510 | User Manual (ENGLISH) - Page 57
Button Description In menu mode, press to select the displayed sub menu item or to confirm the changed setting. The selected item is marked with an *. In menu mode, press to scroll through sub menu items or setting options. Pressing moves you to the next option and pressing the previous option. - Samsung CLP-510 | User Manual (ENGLISH) - Page 58
button ( ) repeatedly, or the Cancel button( ). After 60 seconds of inactivity (no key being pressed), the printer automatically returns to ready mode. NOTE: Print settings made from the printer driver on a connected computer override the settings on the control panel. USING THE CONTROL PANEL 2.5 - Samsung CLP-510 | User Manual (ENGLISH) - Page 59
IPX Frame Type Reset Network Default Set Print Net CFG * This menu only appears when a network card is fitted (CLP-510N or CLP-510 with an optional network card). Information Menu This menu contains information pages that you can print to give details about the printer and its configuration - Samsung CLP-510 | User Manual (ENGLISH) - Page 60
Item Demo Page Explanation The demo page allows you to check to see if your printer is printing properly. 2 Layout Menu Use the Layout menu to define all settings relating to output. (*: the default setting) Item Explanation Options: Off*, Long Edge, - Samsung CLP-510 | User Manual (ENGLISH) - Page 61
: In portrait orientation, appears on the left side of the page. In landscape orientation, appears in the upper line of the page. Printer Menu This menu allows you to reset the printer settings or cancel the current job. Item Explanation Default Set This menu item allows you to restore the - Samsung CLP-510 | User Manual (ENGLISH) - Page 62
: Allows you to manually calibrate the printer. This item allows you to adjust contrast, color by color. CMYK: Allows you to adjust the contrast of the toner in each toner cartridge. • Default: Optimizes colors automatically. • Manual Adjust: Allows you to manually adjust the color contrast for each - Samsung CLP-510 | User Manual (ENGLISH) - Page 63
Save Options: 5 Minutes, 10 Minutes, 15 Minutes, 30 Minutes, 45 Minutes, 60 Minutes, 120 Minutes * 30 Minutes for USA, 120 Minutes for Europe When the printer does not receive data for an extended period of time, power consumption is automatically lowered. You can set how long the - Samsung CLP-510 | User Manual (ENGLISH) - Page 64
unit. Maintenance Transfer Belt: allows you to check the total number of images printed of with the current transfer belt. Fuser, Transfer Roll., MP Pickroll , Tray1 Pickroll , Tray2 Pickroll: These items are only for service technicians. • Alarm Shortage: This item determines how the printer - Samsung CLP-510 | User Manual (ENGLISH) - Page 65
the network interface card installed in your printer according to how the network is set up. You can upgrade the firmware of the network interface card, and print the configuration. NOTE: This menu only appears when a network card is fitted (CLP-510N, or CLP-510 with an optional network card - Samsung CLP-510 | User Manual (ENGLISH) - Page 66
set IP Get Method to Static. This item lets you enter the IP address manually. Press the scroll button to set the value of 2 the 1st byte See "Configuring the Wireless Network" on page C.12 Note: This menu only appears when an optional wireless network interface card has been installed. USING - Samsung CLP-510 | User Manual (ENGLISH) - Page 67
• EN_8022: Select this value to use the IEEE 802.2 frame type. • EN_SNAP: Select this value to use the SNAP frame type. This item reboots the network interface card. This item performs a simple reset and restores the factory default for the network configuration. This item prints a page showing the - Samsung CLP-510 | User Manual (ENGLISH) - Page 68
3 USING PRINT MATERIALS This chapter will help you understand the types of paper you can use with your printer and how to properly load paper in the different paper trays for the best print quality. This chapter includes: • Choosing Paper and Other Materials • Loading - Samsung CLP-510 | User Manual (ENGLISH) - Page 69
of the paper tray. • Weight: Your printer supports paper weights as follows: -16~24lbs ( problems that may require service. This service will not be covered by the warranty or service agreements. Sizes and Capacities Size Plain Paper Input Source/Capacity* Tray 1 Tray 2 (option) Multi- Manual - Samsung CLP-510 | User Manual (ENGLISH) - Page 70
poor print quality. • Use cut-sheet paper only. You cannot use multi-part paper. • Use only high-quality, copier grade paper for the best print 3 withstand the printer's fusing temperature of 180°C (356°F) for 0.1 seconds without deteriorating. Do not use paper with a colored coating that - Samsung CLP-510 | User Manual (ENGLISH) - Page 71
Loading Paper Proper paper loading helps prevent paper jams and ensures trouble-free printing. Do not remove the paper tray while a job is printing 500 sheets of paper. 1 Pull the tray out of the printer. 2 Push down on the metal plate until it locks into position. 3.4 USING PRINT MATERIALS - Samsung CLP-510 | User Manual (ENGLISH) - Page 72
3 Flex the paper sheets back and forth to separate the pages, and then fan them while holding one edge. Tap the edge of the stack on a flat surface to even it up. 3 4 Load paper with the print side facing up. Make sure that all four corners are flat in the tray and under the corner brackets as shown - Samsung CLP-510 | User Manual (ENGLISH) - Page 73
it lightly touches the side of the stack. Do not press the guide too tightly against the edge of the paper as it may cause the paper in the tray, refer to page 3.7. 7 Slide the tray back into the printer. 8 When you print a document, select the paper type, size, and source in your software application - Samsung CLP-510 | User Manual (ENGLISH) - Page 74
the size to A4 or Letter, you must adjust the paper length guide properly. 1 Lift the paper length guide and place it in the correct position for the paper size you are loading. 3 Paper length guide To remove the paper length guide, turn it slightly to your right to release the locks on the - Samsung CLP-510 | User Manual (ENGLISH) - Page 75
shown and slide it to the stack of paper until it lightly touches the side of the stack. Do not push the guide too tightly against the edge of the paper as it may cause the paper to bend. Using the Optional Tray 2 The optional tray, Tray 2, can - Samsung CLP-510 | User Manual (ENGLISH) - Page 76
not using it, making the printer more compact. 3 Multi-purpose Tray The Multi-purpose Tray can hold several sizes and types of material, such as transparencies, cards, and envelopes. You may also want to use the Multi-purpose Tray for single page print jobs on letterhead, colored paper for use as - Samsung CLP-510 | User Manual (ENGLISH) - Page 77
the pages before loading. For transparencies, hold them by the edges and avoid touching the print side. Oils from your fingers can cause print quality problems. 3 Load the print material with the print side facing down and against the right edge of the tray. 4 Squeeze the paper width - Samsung CLP-510 | User Manual (ENGLISH) - Page 78
, the printed side should be facing up with the uncurled edge toward the printer. If you experience problems with the paper feeding, turn the paper around. NOTE: Make sure that you : After printing, fold away the paper support extension and close the Multi-purpose Tray. USING PRINT MATERIALS 3.11 - Samsung CLP-510 | User Manual (ENGLISH) - Page 79
changing print settings, you can manually load a sheet of print material in the Multi-purpose Tray. Manually loading paper can be helpful when against the right edge of the Multi-purpose Tray. 2 Squeeze the paper width guide and slide it to the right to touch lightly against the edge of the paper - Samsung CLP-510 | User Manual (ENGLISH) - Page 80
, set the paper source to Manual and select the correct paper size and type in the software application. For details, see page 4.7. 3 4 Print the document. The display shows a message prompting you to load paper. 5 Press the On Line/Continue button ( ). The printer picks up the print material and - Samsung CLP-510 | User Manual (ENGLISH) - Page 81
envelopes into the Multi-purpose Tray only. • Only use envelopes recommended for laser printers. Before loading envelopes in the Multi-purpose Tray, make sure that they on envelopes: 1 Open the Multi-purpose Tray and unfold the paper support. 2 Flex or fan the edge of the envelope stack to separate - Samsung CLP-510 | User Manual (ENGLISH) - Page 82
4 Squeeze the paper width guide and slide it to the right to touch lightly against the edge of the stack without causing it to bend. 3 5 When you print, set the - Samsung CLP-510 | User Manual (ENGLISH) - Page 83
use labels recommended for laser printers. • Verify that the can cause paper jams. Exposed adhesive can also cause damage to printer components. • Never print on the same sheet of labels more the Multi-purpose Tray and unfold the paper support. 2 Load labels in the Multi-purpose Tray only, with - Samsung CLP-510 | User Manual (ENGLISH) - Page 84
Printing on Transparencies • Only use transparencies recommended for use in laser printers. • Ensure that transparencies do not have torn edges and are use transparencies when printing color documents. NOTE: Before printing on transparencies, make sure that the output support is laid down. USING PRINT - Samsung CLP-510 | User Manual (ENGLISH) - Page 85
Open the Multi-purpose Tray and unfold the paper support. 2 Load transparencies into the Multi-purpose Tray only. They must be loaded with the print side downwards and the top with the white leading edge entering the printer first. Adjust the guide to fit the width of the transparencies. 3.18 USING - Samsung CLP-510 | User Manual (ENGLISH) - Page 86
sticking together, do not let the printed sheets stack up as they are printed out. • Place transparencies on a flat surface after removing them from the printer. USING PRINT MATERIALS 3.19 - Samsung CLP-510 | User Manual (ENGLISH) - Page 87
before it is sent through the printer (paper that has a preprinted logo emissions when subjected to the printer's fusing temperature of 180°C (356 flammable and should not adversely affect printer rollers. • Forms and letterhead and unfold the paper support. 2 Load letterhead in the Multi-purpose - Samsung CLP-510 | User Manual (ENGLISH) - Page 88
paper size in the software application. For details, see page 4.7. 3 Printing on Card Stock or Custom-sized Materials • Postcards, 3.5in. by 5.5in. (index) cards, and other customsized materials can be printed with your printer. The minimum size is 90mm by 140mm (3.5in. by 5.5in.) and the maximum - Samsung CLP-510 | User Manual (ENGLISH) - Page 89
To print on card stock: 1 Open the Multi-purpose Tray and unfold the paper support. 2 Load print material in the Multi-purpose Tray only, with the print side down and the short edge first. Slide the guide until it lightly touches the stack without causing it to bend. 3.22 USING PRINT MATERIALS - Samsung CLP-510 | User Manual (ENGLISH) - Page 90
the size of your print material is not listed in the Size box in the Paper tab, click the Custom button and set the size manually. See page 4.7. USING PRINT MATERIALS 3.23 - Samsung CLP-510 | User Manual (ENGLISH) - Page 91
MEMO 3.24 USING PRINT MATERIALS - Samsung CLP-510 | User Manual (ENGLISH) - Page 92
4 PRINTING TASKS This chapter explains printing options and common printing tasks. This chapter includes: • Printer Driver Features • Printing a Document • Printer Settings - Samsung CLP-510 | User Manual (ENGLISH) - Page 93
of copies The table below lists a general overview of features supported by your printer drivers. Feature Printer driver CUPS Win9x/Me Win2000/ 2003/XP NT4.0 Mac Color mode Y Y Y Y Print quality option Y Y Y Y Poster printing Y Y Y N Double-sided printing Y Y Y Y Booklet - Samsung CLP-510 | User Manual (ENGLISH) - Page 94
range. Make sure that your printer is selected. Windows XP 3 To take advantage of the printer features provided by your printer, click Properties or Peferences in the application's Print window. For details, see "Printer Settings" on page 4.5 If you see a Setup, Printer, or Options button in your - Samsung CLP-510 | User Manual (ENGLISH) - Page 95
or print spooler, such as the Printer group in Windows, delete the job as follows: 1 Click the Windows Start menu. 2 For Windows 9x/NT4.0/2000/Me, select Settings and then Printers. For Windows XP/2003, select Printers and Faxes. 3 Double-click the Samsung CLP-510 Series icon. 4 From the Document - Samsung CLP-510 | User Manual (ENGLISH) - Page 96
use the Samsung CLP-510 Series printer properties window, which allows you to access all of the printer options you need when using your printer. When the printer properties are displayed, you can review and change whatever settings are needed for your print job. The printer's properties window may - Samsung CLP-510 | User Manual (ENGLISH) - Page 97
on accessing printer properties. Click the Layout tab to display the layout properties shown below. 1 2 The preview image shows a sample want to use the printer driver's default setting, select Printer Setting. When you select the Reverse Duplex option, your printer reverses the order of - Samsung CLP-510 | User Manual (ENGLISH) - Page 98
for basic paper handling. See page 4.3 for more information about accessing printer properties. Click the Paper tab to display the paper properties shown below. listed in the Size box, click Custom. When the Custom Paper Size window appears, set the paper size and click OK. The setting then appears - Samsung CLP-510 | User Manual (ENGLISH) - Page 99
Tray1 in the Source option and MP Tray in the Different Source for First Page option. 6 Scaling Scaling allows you to automatically or manually scale your printer job on a page. You can choose from None, Scale Printing, and Fit to Page. For details, see page 5.4 and page 5.5. 4.8 PRINTING TASKS - Samsung CLP-510 | User Manual (ENGLISH) - Page 100
options to adjust the print quality for your specific printing needs. See page 4.3 for more information about accessing printer properties. Click the Graphics tab to display the graphics properties shown below. 1 2 4 3 Property 1 Resolution 2 Color Mode Description You can select the printing - Samsung CLP-510 | User Manual (ENGLISH) - Page 101
when you use Windows 9x. This option determines what the driver tells the printer about how to image the text in your document. Select the appropriate setting according to the status of your document. • Download as Bit Image: When this option is selected, the driver will download the font data - Samsung CLP-510 | User Manual (ENGLISH) - Page 102
as Graphics: When this option is selected, the driver will download any fonts as graphics. When printing documents with Black: When this option is selected, all text in your document prints solid in black, regardless of the color it appears on the screen. When this option is not selected, colored - Samsung CLP-510 | User Manual (ENGLISH) - Page 103
of the document. Reprint When Jammed: When this option is checked, the printer keeps the image for a printed page until the printer signals that the page has successfully exited the printer. When a paper jam occurs, the printer will reprint the last page sent from the computer after you clear the - Samsung CLP-510 | User Manual (ENGLISH) - Page 104
to display the copyright notice and the version number of the driver. If you have an Internet browser, you can connect to the Internet by clicking the website icon. See page 4.3 for more information about accessing printer properties. Using a Favorite Setting The Favorites option, which is visible - Samsung CLP-510 | User Manual (ENGLISH) - Page 105
that can be activated using the Help button in the printer properties window. The help screen gives you detailed information about the printer features provided by the printer driver. You can also click in the upper right hand corner of the window, and then click on any setting. 4.14 PRINTING TASKS - Samsung CLP-510 | User Manual (ENGLISH) - Page 106
5 ADVANCED PRINTING This chapter explains printing options and advanced printing tasks. This chapter includes: • Printing on Both Sides of Paper • Scaling Your Document • Fitting Your Document to a Selected Paper Size • Printing Multiple Pages on One Sheet of Paper • Printing Posters • Printing - Samsung CLP-510 | User Manual (ENGLISH) - Page 107
Edge 3 2 5 3 5 Short Edge NOTES: • Do not print on both sides of labels, transparencies, envelopes, or thick paper. Paper jamming and damage to the printer may result. • To use double-sided printing, you can use only the following paper sizes: A4, Letter, Legal, and Folio, with a weight of 20 - Samsung CLP-510 | User Manual (ENGLISH) - Page 108
properties. See page 4.3. 2 From the Layout tab, select the paper orientation. 3 From the Duplex[Double-Sided Printing] section, select either Printer Setting, None, Short Edge, or Long Edge. 5 4 Click the Paper tab and select the paper source, size, and type. 5 Click OK and print the document - Samsung CLP-510 | User Manual (ENGLISH) - Page 109
size of a page's content to appear larger or smaller on the printed page. 1 To change the print settings from your software application, access the printer properties. See page 4.3. 2 From the Paper tab, select Scale Printing from the Type drop-down list. 3 Enter the scaling rate in the Percentage - Samsung CLP-510 | User Manual (ENGLISH) - Page 110
can be useful when you want to check the fine details on a small document. 1 To change the print settings from your software application, access the printer properties. See page 4.3. 2 From the Paper tab, select Fit to Page from the Type drop-down list. NOTE: This feature is not available when - Samsung CLP-510 | User Manual (ENGLISH) - Page 111
the order you specify. You can print up to 16 pages on one sheet. 1 To change the print settings from your software application, access the printer properties. See page 4.3. 2 From the Layout tab, choose Multiple Pages per Side from the Type drop-down list. NOTE: This feature is not available when - Samsung CLP-510 | User Manual (ENGLISH) - Page 112
the purpose of pasting the sheets together to form one poster-sized document. 1 To change the print settings from your software application, access the printer properties. See page 4.3. 2 From the Layout tab, select Poster from the Type drop- down list. NOTE: This feature is not available when you - Samsung CLP-510 | User Manual (ENGLISH) - Page 113
3 Configure the poster option: You can select the page layout from 2x2, 3x3, or 4x4. If you select 2x2, the image is automatically stretched to cover 4 physical pages. Specify an overlap in millimeters or inches to make it easier to pasting the sheets together. 0.1 inches 0.1 inches 4 - Samsung CLP-510 | User Manual (ENGLISH) - Page 114
the paper can be folded in half after printing to produce a booklet. 1 To change the print settings from your software application, access the printer properties. See page 4.3. 2 From the Layout tab, choose Booklet Printing from the Type drop-down list. 5 NOTES: • The booklet printing option is - Samsung CLP-510 | User Manual (ENGLISH) - Page 115
pages of a document. There are several predefined watermarks that come with your printer, and they can be modified or you can add new ones to the see the selected watermark in the preview image. Preview image 3 Click OK and start printing. NOTE: The preview image shows how the page will look when - Samsung CLP-510 | User Manual (ENGLISH) - Page 116
printer properties. See page 4.3. 2 Click the Extras tab and click the Edit Watermarks button in the Watermark section. The Watermarks window 4 Select the watermark options. You can select the font name, style, color, grayscale level, and size from the Font Attributes section and set the angle - Samsung CLP-510 | User Manual (ENGLISH) - Page 117
page 5.11. 4 Click Update to save the changes. 5 Click OK until you exit the Print window. Deleting a Watermark 1 To change the print settings from your software application, access the printer properties. See page 4.3. 2 From the Extras tab, click the Edit Watermarks button in the Watermark section - Samsung CLP-510 | User Manual (ENGLISH) - Page 118
. 1 Create or open a document containing text or an image for use in a new page overlay. Position the items exactly as you wish them to appear when printed as an overlay. 2 To save the document as an overlay, access the printer properties. See page 4.3. 3 Click the Extras tab and click the Edit - Samsung CLP-510 | User Manual (ENGLISH) - Page 119
, click Create Overlay. 5 In the Create Overlay window, type a name of up to eight characters in the File name box. Select the destination path, if necessary. (The default is C:\Formover). 6 Click Save. The - Samsung CLP-510 | User Manual (ENGLISH) - Page 120
to print. 2 To change the print settings from your software application, access the printer properties. See page 4.3. 3 Click the Extras tab. 4 Select an overlay , you can also load the file when you access this Load Overlay window. After you select the file, click Open. The file appears in the - Samsung CLP-510 | User Manual (ENGLISH) - Page 121
7 Click OK or Yes until the printing starts. The selected overlay downloads with your print job and prints on your document. NOTE: The resolution You can delete page overlays that you no longer use. 1 In the printer properties window, click the Extras tab. 2 Click the Edit Overlays button in the - Samsung CLP-510 | User Manual (ENGLISH) - Page 122
follows: 1 From the Start menu, select Programs ➔ Samsung CLP- 510 Series. Or place the CD-ROM into the CD-ROM drive. 2 Select Maintenance. 3 Select Repair. NOTE: If your printer is not already connected to the computer, the following window will appear. • After connecting the machine, click - Samsung CLP-510 | User Manual (ENGLISH) - Page 123
Programs ➔ Samsung CLP510 Series ➔ Troubleshooting guide. Changing the Status Monitor Program Setting Select the Status Monitor icon on the Windows task bar and right-click on the Status Monitor icon. Select Option. The following window opens: • Display when job is finished for network printer shows - Samsung CLP-510 | User Manual (ENGLISH) - Page 124
causes the computer to check the printer status more frequently, thereby allowing a faster response to any printer error. NOTE: When the Status job or view the corresponding solution. If you select Cancel Printing, turn the printer off and then click OK. It may take several minutes. Note that this - Samsung CLP-510 | User Manual (ENGLISH) - Page 125
MEMO 5.20 ADVANCED PRINTING - Samsung CLP-510 | User Manual (ENGLISH) - Page 126
includes: • Printing a Configuration Page • Replacing Supplies • Managing Toner Cartridges • Replacing Toner Cartridges • Replacing the Waste Toner Container • Replacing the Imaging Unit • Replacing the Transfer Belt • Cleaning the Printer • Replacement Parts • Managing the Printer from the Website - Samsung CLP-510 | User Manual (ENGLISH) - Page 127
can print a configuration page from the printer's control panel. Use the configuration page to view the current settings, to help troubleshoot problems, or to verify the installation of ) when "Configuration" displays on the bottom line. A configuration page prints out. 6.2 MAINTAINING YOUR PRINTER - Samsung CLP-510 | User Manual (ENGLISH) - Page 128
6.8 12,000 pages Waste toner container Replace/Install Waste Toner Tank for black and 3,000 pages for 6.11 color** 50,000 pages 6 Imaging Unit Replace Imaging Unit for black and 12,500 pages 6.14 for color** Transfer Belt Replace Transfer Belt 50,000 pages for black and 12,500 pages - Samsung CLP-510 | User Manual (ENGLISH) - Page 129
cartridge depends on the amount of toner that your print jobs require. When printing text at 5% coverage, a new toner cartridge lasts an average of 3,000 or 7,000 pages for black and 2,000 or 5,000 pages for each color. The starter toner cartridge supplied with the printer lasts an average of 3,000 - Samsung CLP-510 | User Manual (ENGLISH) - Page 130
areas may appear. It is also possible that colored images may be printed with incorrect colors due to flawed mixing of toner colors when one of the colored toner cartridges is low on toner. "Ready [Color] Low Toner" appears on the display. The printer is able to continue to print using the current - Samsung CLP-510 | User Manual (ENGLISH) - Page 131
, but when you are ready to lift it out of the printer, transfer your grip to the body of the cartridge, and lift it out with both hands. CAUTION: If you leave the left cover open for more than a few minutes, the imaging unit can be exposed to light. This will cause damage to - Samsung CLP-510 | User Manual (ENGLISH) - Page 132
cartridge back into the printer. 5 Close the left cover. Make sure that the cover is securely latched. 6 If you have installed the toner cartridges incorrectly, the left cover will not close properly. Check again to make sure the cartridge colors correspond to those marked on the right hand side - Samsung CLP-510 | User Manual (ENGLISH) - Page 133
, but when you are ready to lift it out of the printer, transfer your grip to the body of the cartridge, and lift it out with both hands. CAUTION: If you leave the left cover open for more than a few minutes, the imaging unit can be exposed to light. This will cause damage to - Samsung CLP-510 | User Manual (ENGLISH) - Page 134
cartridge, gently roll it from side to side to evenly distribute the toner. 6 6 Place the toner cartridge on a flat surface, as shown, and remove the paper covering the toner cartridge by removing the tape. NOTE: If toner gets on your clothing, wipe it off with a dry cloth and wash it in cold water - Samsung CLP-510 | User Manual (ENGLISH) - Page 135
the color of the toner cartridge matches the color slot and then slide the new toner cartridge into the printer. Using both hands, insert the cartridge into the slot. Then use the handle to slide the cartridge in. When the toner cartridges are correctly installed, the yellow and black cartridges - Samsung CLP-510 | User Manual (ENGLISH) - Page 136
Replacing the Waste Toner Container The life of the waste toner container is approximately 12,000 pages for black and 3,000 pages for color. Replace the waste toner container when the control panel displays "Replace/Install Waste Toner Tank". 1 Unlatch the front cover by quickly pressing and - Samsung CLP-510 | User Manual (ENGLISH) - Page 137
3 Remove the container's attached caps, as shown below, and use them to close the waste toner container. 4 Take a new waste toner container out of its package. 5 Insert the lower end of the new container into place and then push the upper end. Make sure that it - Samsung CLP-510 | User Manual (ENGLISH) - Page 138
7 Close the front cover. Make sure that the cover is securely latched. 8 Using the handle, completely open the left cover until it is at right angles to the main frame. The toner cartridges will disengage automatically. 6 9 Close the left cover firmly. MAINTAINING YOUR PRINTER 6.13 - Samsung CLP-510 | User Manual (ENGLISH) - Page 139
Replacing the Imaging Unit The life of the imaging unit is approximately 50,000 pages for black and 12,500 pages for color. Replace the imaging unit when the printer control panel displays "Replace Imaging Unit". 1 Turn the printer off, then wait a few minutes for the printer to cool. 2 Using the - Samsung CLP-510 | User Manual (ENGLISH) - Page 140
3 Press the top cover release button to unlatch the top cover and open it all the way. 4 Pull the lock levers on each side toward you, as shown 6 below, to release the transfer belt. MAINTAINING YOUR PRINTER 6.15 - Samsung CLP-510 | User Manual (ENGLISH) - Page 141
5 Using the handle, lift the transfer belt out of the printer by lightly pulling it toward the left of the printer. Set it on a clean flat surface. 6 Lift the handle of the used imaging unit and use it to lift the imaging unit out of the printer. 6.16 MAINTAINING YOUR PRINTER - Samsung CLP-510 | User Manual (ENGLISH) - Page 142
Cover it with black paper, if necessary. • Close the top and left covers should the insallation needs to be 6 halted for any reason. • Do not touch the surface of the green roller on the imaging unit, or print quality problems can occur. 9 Locate the imaging unit slots inside the printer, one on - Samsung CLP-510 | User Manual (ENGLISH) - Page 143
10 Hold the handle of the new imaging unit with the green roller facing you. Align the imaging unit with the slots in your printer so that the colors on both sides of the imaging unit slide into the corresponding colors of the slots. CAUTION: Insert the imaging unit carefully so as not to scratch or - Samsung CLP-510 | User Manual (ENGLISH) - Page 144
12 To reinstall the transfer belt, hold its handle and then align it with the slots on either side of the inside of your printer. 6 NOTE: Do not turn the transfer belt over, or loose toner may be spilled. 13 Slide the transfer belt down into the printer and press it firmly into place. MAINTAINING - Samsung CLP-510 | User Manual (ENGLISH) - Page 145
below, to lock the transfer belt into place. 15 After making sure that the left cover is open, close the top cover. Make sure that it is securely latched. CAUTION: Do not try to close the left cover with the top cover open. This may cause damage to the printer. 6.20 MAINTAINING YOUR - Samsung CLP-510 | User Manual (ENGLISH) - Page 146
16 Close the left cover firmly. 17 Turn the printer on. NOTE: After replacing the imaging unit, your printer will automatically reset the image counter for the imaging unit. 6 MAINTAINING YOUR PRINTER 6.21 - Samsung CLP-510 | User Manual (ENGLISH) - Page 147
Replacing the Transfer Belt The life of the transfer belt is approximately 50,000 black pages and 12,500 color pages. Replace the transfer belt when the control panel displays "Replace Transfer Belt". To replace the transfer belt: 1 Turn the printer off, then wait a few minutes for the printer to - Samsung CLP-510 | User Manual (ENGLISH) - Page 148
3 Press the top cover release button to unlatch the top cover and open it all the way. 4 Pull the lock levers on each side toward you, as shown below, to release the transfer belt. 6 MAINTAINING YOUR PRINTER 6.23 - Samsung CLP-510 | User Manual (ENGLISH) - Page 149
5 Using the handle, lift the used transfer belt out of the printer by lightly pulling it toward the left of the printer. NOTE: Keep the transfer belt level. Do not turn the transfer belt over, or loose toner may be spilled. 6 Take a new transfer belt out of the package. 7 Remove the paper covering - Samsung CLP-510 | User Manual (ENGLISH) - Page 150
tension levers on both sides of the transfer belt. Then, pull them out as shown below. 9 Locate the transfer belt slots inside the printer, one on each side. 6 CAUTION: To prevent damage, do not expose the imaging unit to light for more than a few minutes. Close the top and left covers should the - Samsung CLP-510 | User Manual (ENGLISH) - Page 151
Hold the handle on the new transfer belt and then align it with the slots on either side of the inside of your printer. NOTE: Keep the transfer belt level. Do not turn the transfer belt over, or loose toner may be spilled. 11 Slide the new transfer belt down into the printer and press it firmly into - Samsung CLP-510 | User Manual (ENGLISH) - Page 152
12 Firmly push the lock levers on each side toward the top cover, as shown below, to lock the transfer belt into place. 13 After making sure that the left cover is open, close the top 6 cover. Make sure that it is securely latched. CAUTION: Do - Samsung CLP-510 | User Manual (ENGLISH) - Page 153
14 Close the left cover firmly. 15 Turn the printer on. NOTE: After replacing the transfer belt, your printer will automatically reset the image counter for the transfer belt. 6.28 MAINTAINING YOUR PRINTER - Samsung CLP-510 | User Manual (ENGLISH) - Page 154
. Over time, this build-up can cause print quality problems such as toner specks or smearing. Your printer has a cleaning mode that can correct and prevent these types of problems. Cleaning the Outside of the Printer Clean the cabinet of the printer with a soft and lint-free cloth. You can dampen - Samsung CLP-510 | User Manual (ENGLISH) - Page 155
2 Close the left cover firmly. Cleaning the Inside of the Printer NOTE: While cleaning the inside of the printer, be careful not to touch the transfer roller. Oil from your fingers can cause print quality problems. 1 Turn the printer off and unplug the power cord, then wait a few minutes for the - Samsung CLP-510 | User Manual (ENGLISH) - Page 156
them out with both hands. Set them on a clean flat surface. 4 Press the top cover release button to unlatch the top cover and open it all the way. 6 CAUTION: If you leave the left cover open for more than a few minutes, the imaging unit can be exposed to light. This will cause damage - Samsung CLP-510 | User Manual (ENGLISH) - Page 157
5 Pull the lock levers on each side toward you, as shown below, to release the transfer belt. 6 Using the handle, lift the transfer belt out of the printer by lightly pulling it toward the left of the printer. Set it on a clean flat surface. 6.32 MAINTAINING YOUR PRINTER - Samsung CLP-510 | User Manual (ENGLISH) - Page 158
needs to be halted for any reason. • Do not touch the surface of the green roller on the imaging unit, or print quality problems can occur. 8 Look inside the printer. Remove any dust, paper particles, and spilled toner with a damp, soft lint-free cloth, or small vacuum cleaner. MAINTAINING YOUR - Samsung CLP-510 | User Manual (ENGLISH) - Page 159
of the green roller on the imaging unit. 10 Insert the transfer belt back into the printer. Press it firmly to make sure it fits into place. For details, see steps 9 and 10 on page 6.25~6.26. NOTE: Keep the transfer belt level. Do not turn the transfer belt over, or loose toner may be spilled. 6.34 - Samsung CLP-510 | User Manual (ENGLISH) - Page 160
11 Firmly push the lock levers on each side toward the top cover, as shown below, to lock the transfer belt into place. 6 12 After making sure that the left cover is open, close the top cover. Make sure that it is securely latched. CAUTION: Do - Samsung CLP-510 | User Manual (ENGLISH) - Page 161
13 Look inside the printer on the right and then locate the colors of the toner cartridges that matches the colors of the slots. K Black Y Yellow M Magenta C Cyan 14 Holding each toner cartridge with both hands, insert them into their corresponding positions in the following order: Cyan, - Samsung CLP-510 | User Manual (ENGLISH) - Page 162
15 Close the left cover. Make sure that it is securely latched. If you have installed the toner cartridges incorrectly, the left cover will not close properly. Check again to make sure the cartridge colors correspond to those marked on the right hand side. Never force the cover closed. 16 Plug the - Samsung CLP-510 | User Manual (ENGLISH) - Page 163
below. Item Pick-up roller Transfer roller Fuser unit Yield (Average) Approx. 150,000 pages Approx. 50,000 pages Approx. 100,000 black pages (50,000 color pages) To purchase replacement parts, contact your Samsung dealer or the retailer where you bought your printer. We strongly recommend that - Samsung CLP-510 | User Manual (ENGLISH) - Page 164
or alerts to a specified address. You can also send an order for toner to a specified address. An SMTP server should be used to send these messages. To set up the E-mail notification feature: 1 On the printer's web page, click Machine Settings. 2 Click E-mail Notification Setup. 3 Fill in the - Samsung CLP-510 | User Manual (ENGLISH) - Page 165
the e-mail address of a service center or service representative. • Consumable Shortage Warning: Select to whom the printer will send a warning message when approximately 10% of a consumable item remains. • Consumable & Printer Setup Review: Select to whom the printer will send the status message - Samsung CLP-510 | User Manual (ENGLISH) - Page 166
Setting the Contact Information tab Select the Support tab to know and enter some information in the Contact Information section. • Name: Address: enter the sender's e-mail address. NOTE: It is possible that Firewall in the network will prevent e-mail transmission. 6 MAINTAINING YOUR PRINTER 6.41 - Samsung CLP-510 | User Manual (ENGLISH) - Page 167
MEMO 6.42 MAINTAINING YOUR PRINTER - Samsung CLP-510 | User Manual (ENGLISH) - Page 168
do if you encounter an error while using your printer. This chapter includes: • Troubleshooting Checklist • Solving General Printing Problems • Clearing Paper Jams • Solving Print Quality Problems • Understanding Display Messages • Common Windows Problems • Common Macintosh Problems • Common Linux - Samsung CLP-510 | User Manual (ENGLISH) - Page 169
you are using the proper printer driver and communication port. If the page is interrupted during printing, go to "Solving General Printing Problems" on page 7.3. If completing the checklist does not resolve the printer problem, check the following troubleshooting sections. • See "Solving General - Samsung CLP-510 | User Manual (ENGLISH) - Page 170
for suggested solutions. Problem Possible Cause Solution The printer does not print. The printer is not receiving power. Check the power cord connections. Check the power switch and the power source. The printer is not selected as the default printer. Select Samsung CLP-510 Series as your - Samsung CLP-510 | User Manual (ENGLISH) - Page 171
or network port to improve print speed. Your printer prints A4-sized paper at 24 ppm and letter-sized paper at 25 ppm in black & white mode. In color mode, A4/ letter-sized paper prints at 6 ppm. From the Start menu, choose Settings and Printers. Right-click the Samsung CLP510 Series printer icon - Samsung CLP-510 | User Manual (ENGLISH) - Page 172
board, may be defective. Contact a service representative. The illustrations print incorrectly in Adobe Illustrator. The setting in the software application is wrong. Select Download as Bit Image in the Advanced Options window of the graphic properties. Print the document. SOLVING PROBLEMS 7.5 - Samsung CLP-510 | User Manual (ENGLISH) - Page 173
the photo size and then improve the resolution. After printing about 100 color pages, there will be no more smell. It is a temporary problem. Clearing Paper Jams NOTE: When removing paper that is jammed in the printer, if possible always pull the paper in the direction that it normally moves - Samsung CLP-510 | User Manual (ENGLISH) - Page 174
to step 6. 7 If you cannot find the jammed paper, or if there is any resistance removing the paper, stop pulling and go to step 3. SOLVING PROBLEMS 7.7 - Samsung CLP-510 | User Manual (ENGLISH) - Page 175
3 Pull the tray open. After you pull it all the way out, lift up the front part of the tray slightly to release the tray from the printer. 4 Remove the jammed paper by gently pulling it straight out as shown below. 5 To replace the tray, lower the rear edge, align it with the - Samsung CLP-510 | User Manual (ENGLISH) - Page 176
printer detects that there is either no paper or the paper is improperly loaded. If the paper is not feeding properly, pull the paper out of the printer . To resume printing, open and close the right cover. Inside the Printer If paper is jammed inside the printer, "Jam Inside Printer" - Samsung CLP-510 | User Manual (ENGLISH) - Page 177
: If the paper tears, make sure that all of the paper fragments are removed from the printer. 3 Close the right cover. The printer will resume printing. In the Paper Exit Area If paper is jammed in the paper exit area resistance removing the paper, stop pulling and go to step 2. 7.10 SOLVING PROBLEMS - Samsung CLP-510 | User Manual (ENGLISH) - Page 178
2 Using the handle, completely open the left cover until it is at right angles to the main frame. The toner cartridges will disengage automatically. CAUTION: If the left cover is not completely open, the top cover release button will remain locked. 3 Press the top cover - Samsung CLP-510 | User Manual (ENGLISH) - Page 179
4 Carefully take the jammed paper out of the printer. The fuser is hot! CAUTION: Do not touch the fuser. It is hot and could cause burns! The fuser's operating temperature is 180°C (356° F). Take care when removing paper from the printer. 5 After making sure that the left cover is open, close the - Samsung CLP-510 | User Manual (ENGLISH) - Page 180
6 Close the left cover firmly. 7 Open and close the right cover to resume printing. 7 In the Duplex Area If paper is jammed in the duplex area, "Jam In Duplex Path" appears on the display. 1 Using the handle, open the right cover. SOLVING PROBLEMS 7.13 - Samsung CLP-510 | User Manual (ENGLISH) - Page 181
paper tears, make sure that all of the paper fragments are removed from the printer. If you cannot find the jammed paper, or if there is any resistance cover until it is at right angles to the main frame. The toner cartridges will disengage automatically. CAUTION: If the left cover is not completely - Samsung CLP-510 | User Manual (ENGLISH) - Page 182
unlatch the top cover and open it all the way. 5 Locate the jammed paper, and then carefully take it out of the printer. 7 The fuser is hot! CAUTION: Do not touch the fuser. It is hot and could cause burns! The fuser's operating temperature is 180°C (356°F). Take care when removing paper from the - Samsung CLP-510 | User Manual (ENGLISH) - Page 183
that it is securely latched. CAUTION: Do not try to close the left cover with the top cover open. This may cause damage to the printer. 7 Close the left cover firmly. 8 Close the right cover. The printer will resume printing. 7.16 SOLVING PROBLEMS - Samsung CLP-510 | User Manual (ENGLISH) - Page 184
. 2 Remove the jammed paper in the direction shown below. To avoid the paper tearing, pull it out gently and slowly. Close the right cover. The printer will resume printing. 7 If you cannot find the jammed paper, or if there is any resistance removing the paper, stop pulling and go to step - Samsung CLP-510 | User Manual (ENGLISH) - Page 185
3 Open the outer jam cover in Tray 2. 4 Open the inner cover of Tray 2. 5 Pull the jammed paper out in the direction shown. To avoid the paper tearing, pull it out gently and slowly. 7.18 SOLVING PROBLEMS - Samsung CLP-510 | User Manual (ENGLISH) - Page 186
the paper, stop pulling and continue to step 7. 7 Pull the optional tray2 open. After you pull it all the way out, lift up the front part of the tray slightly to release the tray from the printer. 7 SOLVING PROBLEMS 7.19 - Samsung CLP-510 | User Manual (ENGLISH) - Page 187
8 If you see the jammed paper, remove the paper from the printer by gently pulling it straight out as shown below. 9 Slide the tray back into the printer and close the two jam covers. 10 Open and close the right cover. The printer will resume printing. 7.20 SOLVING PROBLEMS - Samsung CLP-510 | User Manual (ENGLISH) - Page 188
7.6. • Follow the procedures on page 3.4. Ensure that the adjustable guides are positioned correctly. • Do not overload the paper tray. Ensure types in a tray. • Use only recommended print materials. See "Paper Specifications" on page E.4. • Ensure that the print side is facing down when loading - Samsung CLP-510 | User Manual (ENGLISH) - Page 189
Solving Print Quality Problems Dirt inside of the printer or improper paper loading may reduce print quality. See the table below to troubleshoot the problem. Problem Light or faded print AaBbCc AaBbCc AaBbCc AaBbCc AaBbCc Toner specs AaBbCc AaBbCc AaBbCc AaBbCc AaBbCc Dropouts AaBbCc AaBbCc AaBbCc - Samsung CLP-510 | User Manual (ENGLISH) - Page 190
old imaging unit and install a new one. See "Replacing the Imaging Unit" on page 6.14. Toner smear • Clean the inside of the printer. See "Cleaning the Inside of the Printer" on page 6.30 • Check the paper type and quality. See "Paper Specifications" on page E.4. • Remove the transfer belt and - Samsung CLP-510 | User Manual (ENGLISH) - Page 191
through your software application or via the printer properties window. Misformed characters • If characters are improperly formed and producing hollowed images, the paper stock may be too slick. Try a different paper. See "Paper Specifications" on page E.4. • If characters are improperly formed - Samsung CLP-510 | User Manual (ENGLISH) - Page 192
Problem Back of printouts are dirty Solution • The transfer roller may be dirty. See "Cleaning the Inside of the Printer" on page 6.30. • Check for leaking toner. Clean the inside of the printer. Solid Color or Black pages A • The imaging unit may not be installed properly. Remove the imaging - Samsung CLP-510 | User Manual (ENGLISH) - Page 193
printer is empty and the printer working. Replace the corresponding toner cartridge with a new one. See page 6.8. A problem has occurred in the development motor of the printer. Unplug the power cord and plug it in again. If the problem persists, call for service. The temperature in the fuser - Samsung CLP-510 | User Manual (ENGLISH) - Page 194
belt. Invalid Imaging Unit An invalid imaging unit is installed. Only install a Samsung-approved imaging unit, designed for your printer. If you have installed an approved imaging unit and this error still occurs, contact an authorized service agent. Invalid Transfer Belt Invalid Toner [Color - Samsung CLP-510 | User Manual (ENGLISH) - Page 195
Lever Unlocking Error After installing a transfer belt, the lock levers has not been locked. Push the lock levers on each side away from you, referring to page 6.27. Press Continue Button The printer is waiting for the user's action before printing from the manual feeder. Load a sheet of print - Samsung CLP-510 | User Manual (ENGLISH) - Page 196
replace the imaging unit. Replace MP The life span of the MP Contact a service representative. 7 Pick-Roller pickup roller has expired. Replace Transfer Belt The life span of the transfer belt has expired. Replace the transfer belt with a new one. See page 6.22. Replace Transfer Belt Soon - Samsung CLP-510 | User Manual (ENGLISH) - Page 197
transfer belt is properly seated. After turn the printer off and then back on, reinstall the optional tray2. If the message persists, contact a service representative. Close Tray2 cover firmly. A problem has occurred in Contact a service representative. the waste toner motor. The waste toner - Samsung CLP-510 | User Manual (ENGLISH) - Page 198
Macintosh Problems Problem Possible Cause and Solution The printer does not print a document from Acrobat Reader. You should change the Print Method option to Print as Image when you print with Acrobat Reader. The document is printed, but the print job does not disappear from the spooler in Mac - Samsung CLP-510 | User Manual (ENGLISH) - Page 199
Problem Possible Cause and Solution I can't make a printer the system default. In some conditions, it may change the default. To work around this, you can either delete the queue or rename it by manually editing the /etc./printcap file. The N-up setting does not work correctly for some of my - Samsung CLP-510 | User Manual (ENGLISH) - Page 200
Problem Possible Cause and Solution I can't print to an SMB (Windows) printer. To be able to configure and use SMB-shared printers (such as printers shared on a Windows printer), you need to have a correct installation of the SAMBA package that enables that feature. The "smbclient" command should - Samsung CLP-510 | User Manual (ENGLISH) - Page 201
Problem Some color images come out all black. Possible Cause and Solution This is a known bug in Ghostscript (until GNU Ghostscript version 7.05) when the base color space of the document is indexed color space and it is converted through CIE color space. Because Postscript uses CIE color space for - Samsung CLP-510 | User Manual (ENGLISH) - Page 202
A USING YOUR PRINTER WITH A MACINTOSH Your printer supports Macintosh systems with a built-in USB interface or 10/100 Base-TX network interface card (option for CLP-510). When you print a file from a Macintosh computer, you can use the CUPS driver by installing the PPD file. This chapter includes: - Samsung CLP-510 | User Manual (ENGLISH) - Page 203
Macintosh computer. Refer to the table below for the driver available for your printer, and for system requirements. Your Printer CLP-510 CLP-510N Available Driver Connection CUPS driver USB interface Network interface System Requirements Mac OS 10.3.x Verify the following before you install - Samsung CLP-510 | User Manual (ENGLISH) - Page 204
which came with your printer into the CD-ROM drive. 2 Double-click SAMSUNG_CLP on your Macintosh desktop. 3 Double-click the Installer folder. 4 Double-click the Samsung SPLC Installer icon. 5 Enter the password and click OK. 6 The Samsung SPLC Installer window opens. Select Uninstall. 7 When - Samsung CLP-510 | User Manual (ENGLISH) - Page 205
the printer to your computer-the network cable or the USB cable. For a Network-connected Macintosh 1 Follow the instructions printer server, try using the default queue first. 7 Select Samsung in Printer Model and CLP-510 in Model Name. 8 Click Add. 9 Your printer's IP address appears on the Printer - Samsung CLP-510 | User Manual (ENGLISH) - Page 206
the instructions on page A.2 to install the PPD file on your computer. 2 For Macintosh OS 10.3.x, open Print Setup Utility from the Utilities folder. 3 Click Add on the Printer List. 4 Select the USB tab. 5 Select Samsung in Printer Model and CLP-510 in Model Name. 6 Click Add. Your printer appears - Samsung CLP-510 | User Manual (ENGLISH) - Page 207
3 Choose your paper size, orientation, scaling, and other options and click OK. ▲ Mac OS 10.3 4 Open the File menu and click Print. 5 Choose the number of ) on the control panel. The printer finishes printing the page that is moving through the printer and deletes the rest of the print job. A.6 USING - Samsung CLP-510 | User Manual (ENGLISH) - Page 208
pages. 1 From your Macintosh application, select Print from the File menu. 2 Select the Layout. A ▲ Mac OS 10.3 3 Select the number of pages you want to print on one sheet of paper on the list. 5 Click Print, and the printer prints the selected number of pages on one side of each page. USING YOUR - Samsung CLP-510 | User Manual (ENGLISH) - Page 209
Binding: Which is the type often used with calendars. 1 From your Macintosh application, select Print from the File menu. 2 Select the Layout. ▲ Mac OS 10.3 3 Select a binding orientation from Two Sided Printing option. 4 Click Print and the printer prints on both sides of the paper. A.8 USING YOUR - Samsung CLP-510 | User Manual (ENGLISH) - Page 210
time. 1 From your Macintosh application, select Print from the File menu. 2 Select Scheduler. ▲ Mac OS 10.3 3 Select the time at which you want the print job to be printed. •Now: The printer prints a job immediately. •At: The printer prints a job at the time you set in the field. •On Hold: The - Samsung CLP-510 | User Manual (ENGLISH) - Page 211
MEMO A.10 USING YOUR PRINTER WITH A MACINTOSH - Samsung CLP-510 | User Manual (ENGLISH) - Page 212
B USING YOUR PRINTER IN LINUX You can use your printer in a Linux environment. This chapter includes: • Installing the Printer Driver • Using the Configuration Tool • Changing LLPR Properties - Samsung CLP-510 | User Manual (ENGLISH) - Page 213
higher Software • Glibc 2.1 or higher • GTK+ 1.2 or higher • GhostScript Installing the Printer Driver 1 Make sure that you connect the printer to your computer. Turn both the computer and the printer on. 2 When the Administrator Login window appears, type in "root" in the Login field and enter the - Samsung CLP-510 | User Manual (ENGLISH) - Page 214
3 Insert the printer software CD-ROM. The CD-ROM automatically runs. NOTE: If the CD-ROM does not automatically run, click the icon at the bottom of the window. When the Terminal screen appears, type in: [root@local /root]# cd /mnt/cdrom (the CD-ROM directory) [root@local cdrom]# ./setup.sh 4 Select - Samsung CLP-510 | User Manual (ENGLISH) - Page 215
6 The printer driver installation begins. When the installation is complete, click Start. 7 The Linux Printer Configuration window opens. Click the Add Printer icon on the tool bar at the top of the window. NOTE: Depending on the printing system in use, the Administrator Login window may appear. - Samsung CLP-510 | User Manual (ENGLISH) - Page 216
on the printing system in use. 11 To exit, click OK. 12 When the window prompts that the new printer is successfully configured, click OK. 13 The Linux Printer Configuration window reappears. You can view the information about your printer from the Info tab. If necessary, you can change the - Samsung CLP-510 | User Manual (ENGLISH) - Page 217
linux-config" in the Terminal screen. 4 When the Linux Printer Configuration window appears, click the Add Printer icon on the tool bar at the top of the window. 5 Click the Connection tab at the top of the Add a Printer window. Ensure that the printer port is set properly. If not, change the device - Samsung CLP-510 | User Manual (ENGLISH) - Page 218
Uninstalling the Printer Driver 1 From the Startup Menu icon at the bottom of the desktop, select Other and then Configuration Tool. You can also access the Linux Printer Configuration window by typing "linux-config" in the Terminal screen. 2 In the Linux Printer Configuration window, select the - Samsung CLP-510 | User Manual (ENGLISH) - Page 219
of the screen, select Linux Printer and then Configuration Tool. The Linux Printer Configuration window appears. You can also open this window from the Terminal screen by typing in "linux-config." 2 The Linux Printer Configuration window shows a list of installed printers in the left pane. The - Samsung CLP-510 | User Manual (ENGLISH) - Page 220
can click Go to the Web page for this printer to access the printer's web page. Click the Jobs tab to inspect and manage the job queue for the selected printer. You can suspend, resume, or delete a specific job(s) in the queue. If you drag a specific job(s), you can drop it into the print queue - Samsung CLP-510 | User Manual (ENGLISH) - Page 221
opens, click Properties. Click Properties. You can also open the LLPR window: • Click the Startup Menu icon at the bottom of the screen and select Linux Printer and then Linux LPR. • If the Linux Printer Configuration window is currently open, select Test Print from the Print menu. B.10 USING YOUR - Samsung CLP-510 | User Manual (ENGLISH) - Page 222
documents on transparencies, color print quality problems may be occured. • Margins - allows you to specify page margins. The graphic on the right shows the current settings. These margins do not apply when printing regular PostScript data. • Image - allows you to set image options that are used - Samsung CLP-510 | User Manual (ENGLISH) - Page 223
MEMO B.12 USING YOUR PRINTER IN LINUX - Samsung CLP-510 | User Manual (ENGLISH) - Page 224
by other users on the network. This chapter includes: • About Sharing the Printer on a Network • Setting Up a Locally Shared Printer • Setting Up a Network-Connected Printer NOTE: If you are a CLP-510 user, you need to install an optional network interface card. For more information, see Appendix - Samsung CLP-510 | User Manual (ENGLISH) - Page 225
on the network through a Windows 9x/Me/ XP/NT 4.0/2000/2003 network printer connection. Wired Network-connected Printer A CLP-510N printer has a built-in network interface. For more information about connecting your printer to the network, see page D.11. To use a CLP-510 printer as a network printer - Samsung CLP-510 | User Manual (ENGLISH) - Page 226
Setting Up a Locally Shared Printer In Windows 95/98/Me NOTE: Windows 95 is only supported on the CLP-510N. Setting Up the Host Computer 1 Start Windows. 2 From the Start menu, select Control Panel from Settings and double-click on the Network icon. 3 Check the File and Print Sharing box, and click - Samsung CLP-510 | User Manual (ENGLISH) - Page 227
2003/XP NOTE: Windows NT 4.0 is only supported on the CLP-510N. Setting Up the Host Computer 1 Start Windows. 2 For Windows NT 4.0/2000, select Settings, and Printers from the Start menu. For Windows XP/2003, select Printers and Faxes from the Start menu. 3 Double-click your printer icon. 4 From the - Samsung CLP-510 | User Manual (ENGLISH) - Page 228
Up the Client Computer 1 Right-click the Windows Start button and select Explorer. 2 Open your network folder in the left column. 3 Click the shared name. 4 For Windows NT 4.0/2000, select Settings and Printers from the Start menu. For Windows XP/2003, select Printers and Faxes from the Start menu - Samsung CLP-510 | User Manual (ENGLISH) - Page 229
NOTE: The operating systems supported by the network card may be different than the operating systems supported by the printer. The following table shows the network environments supported by the printer. Item Network Interface Requirements 10/100 Base-TX (standard for CLP-510N) or 802.11b - Samsung CLP-510 | User Manual (ENGLISH) - Page 230
line. 4 Press the Enter button ( ). The Network Configuration page prints out. Setting Network Protocols When you first install the printer, all supported network protocols are enabled. If a network protocol is enabled, the printer may actively transmit on the network even when the protocol is not - Samsung CLP-510 | User Manual (ENGLISH) - Page 231
can be set up on a variety of TCP/IP networks. There are several ways in which your printer can be assigned a TCP/IP address, depending on your network. • Static Addressing: TCP/IP address is assigned manually by the system administrator. • Dynamic Addressing BOOTP/DHCP (default): TCP/IP address - Samsung CLP-510 | User Manual (ENGLISH) - Page 232
. Press the Enter button ( ) to access the menu. 2 Press the Enter button ( ) when "Config Network" displays on the bottom line. 3 Press the scroll button ( or ) until "Yes" displays, and C press ( or ) until "Yes" displays, and press the Enter button ( ). USING YOUR PRINTER ON A NETWORK C.9 - Samsung CLP-510 | User Manual (ENGLISH) - Page 233
. Configuring IPX Frame Types On IPX/SPX protocol networks (for example, Novell NetWare), the format of the network communication frames must be specified for the printer. In most cases, you can keep the default setting "Auto". However, you can manually set the frame type format, if required. • Auto - Samsung CLP-510 | User Manual (ENGLISH) - Page 234
display. Press the Enter button ( ) to access the menu. 2 Press the Enter button ( ) when "Config Network" displays on the bottom line. 3 Press the scroll button ( or ) until "Yes" displays on the bottom line /Continue button ( ) to return to C ready mode. USING YOUR PRINTER ON A NETWORK C.11 - Samsung CLP-510 | User Manual (ENGLISH) - Page 235
). The printer resets the network interface card. Configuring the Wireless Network See the instructions supplied with the wireless network interface card you purchase. You can easily configure the wireless network environments using the SetIP program in Windows. See the Wireless Network User's Guide - Samsung CLP-510 | User Manual (ENGLISH) - Page 236
the wireless network card on your printer searches for wireless networks in the area and shows the results on the list. Select a network from the list Key". The Samsung print server is not configured for network authentication (Open System). If required by your network, the proper authentication - Samsung CLP-510 | User Manual (ENGLISH) - Page 237
• Key Type: Select the key type of your network. • Key 1, Key 2, Key 3, Key 4: Enter the key number for "Encryption". The numbers you can enter are as follows: Hexadecimal Alphanumeric 64-bit WEP 10 digits 5 characters 128-bit WEP 26digits 13 characters C.14 USING YOUR PRINTER ON A NETWORK - Samsung CLP-510 | User Manual (ENGLISH) - Page 238
your printing needs. Recognizing that each user may have different requirements, however, Samsung makes several options available to enhance your printer's capabilities. This chapter includes: • Installing Additional Printer Memory • Installing a Network Interface Card • Installing an Optional Tray - Samsung CLP-510 | User Manual (ENGLISH) - Page 239
Use this DIMM slot to install more memory for the printer. NOTE: Your printer has 64 MB of memory which can be expanded to 192 MB. Use only Samsung-approved DIMM, part numbers ML00MC (64MB), or ML-00MD (128MB). Contact your Samsung dealer. CAUTION: Static electricity can damage DIMMs. When handling - Samsung CLP-510 | User Manual (ENGLISH) - Page 240
notches on the bottom edge of the DIMM. Notches Connection points NOTE: Avoid touching the connection points along the edge of the memory DIMM. D INSTALLING PRINTER OPTIONS D.3 - Samsung CLP-510 | User Manual (ENGLISH) - Page 241
DIMM or closing the latches, make sure the notches on the bottom of the DIMM are aligned with the grooves in the DIMM slot. D.4 INSTALLING PRINTER OPTIONS - Samsung CLP-510 | User Manual (ENGLISH) - Page 242
9 Replace the metal cover, as shown below, and replace the two screws you removed in step 3. 10 Replace the control board cover. 11 Reconnect the power cord and printer cable and turn the printer on. D INSTALLING PRINTER OPTIONS D.5 - Samsung CLP-510 | User Manual (ENGLISH) - Page 243
original packaging or wrap it with a sheet of thin metal, such as aluminium foil, and store it in a box. 4 Proceed from step 9 on page D.5. D.6 INSTALLING PRINTER OPTIONS - Samsung CLP-510 | User Manual (ENGLISH) - Page 244
you want to use the printer in both wired and wireless network environments, you need to install an optional wired/wireless network interface card. Check to see if there are any missing parts in your optional interface card package. CLP-510 only CLP-510, CLP-510N Ethernet 10/100 Base TX (Internal - Samsung CLP-510 | User Manual (ENGLISH) - Page 245
2 To remove the control board cover, press down on the tabs at the top and take it off. 3 Remove the two screws holding the metal plate in place, and then remove the metal cover, as shown below. D.8 INSTALLING PRINTER OPTIONS - Samsung CLP-510 | User Manual (ENGLISH) - Page 246
old card. 5 Align the connector on the network interface card with the connector on the control board. Make sure that the jacks on the card go through the holes. Push the card firmly into the connector on the control board until it is completely and securely in place. D INSTALLING PRINTER OPTIONS - Samsung CLP-510 | User Manual (ENGLISH) - Page 247
6 Insert the two screws included with the interface card package into the appropriate holes above and below the Ethernet network port, as shown below. Carefully tighten them. 7 Replace the metal cover, as shown below, and replace the two screws you removed in step 3. D.10 INSTALLING PRINTER OPTIONS - Samsung CLP-510 | User Manual (ENGLISH) - Page 248
connection 10 Reconnect the power cord and turn the printer on. NOTE: For information about configuring and using the printer in a network environment, refer to the User's Guide provided with the network interface card. You can also configure the network parameters using the control panel; see page - Samsung CLP-510 | User Manual (ENGLISH) - Page 249
Installing an Optional Tray You can increase the paper handling capacity of your printer by installing an optional Tray2. This tray holds 500 sheets of paper. 1 Turn the printer off and unplug all cables from the printer. 2 Remove the packing tape and the packing material inside of the tray. 3 Find - Samsung CLP-510 | User Manual (ENGLISH) - Page 250
of the printer driver. To access the properties of the printer driver: 1 Click the Windows Start menu. 2 For Windows 95/98/Me/NT 4.0/2000, select Settings and then Printers. For Windows XP/2003, select Printers and Faxes. 3 Select the Samsung CLP-510 Series printer. D INSTALLING PRINTER OPTIONS - Samsung CLP-510 | User Manual (ENGLISH) - Page 251
4 Right-click on the printer icon and select Properties. 5 Click the Printer tab, and select Tray 2 from the Optional Tray drop-down list. 6 Click OK and print the document. D.14 INSTALLING PRINTER OPTIONS - Samsung CLP-510 | User Manual (ENGLISH) - Page 252
E SPECIFICATIONS This chapter includes: • Printer Specifications • Paper Specifications - Samsung CLP-510 | User Manual (ENGLISH) - Page 253
A4/Letter pages at 5% Coverage (Ships with standard yield toner cartridge) Imaging Unit: Approx. 50,000 black pages (12,500 color pages)*** Transfer Belt: Approx. 50,000 black pages (12,500 color pages)*** Waste Toner Container: Approx. 12,000 black pages (3,000 color pages)*** Monthly: Up to 35,000 - Samsung CLP-510 | User Manual (ENGLISH) - Page 254
Item Printer Language Specifications and Description SPL-C (Samsung Printer Language Color) 64 MB (Max. 192 MB) Memory 64, 128 MB optional memory available Use only the Samsung-approved DIMM. 64 MB: ML-00MC; 128 MB: ML-00MD Fonts Windows font Interface CLP-510: USB 2.0 CLP-510N: USB 2.0, - Samsung CLP-510 | User Manual (ENGLISH) - Page 255
, or other variables over which Samsung has no control. • Before purchasing large quantities of paper, ensure that the paper meets the requirements specified in this User's Guide. CAUTION: Using paper that does not meet these specifications may cause problems, requiring repairs. These repairs are - Samsung CLP-510 | User Manual (ENGLISH) - Page 256
up to 90g/m2 (16 to 24lb) up to 10 *The printer supports a wide range of media sizes. See "Printing on Card Stock or Custom-sized Materials" on page 3.21. **Capacity may vary handling the paper correctly. Please refer to "Printer and Paper Storage Environment" on page E.8. E SPECIFICATIONS E.5 - Samsung CLP-510 | User Manual (ENGLISH) - Page 257
, damage Cutouts or to printer perforations Do not use paper with cutouts or perforations. Problems with feeding Ragged edges Use raised or embossed letterhead. • The printer uses heat and pressure to fuse toner to the paper. Ensure that any colored paper or preprinted forms use inks that - Samsung CLP-510 | User Manual (ENGLISH) - Page 258
Category Acid Content Caliper Curl in Ream Cut Edge Conditions Fusing Compatibility Grain Moisture Content Smoothness Specifications 5.5 ~ 8.0pH 0.094 ~ 0.18mm (3.0 ~ 7.0mils) Flat within 5mm (0.02in.) Cut with sharp blades with no visible fray. Must not scorch, melt, offset, or release - Samsung CLP-510 | User Manual (ENGLISH) - Page 259
operation. Ideally, the printer and paper storage environment storage environment should be properly maintained to ensure optimum printer performance. The required condition is 20° to in its moisture-proof wrapping. If the printer environment is subject to extremes, unwrap only the amount - Samsung CLP-510 | User Manual (ENGLISH) - Page 260
Temperature: You should use envelopes that are compatible with the heat and pressure of the printer. • Size: You should only use envelopes within the following size ranges. Multi-purpose Tray paper correctly. Please refer to "Printer and Paper Storage Environment" on page E.8. E SPECIFICATIONS E.9 - Samsung CLP-510 | User Manual (ENGLISH) - Page 261
compatible with the heat and pressure in the printer. The extra flaps and strips might cause wrinkling, creasing, or even jams and may even damage the fuser. Envelope Margins The following gives typical address • Avoid printing over the area where the envelope's seams meet. E.10 SPECIFICATIONS - Samsung CLP-510 | User Manual (ENGLISH) - Page 262
Transparencies Transparencies used in the printer must be able to withstand 180°C (356°F), the printer's fusing temperature. CAUTION: To avoid damaging the printer, use only transparencies recommended for use in laser printers. See "Printing on Transparencies" on page 3.17. E SPECIFICATIONS E.11 - Samsung CLP-510 | User Manual (ENGLISH) - Page 263
use 4.14 I imaging unit, replace 6.14 install Memory D.2 Network Interface Card D.7 optional Tray2 D.12 printer driver for Linux B.2 printer driver for Macintosh A.2 interface card, install D.7 L labels, print 3.16 Linux common problems 7.31 configuration tool B.8 driver, install B.2 LLPR properties - Samsung CLP-510 | User Manual (ENGLISH) - Page 264
Linux 7.31 Macintosh 7.31 paper jams 7.6 print quality 7.22 Windows 7.30 Q quality problems, solve 7.22 R replace imaging unit 6.14 toner cartridge 6.8 transfer belt 6.22 waste toner container 6.11 S specification paper E.4 printer E.2 status monitor, use 5.17 system requirements for Linux B.2 for - Samsung CLP-510 | User Manual (ENGLISH) - Page 265
T toner cartridge maintain 6.4 redistribute 6.5, 6.8 replace 6.8 transfer belt, replace 6.22 transparencies, print 3.17 Tray1, use 3.4 U uninstall Linux B.7 W waste toner container, replace 6.11 watermarks, use 5.10 iii - Samsung CLP-510 | User Manual (ENGLISH) - Page 266
Visit us at: Home www.samsungprinter.com Rev.3.00
-
 1
1 -
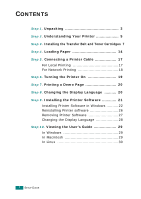 2
2 -
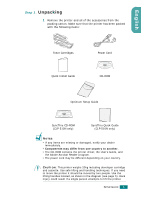 3
3 -
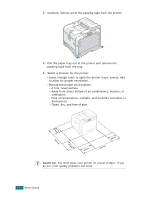 4
4 -
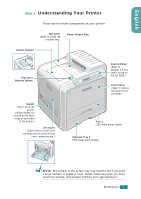 5
5 -
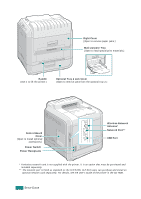 6
6 -
 7
7 -
8
-
9
-
10
-
11
-
12
-
13
-
14
-
15
-
16
-
17
-
18
-
19
-
20
-
21
-
22
-
23
-
24
-
25
-
26
-
27
-
28
-
29
-
30
-
31
-
32
-
33
-
34
-
35
-
36
-
37
-
38
-
39
-
40
-
41
-
42
-
43
-
44
-
45
-
46
-
47
-
48
-
49
-
50
-
51
-
52
-
53
-
54
-
55
-
56
-
57
-
58
-
59
-
60
-
61
-
62
-
63
-
64
-
65
-
66
-
67
-
68
-
69
-
70
-
71
-
72
-
73
-
74
-
75
-
76
-
77
-
78
-
79
-
80
-
81
-
82
-
83
-
84
-
85
-
86
-
87
-
88
-
89
-
90
-
91
-
92
-
93
-
94
-
95
-
96
-
97
-
98
-
99
-
100
-
101
-
102
-
103
-
104
-
105
-
106
-
107
-
108
-
109
-
110
-
111
-
112
-
113
-
114
-
115
-
116
-
117
-
118
-
119
-
120
-
121
-
122
-
123
-
124
-
125
-
126
-
127
-
128
-
129
-
130
-
131
-
132
-
133
-
134
-
135
-
136
-
137
-
138
-
139
-
140
-
141
-
142
-
143
-
144
-
145
-
146
-
147
-
148
-
149
-
150
-
151
-
152
-
153
-
154
-
155
-
156
-
157
-
158
-
159
-
160
-
161
-
162
-
163
-
164
-
165
-
166
-
167
-
168
-
169
-
170
-
171
-
172
-
173
-
174
-
175
-
176
-
177
-
178
-
179
-
180
-
181
-
182
-
183
-
184
-
185
-
186
-
187
-
188
-
189
-
190
-
191
-
192
-
193
-
194
-
195
-
196
-
197
-
198
-
199
-
200
-
201
-
202
-
203
-
204
-
205
-
206
-
207
-
208
-
209
-
210
-
211
-
212
-
213
-
214
-
215
-
216
-
217
-
218
-
219
-
220
-
221
-
222
-
223
-
224
-
225
-
226
-
227
-
228
-
229
-
230
-
231
-
232
-
233
-
234
-
235
-
236
-
237
-
238
-
239
-
240
-
241
-
242
-
243
-
244
-
245
-
246
-
247
-
248
-
249
-
250
-
251
-
252
-
253
-
254
-
255
-
256
-
257
-
258
-
259
-
260
-
261
-
262
-
263
-
264
-
265
-
266
 |
 |