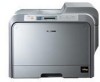
Samsung CLP-510 User Manual (ENGLISH) - Page 159
Keep the transfer belt level. Do not turn the transfer belt, over, or loose toner may be spilled.
 |
UPC - 635753700404
View all Samsung CLP-510 manuals
Add to My Manuals
Save this manual to your list of manuals |
Page 159 highlights
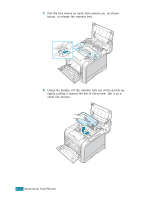
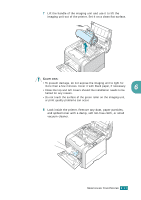
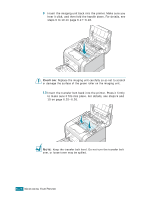
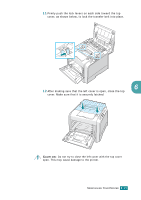
9 Insert the imaging unit back into the printer. Make sure you hear it click, and then fold the handle down. For details, see steps 9 to 10 on page 6.17~6.18. CAUTION: Replace the imaging unit carefully so as not to scratch or damage the surface of the green roller on the imaging unit. 10 Insert the transfer belt back into the printer. Press it firmly to make sure it fits into place. For details, see steps 9 and 10 on page 6.25~6.26. NOTE: Keep the transfer belt level. Do not turn the transfer belt over, or loose toner may be spilled. 6.34 MAINTAINING YOUR PRINTER
-
 1
1 -
2
-
3
-
4
-
5
-
6
-
7
-
8
-
9
-
10
-
11
-
12
-
13
-
14
-
15
-
16
-
17
-
18
-
19
-
20
-
21
-
22
-
23
-
24
-
25
-
26
-
27
-
28
-
29
-
30
-
31
-
32
-
33
-
34
-
35
-
36
-
37
-
38
-
39
-
40
-
41
-
42
-
43
-
44
-
45
-
46
-
47
-
48
-
49
-
50
-
51
-
52
-
53
-
54
-
55
-
56
-
57
-
58
-
59
-
60
-
61
-
62
-
63
-
64
-
65
-
66
-
67
-
68
-
69
-
70
-
71
-
72
-
73
-
74
-
75
-
76
-
77
-
78
-
79
-
80
-
81
-
82
-
83
-
84
-
85
-
86
-
87
-
88
-
89
-
90
-
91
-
92
-
93
-
94
-
95
-
96
-
97
-
98
-
99
-
100
-
101
-
102
-
103
-
104
-
105
-
106
-
107
-
108
-
109
-
110
-
111
-
112
-
113
-
114
-
115
-
116
-
117
-
118
-
119
-
120
-
121
-
122
-
123
-
124
-
125
-
126
-
127
-
128
-
129
-
130
-
131
-
132
-
133
-
134
-
135
-
136
-
137
-
138
-
139
-
140
-
141
-
142
-
143
-
144
-
145
-
146
-
147
-
148
-
149
-
150
-
151
-
152
-
153
-
 154
154 -
 155
155 -
 156
156 -
 157
157 -
 158
158 -
 159
159 -
 160
160 -
 161
161 -
 162
162 -
 163
163 -
 164
164 -
165
-
166
-
167
-
168
-
169
-
170
-
171
-
172
-
173
-
174
-
175
-
176
-
177
-
178
-
179
-
180
-
181
-
182
-
183
-
184
-
185
-
186
-
187
-
188
-
189
-
190
-
191
-
192
-
193
-
194
-
195
-
196
-
197
-
198
-
199
-
200
-
201
-
202
-
203
-
204
-
205
-
206
-
207
-
208
-
209
-
210
-
211
-
212
-
213
-
214
-
215
-
216
-
217
-
218
-
219
-
220
-
221
-
222
-
223
-
224
-
225
-
226
-
227
-
228
-
229
-
230
-
231
-
232
-
233
-
234
-
235
-
236
-
237
-
238
-
239
-
240
-
241
-
242
-
243
-
244
-
245
-
246
-
247
-
248
-
249
-
250
-
251
-
252
-
253
-
254
-
255
-
256
-
257
-
258
-
259
-
260
-
261
-
262
-
263
-
264
-
265
-
266
 |
 |

M
AINTAINING
Y
OUR
P
RINTER
6.
34
9
Insert the imaging unit back into the printer. Make sure you
hear it click, and then fold the handle down. For details, see
steps 9 to 10 on page 6.17~6.18.
C
AUTION
: Replace the imaging unit carefully so as not to scratch
or damage the surface of the green roller on the imaging unit.
10
Insert the transfer belt back into the printer. Press it firmly
to make sure it fits into place. For details, see steps 9 and
10 on page 6.25~6.26.
N
OTE
:
Keep the transfer belt level. Do not turn the transfer belt
over, or loose toner may be spilled.