Samsung CLX 3175FN User Manual (ENGLISH) - Page 14
Contents - cartridges
 |
UPC - 635753710281
View all Samsung CLX 3175FN manuals
Add to My Manuals
Save this manual to your list of manuals |
Page 14 highlights
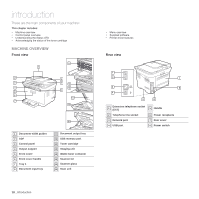
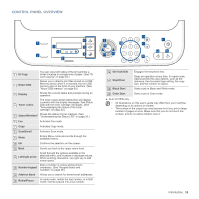
contents 14_Contents 2 Features of your new laser product 5 Safety information INTRODUCTION 18 Machine overview 18 18 18 Front view Rear view 19 Control panel overview 20 Understanding the Status LED 20 Acknowledging the status of the toner cartridge 21 Menu overview 22 Supplied software 22 Printer driver features 22 Printer driver GETTING STARTED 23 Setting up the hardware 23 24 System requirements 24 Windows 24 Macintosh 24 Linux 25 Setting up the network 25 Supported operation environments 25 Using a wired network 25 Printing Configuration report 25 Setting IP address 26 Network parameter setting 26 Installing the driver software 27 Using a wireless network(Windows/CLX-3175FW only) 27 Checking your network environments 27 Installing the printer on an Ad-Hoc wireless network 28 Installing the printer on a wireless network with an Access Point 29 Using a wireless network(CLX-3175FW only) 29 Checking your Network Environments 30 Printing Configuration report 30 Setting IP address 31 Network parameter setting 31 Restoring factory default settings 31 Configuring the machine's wireless network 33 Installing the driver software 35 Machine's basic settings 35 Altitude adjustment 35 Changing the display language 35 Setting the date and time 35 Changing the clock mode 35 Changing the default mode 35 Setting sounds 36 Entering characters using the number keypad 36 Using the save modes 36 Auto continue LOADING ORIGINALS AND PRINT MEDIA 37 Loading originals 37 37 37 On the scanner glass In the ADF 38 Selecting print media 39 Specifications on print media 40 Media sizes supported in each mode
-
 1
1 -
2
-
3
-
4
-
5
-
6
-
7
-
8
-
 9
9 -
 10
10 -
 11
11 -
 12
12 -
 13
13 -
 14
14 -
 15
15 -
 16
16 -
 17
17 -
 18
18 -
 19
19 -
20
-
21
-
22
-
23
-
24
-
25
-
26
-
27
-
28
-
29
-
30
-
31
-
32
-
33
-
34
-
35
-
36
-
37
-
38
-
39
-
40
-
41
-
42
-
43
-
44
-
45
-
46
-
47
-
48
-
49
-
50
-
51
-
52
-
53
-
54
-
55
-
56
-
57
-
58
-
59
-
60
-
61
-
62
-
63
-
64
-
65
-
66
-
67
-
68
-
69
-
70
-
71
-
72
-
73
-
74
-
75
-
76
-
77
-
78
-
79
-
80
-
81
-
82
-
83
-
84
-
85
-
86
-
87
-
88
-
89
-
90
-
91
-
92
-
93
-
94
-
95
-
96
-
97
-
98
-
99
-
100
-
101
-
102
-
103
-
104
-
105
-
106
-
107
-
108
-
109
-
110
-
111
-
112
-
113
-
114
-
115
-
116
-
117
-
118
-
119
-
120
-
121
-
122
-
123
-
124
-
125
-
126
-
127
-
128
-
129
-
130
-
131
-
132
-
133
-
134
-
135
-
136
-
137
-
138
-
139
-
140
-
141
-
142
-
143
-
144
-
145
-
146
-
147
-
148
-
149
-
150
-
151
-
152
-
153
-
154
-
155
-
156
-
157
-
158
-
159
-
160
-
161
-
162
-
163
-
164
-
165
-
166
-
167
-
168
-
169
-
170
-
171
-
172
-
173
-
174
-
175
-
176
-
177
-
178
-
179
-
180
-
181
-
182
-
183
-
184
-
185
-
186
-
187
-
188
-
189
-
190
-
191
-
192
-
193
-
194
-
195
-
196
-
197
-
198
-
199
-
200
-
201
-
202
-
203
-
204
-
205
-
206
-
207
-
208
-
209
-
210
-
211
-
212
-
213
-
214
-
215
-
216
-
217
-
218
 |
 |
