Samsung CLX 3175FN User Manual (ENGLISH) - Page 68
Replacing the toner cartridge, For the CLX-3170FN/CLX-3175FN/CLX-3175FW, incoming faxes are - black cartridge
 |
UPC - 635753710281
View all Samsung CLX 3175FN manuals
Add to My Manuals
Save this manual to your list of manuals |
Page 68 highlights
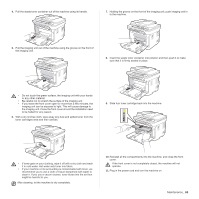
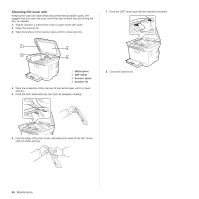
4. Slide four toner cartridges back into the machine. 4. Take a new toner cartridge out of its package. • Don't use sharp objects, such as a knife or scissors, to open the toner cartridge package. You could damage the surface of the toner cartridge. 5. Holding both handles on the toner cartridge, thoroughly rock it from side to side to evenly distribute the toner. 5. Close the front cover. Make sure the cover is securely latched. If the front cover is not completely closed, the machine will not operate. REPLACING THE TONER CARTRIDGE The machine uses four colors and has a different toner cartridge for each one: yellow (Y), magenta (M), cyan (C), and black (K). • The status LED and the toner-related message on the display indicates which each individual toner cartridge should be replaced. • For the CLX-3170FN/CLX-3175FN/CLX-3175FW, incoming faxes are saved in memory. At this stage, the toner cartridge needs to be replaced. Check the type of toner cartridge for your machine. (See "" on page 87.) 1. Turn the machine off, then wait a few minutes for the machine to cool. 2. Using the handle, completely open the front cover. 3. Grasp the handles on the toner cartridge and pull to remove the cartridge from the machine. 6. Place the toner cartridge on a flat surface, as shown, and remove the protecting cover. If toner gets on your clothing, wipe it off with a dry cloth and wash it in cold water. Hot water sets toner into fabric. 7. Make sure that the color of the toner cartridge matches the color slot and then grasp the handles on the toner cartridge. Insert the cartridge until it clicks into place. 68 _Maintenance 8. Close the front cover. Make sure the cover is securely latched, and then turn the machine on. If the front cover is not completely closed, the machine will not operate.
-
 1
1 -
2
-
3
-
4
-
5
-
6
-
7
-
8
-
9
-
10
-
11
-
12
-
13
-
14
-
15
-
16
-
17
-
18
-
19
-
20
-
21
-
22
-
23
-
24
-
25
-
26
-
27
-
28
-
29
-
30
-
31
-
32
-
33
-
34
-
35
-
36
-
37
-
38
-
39
-
40
-
41
-
42
-
43
-
44
-
45
-
46
-
47
-
48
-
49
-
50
-
51
-
52
-
53
-
54
-
55
-
56
-
57
-
58
-
59
-
60
-
61
-
62
-
 63
63 -
 64
64 -
 65
65 -
 66
66 -
 67
67 -
 68
68 -
 69
69 -
 70
70 -
 71
71 -
 72
72 -
 73
73 -
74
-
75
-
76
-
77
-
78
-
79
-
80
-
81
-
82
-
83
-
84
-
85
-
86
-
87
-
88
-
89
-
90
-
91
-
92
-
93
-
94
-
95
-
96
-
97
-
98
-
99
-
100
-
101
-
102
-
103
-
104
-
105
-
106
-
107
-
108
-
109
-
110
-
111
-
112
-
113
-
114
-
115
-
116
-
117
-
118
-
119
-
120
-
121
-
122
-
123
-
124
-
125
-
126
-
127
-
128
-
129
-
130
-
131
-
132
-
133
-
134
-
135
-
136
-
137
-
138
-
139
-
140
-
141
-
142
-
143
-
144
-
145
-
146
-
147
-
148
-
149
-
150
-
151
-
152
-
153
-
154
-
155
-
156
-
157
-
158
-
159
-
160
-
161
-
162
-
163
-
164
-
165
-
166
-
167
-
168
-
169
-
170
-
171
-
172
-
173
-
174
-
175
-
176
-
177
-
178
-
179
-
180
-
181
-
182
-
183
-
184
-
185
-
186
-
187
-
188
-
189
-
190
-
191
-
192
-
193
-
194
-
195
-
196
-
197
-
198
-
199
-
200
-
201
-
202
-
203
-
204
-
205
-
206
-
207
-
208
-
209
-
210
-
211
-
212
-
213
-
214
-
215
-
216
-
217
-
218
 |
 |
