Samsung CLX 3175FN User Manual (ENGLISH) - Page 149
Troubleshooting, Tips for avoiding paper jams, Clearing paper jams, In the tray 1 - fuser removal
 |
UPC - 635753710281
View all Samsung CLX 3175FN manuals
Add to My Manuals
Save this manual to your list of manuals |
Page 149 highlights
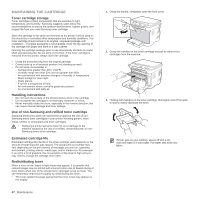
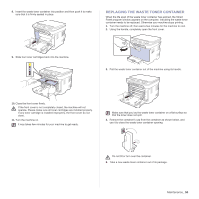
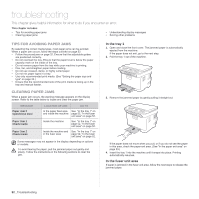
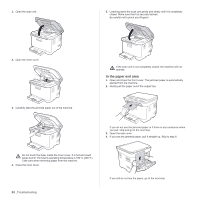
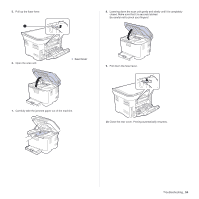
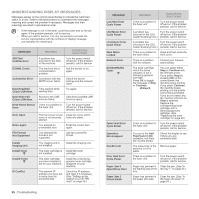
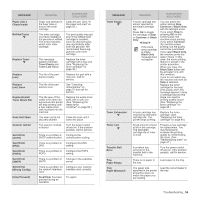
troubleshooting This chapter gives helpful information for what to do if you encounter an error. This chapter includes: • Tips for avoiding paper jams • Clearing paper jams • Understanding display messages • Solving other problems TIPS FOR AVOIDING PAPER JAMS By selecting the correct media types, most paper jams can be avoided. When a paper jam occurs, follow the steps outlined on page 52. • Follow the procedures on page 32. Ensure that the adjustable guides are positioned correctly. • Do not overload the tray. Ensure that the paper level is below the paper capacity mark on the inside of the tray. • Do not remove paper from the tray while your machine is printing. • Flex, fan, and straighten paper before loading. • Do not use creased, damp, or highly curled paper. • Do not mix paper types in a tray. • Use only recommended print media. (See "Setting the paper size and type" on page 33.) • Ensure that the recommended side of the print media is facing up in the tray and manual feeder. CLEARING PAPER JAMS When a paper jam occurs, the warning message appears on the display screen. Refer to the table below to locate and clear the paper jam. MESSAGE LOCATION OF JAM GO TO Paper Jam 0 Open/Close Door In the paper feed area See "In the tray 1" on and inside the machine page 52, "In the fuser unit area" on page 52. Paper Jam 1 Check Inside Inside the machine See "In the tray 1" on page 52, "In the fuser unit area" on page 52. Paper Jam 2 Check Inside Inside the machine and See "In the tray 1" on in the fuser area page 52, "In the fuser unit area" on page 52. Some messages may not appear in the display depending on options or models. To avoid tearing the paper, pull the jammed paper out gently and slowly. Follow the instructions in the following sections to clear the jam. In the tray 1 1. Open and close the front cover. The jammed paper is automatically ejected from the machine. If the paper does not exit, go to the next step. 2. Pull the tray 1 out of the machine. 3. Remove the jammed paper by gently pulling it straight out. If the paper does not move when you pull, or if you do not see the paper in this area, check the paper exit area. (See "In the paper exit area" on page 53.) 4. Insert the tray 1 into the machine until it snaps into place. Printing automatically resumes. In the fuser unit area If paper is jammed in the fuser unit area, follow the next steps to release the jammed paper. 52 _Troubleshooting
-
 1
1 -
2
-
3
-
4
-
5
-
6
-
7
-
8
-
9
-
10
-
11
-
12
-
13
-
14
-
15
-
16
-
17
-
18
-
19
-
20
-
21
-
22
-
23
-
24
-
25
-
26
-
27
-
28
-
29
-
30
-
31
-
32
-
33
-
34
-
35
-
36
-
37
-
38
-
39
-
40
-
41
-
42
-
43
-
44
-
45
-
46
-
47
-
48
-
49
-
50
-
51
-
52
-
53
-
54
-
55
-
56
-
57
-
58
-
59
-
60
-
61
-
62
-
63
-
64
-
65
-
66
-
67
-
68
-
69
-
70
-
71
-
72
-
73
-
74
-
75
-
76
-
77
-
78
-
79
-
80
-
81
-
82
-
83
-
84
-
85
-
86
-
87
-
88
-
89
-
90
-
91
-
92
-
93
-
94
-
95
-
96
-
97
-
98
-
99
-
100
-
101
-
102
-
103
-
104
-
105
-
106
-
107
-
108
-
109
-
110
-
111
-
112
-
113
-
114
-
115
-
116
-
117
-
118
-
119
-
120
-
121
-
122
-
123
-
124
-
125
-
126
-
127
-
128
-
129
-
130
-
131
-
132
-
133
-
134
-
135
-
136
-
137
-
138
-
139
-
140
-
141
-
142
-
143
-
 144
144 -
 145
145 -
 146
146 -
 147
147 -
 148
148 -
 149
149 -
 150
150 -
 151
151 -
 152
152 -
 153
153 -
 154
154 -
155
-
156
-
157
-
158
-
159
-
160
-
161
-
162
-
163
-
164
-
165
-
166
-
167
-
168
-
169
-
170
-
171
-
172
-
173
-
174
-
175
-
176
-
177
-
178
-
179
-
180
-
181
-
182
-
183
-
184
-
185
-
186
-
187
-
188
-
189
-
190
-
191
-
192
-
193
-
194
-
195
-
196
-
197
-
198
-
199
-
200
-
201
-
202
-
203
-
204
-
205
-
206
-
207
-
208
-
209
-
210
-
211
-
212
-
213
-
214
-
215
-
216
-
217
-
218
 |
 |
