Samsung CLX 3175FN User Manual (ENGLISH) - Page 63
Maintenance, Printing reports, Printing a report, Adjusting the color contrast - imaging unit
 |
UPC - 635753710281
View all Samsung CLX 3175FN manuals
Add to My Manuals
Save this manual to your list of manuals |
Page 63 highlights
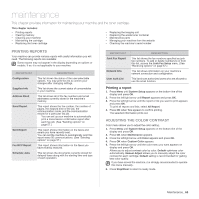
maintenance This chapter provides information for maintaining your machine and the toner cartridge. This chapter includes: • Printing reports • Clearing memory • Cleaning your machine • Maintaining the cartridge • Replacing the toner cartridge • Replacing the imaging unit • Replacing the waste toner container • Maintenance parts • Managing your machine from the website • Checking the machine's serial number PRINTING REPORTS Your machine can provide various reports with useful information you will need. The following reports are available: Some reports may not appear in the display depending on options or models. If so, it is not applicable to your machine. REPORT/LIST Configuration Supplies Info Address Book Send Report Sent Report Fax RCV Report Schedule Jobs DESCRIPTION This list shows the status of the user-selectable options. You may print this list to confirm your changes after changing settings. This list shows the current status of consumables in your machine. This list shows all of the fax numbers and email addresses currently stored in the machine's memory. This report shows the fax number, the number of pages, the elapsed time of the job, the communication mode, and the communication results for a particular fax job. You can set up your machine to automatically print a transmission confirmation report after each fax job. (See "Sending options" on page 57.) This report shows information on the faxes and emails you have recently sent. You can set the machine to automatically print this report every 50 communications. (See "Sending options" on page 57.) This report shows information on the faxes you have recently received. This list shows the documents currently stored for delayed faxes along with the starting time and type of each operation. REPORT/LIST Junk Fax Report Network Info. User Auth List DESCRIPTION This list shows the fax numbers specified as junk fax numbers. To add or delete numbers to or from this list, access the Junk Fax Setup menu. (See "Receiving options" on page 57.) This list shows information on your machine's network connection and configuration. This list shows authorized users who are allowed to use the email function. Printing a report 1. Press Menu until System Setup appears on the bottom line of the display and press OK. 2. Press the left/right arrow until Report appears and press OK. 3. Press the left/right arrow until the report or list you want to print appears and press OK. To print all reports and lists, select All Report. 4. Press OK when Yes appears to confirm printing. The selected information prints out. ADJUSTING THE COLOR CONTRAST Color menu allows you to adjust the color setting. 1. Press Menu until System Setup appears on the bottom line of the display and press OK. 2. Press OK when Maintenance appears. 3. Press the left/right arrow until Color appears and press OK. 4. Press OK when Custom Color appears. 5. Press the left/right arrow until the color menu you want appears on display and press OK. Allows you to adjust contrast color by color. Default optimizes color automatically. Manual Adjust allows you to manually adjust the color contrast for each cartridge. Default setting is recommended for getting best color quality. If you have moved the machine, it is strongly recommended to operate this menu manually. 6. Press Stop/Clear to return to ready mode. Maintenance_ 63
-
 1
1 -
2
-
3
-
4
-
5
-
6
-
7
-
8
-
9
-
10
-
11
-
12
-
13
-
14
-
15
-
16
-
17
-
18
-
19
-
20
-
21
-
22
-
23
-
24
-
25
-
26
-
27
-
28
-
29
-
30
-
31
-
32
-
33
-
34
-
35
-
36
-
37
-
38
-
39
-
40
-
41
-
42
-
43
-
44
-
45
-
46
-
47
-
48
-
49
-
50
-
51
-
52
-
53
-
54
-
55
-
56
-
57
-
 58
58 -
 59
59 -
 60
60 -
 61
61 -
 62
62 -
 63
63 -
 64
64 -
 65
65 -
 66
66 -
 67
67 -
 68
68 -
69
-
70
-
71
-
72
-
73
-
74
-
75
-
76
-
77
-
78
-
79
-
80
-
81
-
82
-
83
-
84
-
85
-
86
-
87
-
88
-
89
-
90
-
91
-
92
-
93
-
94
-
95
-
96
-
97
-
98
-
99
-
100
-
101
-
102
-
103
-
104
-
105
-
106
-
107
-
108
-
109
-
110
-
111
-
112
-
113
-
114
-
115
-
116
-
117
-
118
-
119
-
120
-
121
-
122
-
123
-
124
-
125
-
126
-
127
-
128
-
129
-
130
-
131
-
132
-
133
-
134
-
135
-
136
-
137
-
138
-
139
-
140
-
141
-
142
-
143
-
144
-
145
-
146
-
147
-
148
-
149
-
150
-
151
-
152
-
153
-
154
-
155
-
156
-
157
-
158
-
159
-
160
-
161
-
162
-
163
-
164
-
165
-
166
-
167
-
168
-
169
-
170
-
171
-
172
-
173
-
174
-
175
-
176
-
177
-
178
-
179
-
180
-
181
-
182
-
183
-
184
-
185
-
186
-
187
-
188
-
189
-
190
-
191
-
192
-
193
-
194
-
195
-
196
-
197
-
198
-
199
-
200
-
201
-
202
-
203
-
204
-
205
-
206
-
207
-
208
-
209
-
210
-
211
-
212
-
213
-
214
-
215
-
216
-
217
-
218
 |
 |
