Sony BDP-CX7000ES Operating Instructions - Page 42
Video Equalizer elements, HD Reality Enhancer elements, Items, Details - parts
 |
UPC - 027242754843
View all Sony BDP-CX7000ES manuals
Add to My Manuals
Save this manual to your list of manuals |
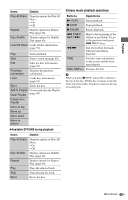
Page 42 highlights
2 Select "A/V Settings" using V/v, and press . 3 Select "Video Settings" using V/v, and press . The "Video Settings" screen appears. 4 Select an item using V/v, and press . The default settings are underlined. Items Details Picture Quality Selects the picture Mode settings for different (Standard/ lighting environments. Brighter Room/ Theater Room/ Memory) Video Equalizer This setting is selectable when "Picture Quality Mode" is set to "Memory" (see ""Video Equalizer" elements" on page 42). HD Reality Enhancer This setting is available only when video signals are output from the HDMI OUT jack or the COMPONENT VIDEO OUT jacks (see ""HD Reality Enhancer" elements" on page 42). NR (Noise Reduction) Reduces the noise in the picture (see ""NR" elements" on page 43). 5 Select or adjust the settings using B/V/v/ b, and press . To adjust any other items, repeat steps 4 and 5. z The "HD Reality Enhancer" settings are individually set during video and photo playback. b • Set the picture setting of your TV to 'Standard' before changing the "Picture Quality Mode" settings. • "Video Settings" is not available when the connected TV is set to Theater Mode (page 56). • Depending on the disc or the scene being played, "FNR," "BNR" or "MNR" effects may be hard to discern. ◆"Video Equalizer" elements 1 Select "Video Equalizer" in step 4 above, and press . 2 Select an item, and press . Items Details Contrast Changes the contrast. ((weak) -3 ~ 0 ~ 3 (strong)) Brightness Changes the overall ((dark) -3 ~ 0 brightness. ~ 3 (bright)) Chroma Deepens deep colors, or ((light) -3 ~ 0 lightens light colors. ~ 3 (deep)) Hue ((red) -3 Changes overall color ~ 0 ~ 3 balance. (green)) Gamma Adjusts the picture balance between light and dark areas. ◆"HD Reality Enhancer" elements 1 Select "HD Reality Enhancer" in step 4 above, and press . 2 Select an item, and press . Items Details Enhance (-3 ~ 0 ~ 3) Enhances the scene picture outline pixel by pixel. Smoothing Smooths the gradation (Off/Standard/ on flat parts of the High) picture. FGR (0 ~ 3) Reduces film grain. 42US
-
 1
1 -
2
-
3
-
4
-
5
-
6
-
7
-
8
-
9
-
10
-
11
-
12
-
13
-
14
-
15
-
16
-
17
-
18
-
19
-
20
-
21
-
22
-
23
-
24
-
25
-
26
-
27
-
28
-
29
-
30
-
31
-
32
-
33
-
34
-
35
-
36
-
 37
37 -
 38
38 -
 39
39 -
 40
40 -
 41
41 -
 42
42 -
 43
43 -
 44
44 -
 45
45 -
 46
46 -
 47
47 -
48
-
49
-
50
-
51
-
52
-
53
-
54
-
55
-
56
-
57
-
58
-
59
-
60
-
61
-
62
-
63
-
64
-
65
-
66
-
67
-
68
-
69
-
70
-
71
-
72
-
73
-
74
-
75
-
76
-
77
-
78
-
79
-
80
-
81
-
82
-
83
-
84
-
85
-
86
-
87
-
88
-
89
-
90
-
91
-
92
-
93
-
94
-
95
-
96
-
97
-
98
-
99
-
100
-
101
-
102
-
103
-
104
-
105
-
106
-
107
-
108
-
109
-
110
-
111
-
112
-
113
-
114
-
115
-
116
-
117
-
118
-
119
-
120
-
121
-
122
-
123
-
124
-
125
-
126
-
127
-
128
-
129
-
130
-
131
-
132
-
133
-
134
-
135
-
136
-
137
-
138
-
139
-
140
-
141
-
142
-
143
-
144
-
145
-
146
-
147
-
148
-
149
-
150
-
151
-
152
-
153
-
154
-
155
-
156
-
157
-
158
-
159
-
160
-
161
-
162
-
163
-
164
-
165
-
166
-
167
-
168
-
169
-
170
-
171
-
172
-
173
-
174
-
175
-
176
-
177
-
178
-
179
-
180
-
181
-
182
-
183
-
184
-
185
-
186
-
187
-
188
-
189
-
190
-
191
-
192
-
193
-
194
-
195
-
196
-
197
-
198
-
199
-
200
-
201
-
202
-
203
-
204
-
205
-
206
-
207
-
208
-
209
-
210
-
211
-
212
-
213
-
214
-
215
-
216
-
217
-
218
-
219
 |
 |
