Sony BDP-CX7000ES Operating Instructions - Page 71
Audio HDMI, BD Audio Setting, Audio ATT, Level, Test Tone
 |
UPC - 027242754843
View all Sony BDP-CX7000ES manuals
Add to My Manuals
Save this manual to your list of manuals |
Page 71 highlights
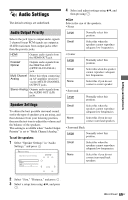
Settings and Adjustments z To adjust the level without listening to the test tone, select "Level" in step 2 and press , then adjust the level using V/v, and press . ◆Level You can vary the level of each speaker as follows. Be sure to set "Test Tone" to "On" for easy adjustment. Front Left Front Right Center Surround Left Surround Right Surround Back Left Surround Back Right Subwoofer Adjust the level of the front speakers (-12 dB to 0 dB, 0.5 dB increments). (0 [dB]) Adjust the level of the center speaker (-12 dB to 0 dB, 0.5 dB increments). (0 [dB]) Adjust the level of the surround speakers (-12 dB to 0 dB, 0.5 dB increments). (0 [dB]) Adjust the level of the surround back speakers (-12 dB to 0 dB, 0.5 dB increments). (0 [dB]) Adjust the level of the subwoofer (-12 dB to 0 dB, 0.5 dB increments). (0 [dB]) ◆Test Tone On The player emits a test tone in sequence from the MULTI CHANNEL OUTPUT jacks to adjust the sound level from each speaker. When you select one of the "Speaker Settings" items, the test tone is emitted from the selected speaker. Off The test tone is not emitted from the speakers. Audio (HDMI) Selects the signal type for the HDMI OUT jack. Auto 2ch PCM Normally select this. Outputs audio signals according to the status of the connected HDMI device. Downmixes to 2-channel Linear PCM signals before outputting from the HDMI OUT jack. b Select "2ch PCM" when connecting a TV or an AV amplifier (receiver) that does not support Dolby Digital or DTS, otherwise noise or no sound may result. BD Audio Setting Selects whether to mix or not mix interactive audio and secondary audio (commentary) when playing a BD that contains such audio. Mix Direct Mixes the interactive and secondary audio as primary audio. Outputs the primary audio only. b PCM 96 kHz and PCM 192 kHz audio signals are output as PCM 48 kHz audio signals when "BD Audio Setting" is set to "Mix." Audio ATT Lowers the audio output level to prevent sound distortion. On Enables Audio Attenuation. Off Disables Audio Attenuation. b "Audio ATT" does not affect the output from the HDMI OUT jack or DIGITAL OUT (OPTICAL/ COAXIAL) jack. ,continued 71US
-
 1
1 -
2
-
3
-
4
-
5
-
6
-
7
-
8
-
9
-
10
-
11
-
12
-
13
-
14
-
15
-
16
-
17
-
18
-
19
-
20
-
21
-
22
-
23
-
24
-
25
-
26
-
27
-
28
-
29
-
30
-
31
-
32
-
33
-
34
-
35
-
36
-
37
-
38
-
39
-
40
-
41
-
42
-
43
-
44
-
45
-
46
-
47
-
48
-
49
-
50
-
51
-
52
-
53
-
54
-
55
-
56
-
57
-
58
-
59
-
60
-
61
-
62
-
63
-
64
-
65
-
 66
66 -
 67
67 -
 68
68 -
 69
69 -
 70
70 -
 71
71 -
 72
72 -
 73
73 -
 74
74 -
 75
75 -
 76
76 -
77
-
78
-
79
-
80
-
81
-
82
-
83
-
84
-
85
-
86
-
87
-
88
-
89
-
90
-
91
-
92
-
93
-
94
-
95
-
96
-
97
-
98
-
99
-
100
-
101
-
102
-
103
-
104
-
105
-
106
-
107
-
108
-
109
-
110
-
111
-
112
-
113
-
114
-
115
-
116
-
117
-
118
-
119
-
120
-
121
-
122
-
123
-
124
-
125
-
126
-
127
-
128
-
129
-
130
-
131
-
132
-
133
-
134
-
135
-
136
-
137
-
138
-
139
-
140
-
141
-
142
-
143
-
144
-
145
-
146
-
147
-
148
-
149
-
150
-
151
-
152
-
153
-
154
-
155
-
156
-
157
-
158
-
159
-
160
-
161
-
162
-
163
-
164
-
165
-
166
-
167
-
168
-
169
-
170
-
171
-
172
-
173
-
174
-
175
-
176
-
177
-
178
-
179
-
180
-
181
-
182
-
183
-
184
-
185
-
186
-
187
-
188
-
189
-
190
-
191
-
192
-
193
-
194
-
195
-
196
-
197
-
198
-
199
-
200
-
201
-
202
-
203
-
204
-
205
-
206
-
207
-
208
-
209
-
210
-
211
-
212
-
213
-
214
-
215
-
216
-
217
-
218
-
219
 |
 |
