Sony HDWD1800 Operation Manual - Page 22
Switch Panel
 |
View all Sony HDWD1800 manuals
Add to My Manuals
Save this manual to your list of manuals |
Page 22 highlights
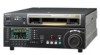
Chapter 2 Location and Function of Parts Playback modes using the search dial Playback mode Operations and functions Shuttle Press the SHUTTLE button or the search dial so that the SHUTTLE button lights, then rotate the search dial. Playback is carried out at a speed determined by the angular position of the search dial. Playback speed ranges are as follows. • HDCAM tape: ±50 times normal speed (59.94i, 29.97PsF mode), ±58 times normal speed (50i, 25PsF mode), ±60 times normal speed (24PsF, 23.98PsF mode) • Digital Betacam tape: ±50 times normal speed • MPEG IMX tape: ±78 times normal speed There are detents on the search dial at the still position and at the position for ±5 times normal speed. The maximum shuttle mode playback speed can be changed in setup menu item 102 (see page 81). Jog Press the JOG button or the search dial so that the JOG button lights, then rotate the search dial. Playback is carried out at a speed determined by the speed of rotation of the search dial. The playback speed range is ±1 time normal speed. The search dial has no detents. Variable speed Press the VAR button, turning it on, then rotate the search dial. You can control the playback speed finely in the range in which noiseless playback is possible. • HDCAM: Maximum 51 steps • Digital Betacam, MPEG IMX: Maximum 54 steps There are detents on the search dial at the still position and at the position for ±1 times normal speed. Capstan override For details on operation, see page 39. Setting setup menu item 101 (see page 81) to KEY enables you to use only the SHUTTLE, JOG, and VAR buttons to select shuttle/jog/variable speed modes. 4 CONTROL PANEL connector KEY INHI ON OFF CONTROL PANEL 3 KEY INHI switch 2 "Memory Stick" slot 1 "Memory Stick" access indicator a "Memory Stick" access indicator Lights or flashes when data is being read from or written to a "Memory Stick". b "Memory Stick" slot Use this to update the firmware. You can also save or load setup menu settings onto or from the "Memory Stick". Note After inserting a "Memory Stick", allow at least five seconds to elapse before removing it. For details on firmware update and saving or loading of setup menu settings, refer to the Maintenance Manual Volume 1. c KEY INHI (inhibit) switch Setting this switch to the ON position disables the controls on the upper and lower control panels. You can specify which buttons and knobs are disabled in setup menu item 118. d CONTROL PANEL connector (20-pin, round type) Plug in the lower control panel connection cable. 2-1-3 Switch Panel To access the switch panel, open the lower control panel. For details on how to open the lower control panel, see the figure on page 11. 22 2-1 Control Panels
-
 1
1 -
2
-
3
-
4
-
5
-
6
-
7
-
8
-
9
-
10
-
11
-
12
-
13
-
14
-
15
-
16
-
 17
17 -
 18
18 -
 19
19 -
 20
20 -
 21
21 -
 22
22 -
 23
23 -
 24
24 -
 25
25 -
 26
26 -
 27
27 -
28
-
29
-
30
-
31
-
32
-
33
-
34
-
35
-
36
-
37
-
38
-
39
-
40
-
41
-
42
-
43
-
44
-
45
-
46
-
47
-
48
-
49
-
50
-
51
-
52
-
53
-
54
-
55
-
56
-
57
-
58
-
59
-
60
-
61
-
62
-
63
-
64
-
65
-
66
-
67
-
68
-
69
-
70
-
71
-
72
-
73
-
74
-
75
-
76
-
77
-
78
-
79
-
80
-
81
-
82
-
83
-
84
-
85
-
86
-
87
-
88
-
89
-
90
-
91
-
92
-
93
-
94
-
95
-
96
-
97
-
98
-
99
-
100
-
101
-
102
-
103
-
104
-
105
-
106
-
107
-
108
-
109
-
110
-
111
-
112
-
113
-
114
-
115
-
116
-
117
-
118
-
119
-
120
-
121
 |
 |
