Sony HDWD1800 Operation Manual - Page 33
Recording and Playback
 |
View all Sony HDWD1800 manuals
Add to My Manuals
Save this manual to your list of manuals |
Page 33 highlights
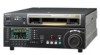
Recording and Playback 4 Chapter Chapter 4 Recording and Playback 4-1 Recording This section describes video and audio recording on the unit. 4-1-1 Preparations for Recording Switch and menu settings Before you start recording, make necessary switch and menu settings. For details on each setting, see the pages indicated in parenthesis. Turn on: POWER switch (see page 12) REMOTE buttons (see page 12): off HOME VIDEO IN SDI EDIT E.PRESET CLR CNT 59.94 SDI 10801080 2F ASM CONFI LTC D F VITC LTC EXT-LTC R-RUN PARARUN 12:34:47:12 HD PROLL BANK3 R E M : 2 0 m i n COND 3+4 EMPH 2 dB DATA 0 -10 1 4 EMPH dB DATA 0 dB -10 10 -20 -20 -20 -30 -40 -60 L1R L2R SDI1 ANA2 L3R SDI3 -30 -40 -60 L4R AES4 -10 -20 -40 L CUE R 3+4 HOME PB/EE PB CONFI ENABLE COUNTER CTL MENU TCG SET Adjust the audio recording levels (see page 19). Select the input audio signal (see page 69). Select the input video signal (see page 65). Select the audio channel to be monitored (see page 69). PREREAD setting (see page 68): OFF CONFI setting (see page 65): ENABLE PB/EE setting (see page 65): PB COUNTER setting (see page 66): Select the time data to be displayed. REC INHI setting (see page 69): OFF 33 4-1 Recording
-
 1
1 -
2
-
3
-
4
-
5
-
6
-
7
-
8
-
9
-
10
-
11
-
12
-
13
-
14
-
15
-
16
-
17
-
18
-
19
-
20
-
21
-
22
-
23
-
24
-
25
-
26
-
27
-
 28
28 -
 29
29 -
 30
30 -
 31
31 -
 32
32 -
 33
33 -
 34
34 -
 35
35 -
 36
36 -
 37
37 -
 38
38 -
39
-
40
-
41
-
42
-
43
-
44
-
45
-
46
-
47
-
48
-
49
-
50
-
51
-
52
-
53
-
54
-
55
-
56
-
57
-
58
-
59
-
60
-
61
-
62
-
63
-
64
-
65
-
66
-
67
-
68
-
69
-
70
-
71
-
72
-
73
-
74
-
75
-
76
-
77
-
78
-
79
-
80
-
81
-
82
-
83
-
84
-
85
-
86
-
87
-
88
-
89
-
90
-
91
-
92
-
93
-
94
-
95
-
96
-
97
-
98
-
99
-
100
-
101
-
102
-
103
-
104
-
105
-
106
-
107
-
108
-
109
-
110
-
111
-
112
-
113
-
114
-
115
-
116
-
117
-
118
-
119
-
120
-
121
 |
 |
