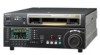
Sony HDWD1800 Operation Manual - Page 79
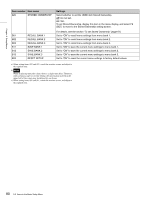
WHITE, BLACK, W/OUT, B/OUT, Item number, Item name, Settings
 |
View all Sony HDWD1800 manuals
Add to My Manuals
Save this manual to your list of manuals |
Page 79 highlights
Chapter 9 Setup Menus Item number Item name 009 c) CHARACTER TYPE 011 c) CHARACTER V-SIZE 013 SYSTEM FREQUENCY SELECT Settings Determine the type of characters such as timecode output from the COMPOSITE VIDEO OUTPUT 3 (SUPER) connector, SDI OUTPUT 3 (SUPER) connector, or HDSDI OUTPUT 3 (SUPER) connector for superimposed display on the monitor. WHITE: White letters on a black background BLACK: Black letters on a white background W/OUT: White letters with black outline B/OUT: Black letters with white outline Determine the vertical size of characters such as timecode output from the COMPOSITE VIDEO OUTPUT 3 (SUPER) connector, SDI OUTPUT 3 (SUPER) connector, or HDSDI OUTPUT 3 (SUPER) connector for superimposed display on the monitor. x1: Standard size x2: 2 times the standard size Determine whether to enable switching of the system frequency among 59.94i, 50i, 29.97PsF, 25PsF, 24PsF and 23.98PsF. OFF: Disable switching. ON: Enable switching. When "ON" is selected, the menu display changes to allow switching of the setting among 59.94i, 50i, 29.97PsF, 25PsF, 24PsF and 23.98PsF. For the procedure for switching the system frequency, see page 76. Note For the basic and extended setup menus, settings are saved for 59.94i, 29.97PsF, 23.98PsF mode and the other for 50i, 25PsF, 24PsF modes separately. When you switch systems, all menu items change to the current menu values of the selected mode. (These are different from the settings for the mode before switching.) 018 ACTIVE LINE SELECT Determine whether to enable switching of the number of active lines for HDSDI (enabled only when the outputs (OFF TAPE/720P). optional HKDW-104 board OFF: Disable switching. is installed, and disabled in ON: Enable switching. 24PsF, 23.98PsF, 24PD, and 23.98PD2 mode) When "ON" is selected, the menu display changes to enable switching between OFF TAPE and 720P.For details on the procedure for switching the ACTIVE LINE, see "To switch the line conversion function (menu item 018)" (page 76). 023 LOCAL KEY MAP When "MAP" is selected in setup menu item 006 and the unit is controlled from another device, you can select the operable buttons on the control panel from the following sub-items. The settings of each sub-item are as follows. DIS: Disable the buttons. Sub-item ENA: Enable the buttons. 1 STOP Select whether to enable or disable the STOP button. 2 PLAY Select whether to enable or disable the PLAY button. 3 REC Select whether to enable or disable the REC button. 4 STANDBY Select whether to enable or disable the STANDBY button. 5 EJECT Select whether to enable or disable the EJECT button. 6 JOG Select whether to enable or disable the JOG button. 7 SHUTTLE Select whether to enable or disable the SHUTTLE button. 8 VAR Select whether to enable or disable the VAR button 9 FF/REW Select whether to enable or disable the F FWD and REW buttons. 10 F-KEY Select whether to enable or disable the function selection buttons (F1 to F10) and audio level control knobs. 11 P-KEY/DISPLAY Select whether to enable or disable the menu page selection buttons (P1 to P5) and DISPLAY button. 79 9-3 Items in the Basic Setup Menu
-
 1
1 -
2
-
3
-
4
-
5
-
6
-
7
-
8
-
9
-
10
-
11
-
12
-
13
-
14
-
15
-
16
-
17
-
18
-
19
-
20
-
21
-
22
-
23
-
24
-
25
-
26
-
27
-
28
-
29
-
30
-
31
-
32
-
33
-
34
-
35
-
36
-
37
-
38
-
39
-
40
-
41
-
42
-
43
-
44
-
45
-
46
-
47
-
48
-
49
-
50
-
51
-
52
-
53
-
54
-
55
-
56
-
57
-
58
-
59
-
60
-
61
-
62
-
63
-
64
-
65
-
66
-
67
-
68
-
69
-
70
-
71
-
72
-
73
-
 74
74 -
 75
75 -
 76
76 -
 77
77 -
 78
78 -
 79
79 -
 80
80 -
 81
81 -
 82
82 -
 83
83 -
 84
84 -
85
-
86
-
87
-
88
-
89
-
90
-
91
-
92
-
93
-
94
-
95
-
96
-
97
-
98
-
99
-
100
-
101
-
102
-
103
-
104
-
105
-
106
-
107
-
108
-
109
-
110
-
111
-
112
-
113
-
114
-
115
-
116
-
117
-
118
-
119
-
120
-
121
 |
 |
