Sony HT-8800DP Operating Instructions (RDR-GX300 DVD Recorder) - Page 23
Step 7: Easy Setup, Select the Command mode DVD1, DVD2
 |
View all Sony HT-8800DP manuals
Add to My Manuals
Save this manual to your list of manuals |
Page 23 highlights
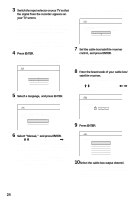
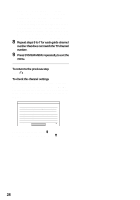
Hookups and Settings 1 Press SYSTEM MENU. The System Menu appears. 2 Select "SETUP," and press ENTER. SETUP Settings Video Audio Features Options Tuner Preset Set VCR Plus+ Channels Clock Set Top Box Control Language Easy Setup 3 Select "Options," and press ENTER. SETUP Settings Video Audio Features Options Format DVD : Dimmer : Auto Display : Command Mode : Factory Setup VR Normal On DVD3 Easy Setup 4 Select "Command Mode," and press ENTER. SETUP Settings Video Audio Features Options Format DVD : Dimmer : Auto Display : Command Mode : Factory Setup Easy Setup VR Normal On DVDD3VD1 DVD2 DVD3 5 Select the Command mode (DVD1, DVD2, or DVD3), and press ENTER. 6 Slide the COMMAND MODE switch on the remote so it matches the mode you selected above. Step 7: Easy Setup Follow the steps below to make the minimum number of basic adjustments for using the recorder. If you do not complete Easy Setup, it will appear each time you turn on your recorder. Settings are made in the following order. OSD Language Setup m Clock Setup m Cable Box/Sat. Control Setup m Tuner and Channel Setup m TV Type Setup m Audio Connection Setup m Finished! Number buttons 123 456 789 0 "/1 CH +/- O RETURN
-
 1
1 -
2
-
3
-
4
-
5
-
6
-
7
-
8
-
9
-
10
-
11
-
12
-
13
-
14
-
15
-
16
-
17
-
 18
18 -
 19
19 -
 20
20 -
 21
21 -
 22
22 -
 23
23 -
 24
24 -
 25
25 -
 26
26 -
 27
27 -
 28
28 -
29
-
30
-
31
-
32
-
33
-
34
-
35
-
36
-
37
-
38
-
39
-
40
-
41
-
42
-
43
-
44
-
45
-
46
-
47
-
48
-
49
-
50
-
51
-
52
-
53
-
54
-
55
-
56
-
57
-
58
-
59
-
60
-
61
-
62
-
63
-
64
-
65
-
66
-
67
-
68
-
69
-
70
-
71
-
72
-
73
-
74
-
75
-
76
-
77
-
78
-
79
-
80
-
81
-
82
-
83
-
84
-
85
-
86
-
87
-
88
-
89
-
90
-
91
-
92
-
93
-
94
-
95
-
96
-
97
-
98
-
99
-
100
-
101
-
102
-
103
-
104
 |
 |
