Sony HT-8800DP Operating Instructions (RDR-GX300 DVD Recorder) - Page 25
Press ENTER., Select the type of jack if any you are
 |
View all Sony HT-8800DP manuals
Add to My Manuals
Save this manual to your list of manuals |
Page 25 highlights
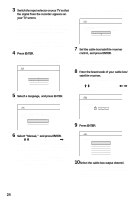
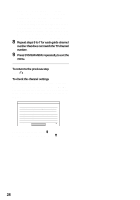
Hookups and Settings If you connect the satellite receiver or cable box to the recorder's antenna input (page 14), select "Ch2," 'Ch3," or "Ch4" and press ENTER, then go to step 13. See the instructions supplied with your cable box to confirm the cable box's antenna output channel. 11Select whether or not you have a cable connection. EASY SETUP Tuner Preset 4/6 Select the way in which you will receive channels. Antenna Cable If you use an antenna only (no cable TV), select "Antenna." If you use a cable connection without a cable box, select "Cable." 12Press ENTER. The Tuner Preset function automatically starts searching for all of the receivable channels and presets them. EASY SETUP Tuner Preset Searching for receivable channels. Please wait. 4/6 Ch45 To set the channels manually, see page 71. After the Tuner Preset is finished, the Setup Display for selecting the aspect ratio of the connected TV appears. 13Select the setting that matches your TV type. "4:3 Letter Box": For standard TVs. Displays "wide screen" pictures with bands on the upper and lower sections of the screen. "4:3 Pan Scan": For standard TVs. Automatically displays "wide screen" pictures on the entire screen and cuts off the sections that do not fit. "16:9": For wide-screen TVs or standard TVs with a wide screen mode. For details, see "TV type" on page 74. 14Press ENTER. The Setup Display for selecting the type of jack used to connect to your amplifier (receiver) appears. EASY SETUP Audio Connection 6/6 Is this recorder connected to an amplifier (receiver)? Select the type of jack you are using. Yes : LINE OUT(R-AUDIO-L) Yes : DIGITAL OUT No 15Select the type of jack (if any) you are using to connect to an amplifier (receiver), and press ENTER. If you did not connect an AV amplifier (receiver), select "No," then go to step 19. If you connected an AV amplifier (receiver) using just an audio cord, select "Yes: LINE OUT (R-AUDIO-L)," then go to step 19. If you connected an AV amplifier (receiver) using either a digital optical or coaxial cord, select "Yes: DIGITAL OUT." 16Select the type of Dolby Digital signal you wish to send to your amplifier (receiver). EASY SETUP Audio Connection 6/6 Dolby Digital D-PCM Dolby Digital EASY SETUP TV Type 5/6 Select your TV screen type. 16 : 9 4 : 3 Letter Box 4 : 3 Pan Scan If your AV amplifier (receiver) has a Dolby Digital decoder, select "Dolby Digital." Otherwise, select "D-PCM." ,continued 25
-
 1
1 -
2
-
3
-
4
-
5
-
6
-
7
-
8
-
9
-
10
-
11
-
12
-
13
-
14
-
15
-
16
-
17
-
18
-
19
-
 20
20 -
 21
21 -
 22
22 -
 23
23 -
 24
24 -
 25
25 -
 26
26 -
 27
27 -
 28
28 -
 29
29 -
 30
30 -
31
-
32
-
33
-
34
-
35
-
36
-
37
-
38
-
39
-
40
-
41
-
42
-
43
-
44
-
45
-
46
-
47
-
48
-
49
-
50
-
51
-
52
-
53
-
54
-
55
-
56
-
57
-
58
-
59
-
60
-
61
-
62
-
63
-
64
-
65
-
66
-
67
-
68
-
69
-
70
-
71
-
72
-
73
-
74
-
75
-
76
-
77
-
78
-
79
-
80
-
81
-
82
-
83
-
84
-
85
-
86
-
87
-
88
-
89
-
90
-
91
-
92
-
93
-
94
-
95
-
96
-
97
-
98
-
99
-
100
-
101
-
102
-
103
-
104
 |
 |
