Sony HT-8800DP Operating Instructions (RDR-GX300 DVD Recorder) - Page 67
Moving a Playlist title Move Title, Select Divide Title, and press ENTER.
 |
View all Sony HT-8800DP manuals
Add to My Manuals
Save this manual to your list of manuals |
Page 67 highlights
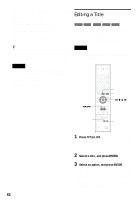
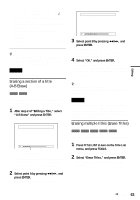
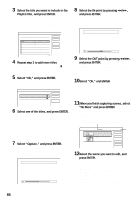
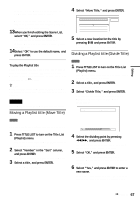
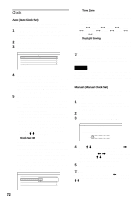
Editing "Change OUT": Allows you to change the OUT point, and repeat from step 9. To add more scenes, select "Add" and go to step 6. To preview all of the captured scenes in the listed order, select "Preview." 13When you finish editing the Scene List, select "OK," and press ENTER. The display for entering the title name appears. To enter a new name, select "Enter" (see page 39). 14Select "OK" to use the default name, and press ENTER. To play the Playlist title Press TOOLS while the Title List menu is turned on. Then, select "Playlist" and press ENTER. When the Title List (Playlist) menu appears, select a title and press H PLAY. z Hint When a Playlist title is created, the IN and OUT points will become chapter marks, and each scene will become a chapter. Note The picture may pause when the edited scene is played. Moving a Playlist title (Move Title) 4 Select "Move Title," and press ENTER. Move 1 2ch 1:00PM - 2:00PM Wed 9/15 Where do you want to move this title? 2 5ch 8:00AM - 9:00AM Fri 9/17 Cancel 5 Select a new location for the title by pressing M/m and press ENTER. The title moves to the new location. Dividing a Playlist title (Divide Title) -RWVR 1 Press TITLE LIST to turn on the Title List (Playlist) menu. If the Title List (Original) menu appears, press TOOLS and select "Playlist." 2 Select a title, and press ENTER. The sub-menu appears. 3 Select "Divide Title," and press ENTER. The display for setting the dividing point appears. The title starts to play in the background. Divide 1 2ch 1:00PM - 2:00PM -RWVR You can change the Playlist title order within the Title List (Playlist). 1 Press TITLE LIST to turn on the Title List (Playlist) menu. If the Title List (Original) menu appears, press TOOLS and select "Playlist." 2 Select "Number" in the "Sort" column, and press ENTER. The titles are sorted in order of title number. 3 Select a title, and press ENTER. The sub-menu appears. 0:12:34 4 Select the dividing point by pressing m/M, and press ENTER. The display asks for confirmation. To change the dividing point, select "Change." 5 Select "OK," and press ENTER. The display for entering the title name appears. To use the same title name as before, select "No." 6 Select "Yes," and press ENTER to enter a new name. Follow the explanations on page 39. After you enter a new name, the title is divided in two. ,continued 67
-
 1
1 -
2
-
3
-
4
-
5
-
6
-
7
-
8
-
9
-
10
-
11
-
12
-
13
-
14
-
15
-
16
-
17
-
18
-
19
-
20
-
21
-
22
-
23
-
24
-
25
-
26
-
27
-
28
-
29
-
30
-
31
-
32
-
33
-
34
-
35
-
36
-
37
-
38
-
39
-
40
-
41
-
42
-
43
-
44
-
45
-
46
-
47
-
48
-
49
-
50
-
51
-
52
-
53
-
54
-
55
-
56
-
57
-
58
-
59
-
60
-
61
-
 62
62 -
 63
63 -
 64
64 -
 65
65 -
 66
66 -
 67
67 -
 68
68 -
 69
69 -
 70
70 -
 71
71 -
 72
72 -
73
-
74
-
75
-
76
-
77
-
78
-
79
-
80
-
81
-
82
-
83
-
84
-
85
-
86
-
87
-
88
-
89
-
90
-
91
-
92
-
93
-
94
-
95
-
96
-
97
-
98
-
99
-
100
-
101
-
102
-
103
-
104
 |
 |
