Sony PCG-TR1A VAIO User Guide - Page 114
Removing and Installing Memory Modules, Removing the Bottom Screws, Removing a Memory Module - parts
 |
UPC - 027242629578
View all Sony PCG-TR1A manuals
Add to My Manuals
Save this manual to your list of manuals |
Page 114 highlights
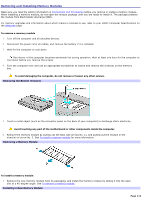
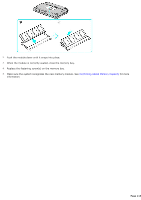
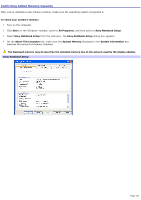
Removing and Installing Memory Modules Make sure you read the safety information in Precautions and Procedures before you remove or install a memory module. When installing a memory module, do not open the module package until you are ready to install it. The package protects the module from Electrostatic discharge (ESD). For memory upgrades and information about which memory modules to use, refer to your VAIO® Computer Specifications on the Welcome page. To remove a memory module 1. Turn off the computer and all attached devices. 2. Disconnect the power cord, all cables, and remove the battery if it is installed. 3. Wait for the computer to cool down. The interior of the computer becomes extremely hot during operation. Wait at least one hour for the computer to cool down before you remove the screws. 4. Turn the computer over and use an appropriate screwdriver to loosen and remove the screw(s) on the memory bay. To avoid damaging the computer, do not remove or loosen any other screws. Rem ov ing the Bottom Screw(s) 5. Touch a metal object (such as the connector panel on the back of your computer) to discharge static electricity. Avoid touching any part of the motherboard or other components inside the computer. 6. Remove the memory module by pulling out the tabs (see arrows No. 1), and pulling out the module in the direction of arrow No. 2. See To install a memory module for more information. Rem ov ing a Mem ory Module To install a memory module 1. Remove the new memory module from its packaging, and install the memory module by sliding it into the open slot at a 45-degree angle. See To remove a memory module. Installing a New Mem ory Module Page 114
-
 1
1 -
2
-
3
-
4
-
5
-
6
-
7
-
8
-
9
-
10
-
11
-
12
-
13
-
14
-
15
-
16
-
17
-
18
-
19
-
20
-
21
-
22
-
23
-
24
-
25
-
26
-
27
-
28
-
29
-
30
-
31
-
32
-
33
-
34
-
35
-
36
-
37
-
38
-
39
-
40
-
41
-
42
-
43
-
44
-
45
-
46
-
47
-
48
-
49
-
50
-
51
-
52
-
53
-
54
-
55
-
56
-
57
-
58
-
59
-
60
-
61
-
62
-
63
-
64
-
65
-
66
-
67
-
68
-
69
-
70
-
71
-
72
-
73
-
74
-
75
-
76
-
77
-
78
-
79
-
80
-
81
-
82
-
83
-
84
-
85
-
86
-
87
-
88
-
89
-
90
-
91
-
92
-
93
-
94
-
95
-
96
-
97
-
98
-
99
-
100
-
101
-
102
-
103
-
104
-
105
-
106
-
107
-
108
-
 109
109 -
 110
110 -
 111
111 -
 112
112 -
 113
113 -
 114
114 -
 115
115 -
 116
116 -
 117
117 -
 118
118 -
 119
119 -
120
-
121
-
122
-
123
-
124
-
125
-
126
-
127
-
128
-
129
-
130
-
131
-
132
-
133
-
134
-
135
-
136
-
137
-
138
-
139
-
140
-
141
-
142
-
143
-
144
-
145
-
146
-
147
-
148
-
149
-
150
-
151
-
152
-
153
-
154
-
155
-
156
-
157
-
158
-
159
-
160
-
161
-
162
-
163
-
164
-
165
-
166
-
167
-
168
-
169
-
170
-
171
-
172
-
173
-
174
-
175
-
176
-
177
-
178
-
179
-
180
-
181
-
182
-
183
-
184
-
185
-
186
-
187
-
188
-
189
-
190
-
191
-
192
-
193
-
194
-
195
-
196
 |
 |
