Sony PCG-TR1A VAIO User Guide - Page 48
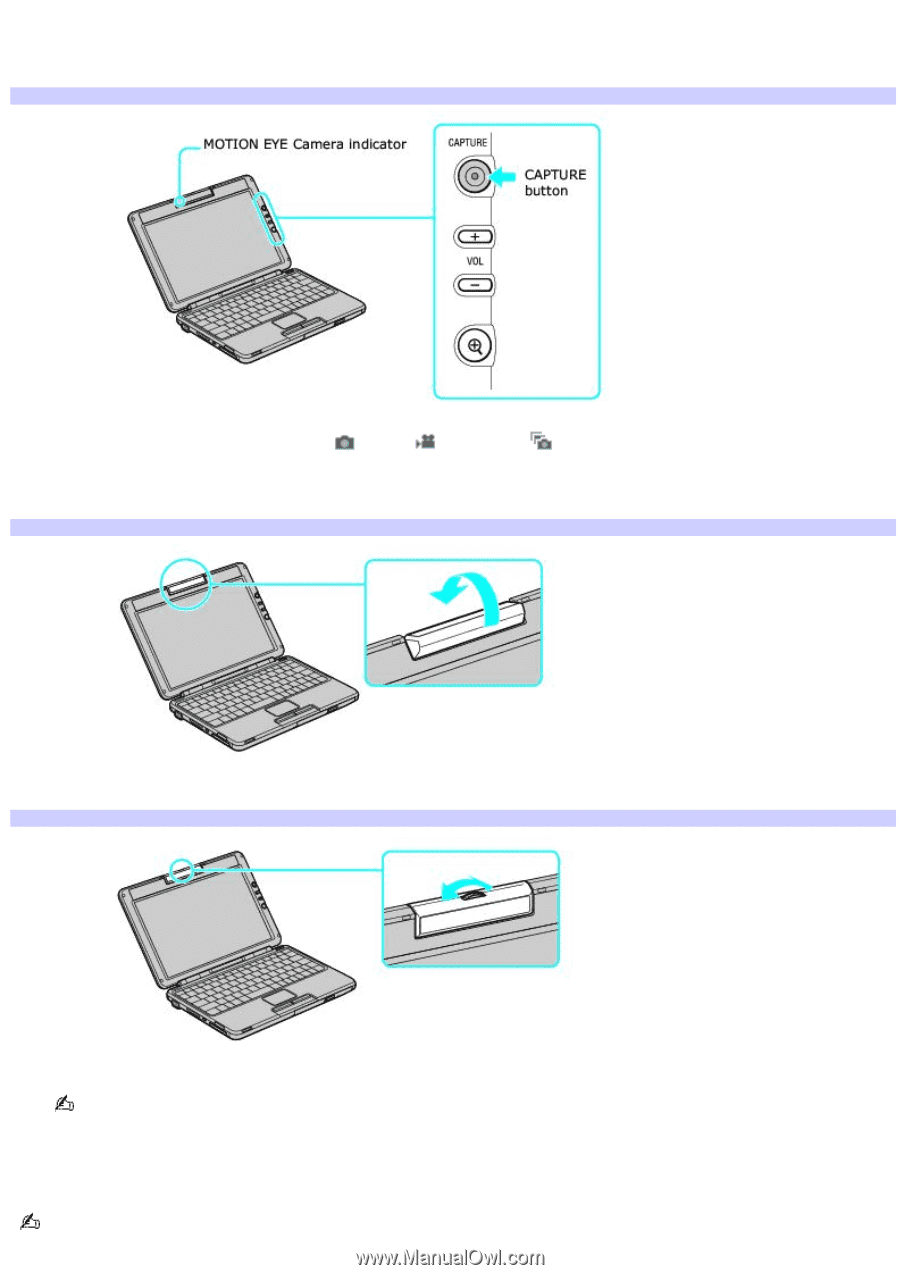
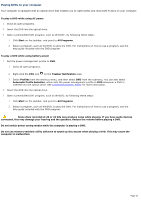
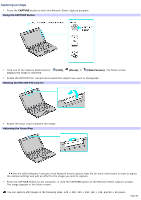
Capturing an image, Using the CAPTURE Button, Rotating the MOTION EYE Cam era - camera
 |
UPC - 027242629578
View all Sony PCG-TR1A manuals
Add to My Manuals
Save this manual to your list of manuals |
Page 48 highlights
Capturing an image 1. Press the CAPTURE button to start the Network Smart Capture program. Using the CAPTURE Button 2. Click one of the Capture Mode buttons: displays the image in real-time. (Still), (Movie), or (Web Camera). The finder screen 3. Rotate the MOTION EYE® camera lens toward the subject you want to photograph. Rotating the MOTION EYE Cam era 4. Rotate the focus ring to sharpen the image. Adjusting the Focus Ring See the VAIO Software Tutorials or the Network Smart Capture Help file for more information on how to adjust the camera settings and add an effect to the image you wish to capture. 5. Press the CAPTURE button on the computer, or click the CAPTURE button on the Network Smart Capture window. The image appears in the finder screen. You can capture still images in the following sizes: 640 × 480, 320 × 240, 160 × 120, and 80 × 60 pixels. Page 48
-
 1
1 -
2
-
3
-
4
-
5
-
6
-
7
-
8
-
9
-
10
-
11
-
12
-
13
-
14
-
15
-
16
-
17
-
18
-
19
-
20
-
21
-
22
-
23
-
24
-
25
-
26
-
27
-
28
-
29
-
30
-
31
-
32
-
33
-
34
-
35
-
36
-
37
-
38
-
39
-
40
-
41
-
42
-
 43
43 -
 44
44 -
 45
45 -
 46
46 -
 47
47 -
 48
48 -
 49
49 -
 50
50 -
 51
51 -
 52
52 -
 53
53 -
54
-
55
-
56
-
57
-
58
-
59
-
60
-
61
-
62
-
63
-
64
-
65
-
66
-
67
-
68
-
69
-
70
-
71
-
72
-
73
-
74
-
75
-
76
-
77
-
78
-
79
-
80
-
81
-
82
-
83
-
84
-
85
-
86
-
87
-
88
-
89
-
90
-
91
-
92
-
93
-
94
-
95
-
96
-
97
-
98
-
99
-
100
-
101
-
102
-
103
-
104
-
105
-
106
-
107
-
108
-
109
-
110
-
111
-
112
-
113
-
114
-
115
-
116
-
117
-
118
-
119
-
120
-
121
-
122
-
123
-
124
-
125
-
126
-
127
-
128
-
129
-
130
-
131
-
132
-
133
-
134
-
135
-
136
-
137
-
138
-
139
-
140
-
141
-
142
-
143
-
144
-
145
-
146
-
147
-
148
-
149
-
150
-
151
-
152
-
153
-
154
-
155
-
156
-
157
-
158
-
159
-
160
-
161
-
162
-
163
-
164
-
165
-
166
-
167
-
168
-
169
-
170
-
171
-
172
-
173
-
174
-
175
-
176
-
177
-
178
-
179
-
180
-
181
-
182
-
183
-
184
-
185
-
186
-
187
-
188
-
189
-
190
-
191
-
192
-
193
-
194
-
195
-
196
 |
 |