Sony PCG-TR1A VAIO User Guide - Page 95
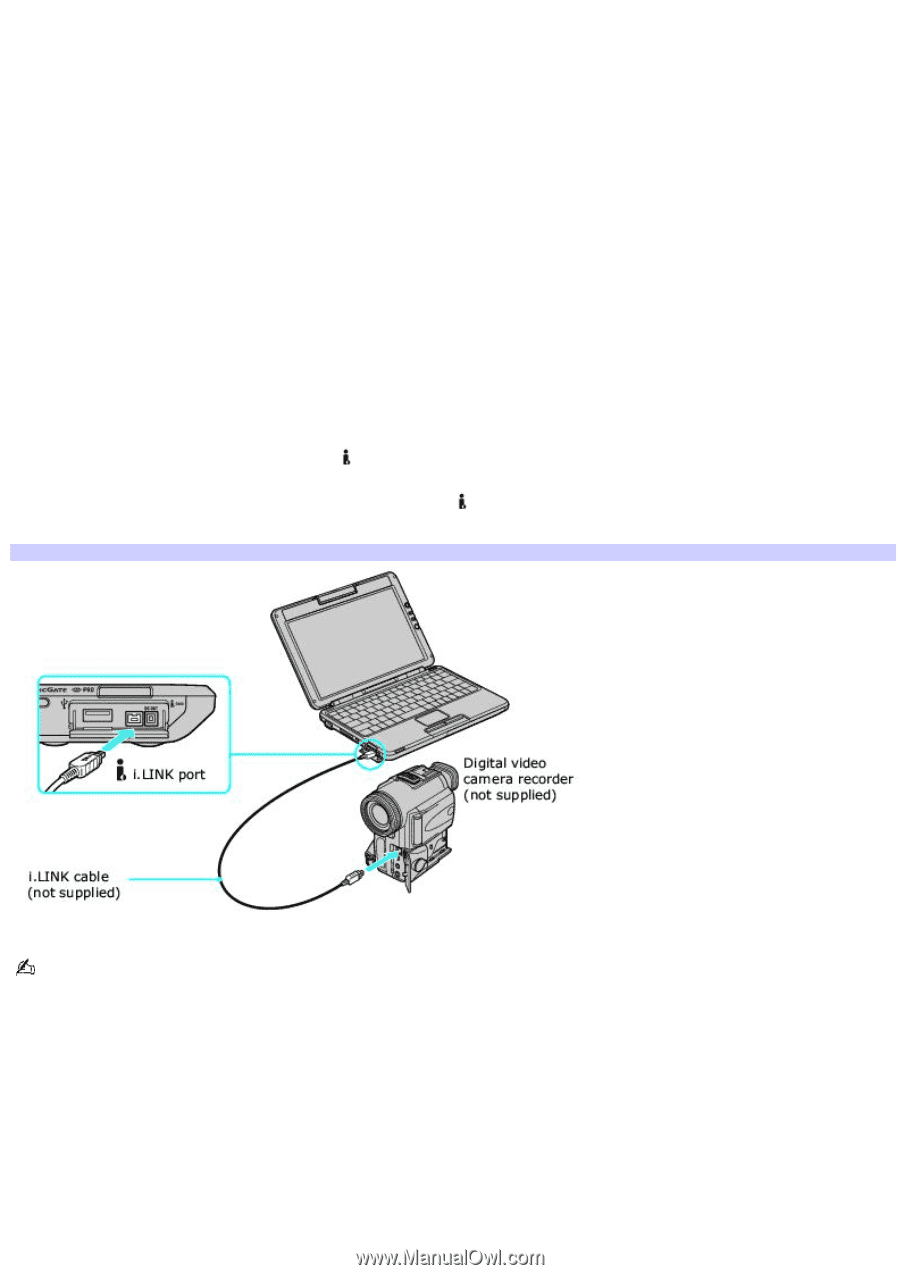
Connecting an i.LINK digital video recorder
 |
UPC - 027242629578
View all Sony PCG-TR1A manuals
Add to My Manuals
Save this manual to your list of manuals |
Page 95 highlights
Connecting an i.LINK digital video recorder You can connect an i.LINK digital video (DV) recorder when the computer is on or off. Connecting the DV recorder when the computer is in a power saving mode (Standby or Hibernate) may cause the computer to malfunction. Before you connect an i.LINK digital video recorder Do not connect more than one digital video camera recorder at a time. The preinstalled programs on your computer will not recognize multiple cameras. Do not connect an external device that requires power from the i.LINK port. The i.LINK port does not supply power to the external device. The i.LINK port supports transfer rates of up to 400 Mbps; however, the actual transfer rate is the lowest transfer rate of the external device. The i.LINK features available may vary depending on the programs you use. See the help guide that accompanied your program for more information. To connect an i.LINK digital video recorder 1. Turn on the digital video (DV) device and the computer. 2. Plug the i.LINK® cable into the i.LINK port on the DV device. 3. Plug the other end of the i.LINK cable into the i.LINK port on your computer. The Found New Hardware window appears on the lower right corner of your screen. Connecting an i.LINK Digital Video Cam era Recorder See the guide that accompanied your digital video camera recorder for more information on its installation and use. Page 95
-
 1
1 -
2
-
3
-
4
-
5
-
6
-
7
-
8
-
9
-
10
-
11
-
12
-
13
-
14
-
15
-
16
-
17
-
18
-
19
-
20
-
21
-
22
-
23
-
24
-
25
-
26
-
27
-
28
-
29
-
30
-
31
-
32
-
33
-
34
-
35
-
36
-
37
-
38
-
39
-
40
-
41
-
42
-
43
-
44
-
45
-
46
-
47
-
48
-
49
-
50
-
51
-
52
-
53
-
54
-
55
-
56
-
57
-
58
-
59
-
60
-
61
-
62
-
63
-
64
-
65
-
66
-
67
-
68
-
69
-
70
-
71
-
72
-
73
-
74
-
75
-
76
-
77
-
78
-
79
-
80
-
81
-
82
-
83
-
84
-
85
-
86
-
87
-
88
-
89
-
 90
90 -
 91
91 -
 92
92 -
 93
93 -
 94
94 -
 95
95 -
 96
96 -
 97
97 -
 98
98 -
 99
99 -
 100
100 -
101
-
102
-
103
-
104
-
105
-
106
-
107
-
108
-
109
-
110
-
111
-
112
-
113
-
114
-
115
-
116
-
117
-
118
-
119
-
120
-
121
-
122
-
123
-
124
-
125
-
126
-
127
-
128
-
129
-
130
-
131
-
132
-
133
-
134
-
135
-
136
-
137
-
138
-
139
-
140
-
141
-
142
-
143
-
144
-
145
-
146
-
147
-
148
-
149
-
150
-
151
-
152
-
153
-
154
-
155
-
156
-
157
-
158
-
159
-
160
-
161
-
162
-
163
-
164
-
165
-
166
-
167
-
168
-
169
-
170
-
171
-
172
-
173
-
174
-
175
-
176
-
177
-
178
-
179
-
180
-
181
-
182
-
183
-
184
-
185
-
186
-
187
-
188
-
189
-
190
-
191
-
192
-
193
-
194
-
195
-
196
 |
 |