Sony PCG-TR1A VAIO User Guide - Page 58
Customizing the touch pad, A Sony Notebook Setup message appears.
 |
UPC - 027242629578
View all Sony PCG-TR1A manuals
Add to My Manuals
Save this manual to your list of manuals |
Page 58 highlights
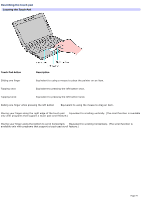
Customizing the touch pad Sony Notebook Setup lets you customize, enable, or disable the touch pad. Open the Mouse Properties dialog box to set your touch pad and mouse preferences, such as changing pointers, enabling or disabling the tapping feature, clicking both buttons simultaneously, and adjusting the touch pad speed. To customize the touch pad and mouse Right-click the Touchpad icon on the Taskbar Notification area, and click Mouse Properties from the shortcut menu. The Mouse Properties dialog box appears. To enable the touch pad 1. Press the Windows key . The Start menu appears. 2. Press P until All Programs is selected, and press Enter. 3. Press S until Sony Notebook Setup is selected, and press Enter. A submenu appears with Sony Notebook Setup preselected. 4. Press Enter. The Sony Notebook Setup dialog box appears. 5. Press the Right Arrow key to select the Device tab. 6. Press the Tab key to select the Default button, and press Enter. A pop-up window appears. 7. Press the Left Arrow key selected. to select OK, and press Enter. The Enable Touchpad option is automatically 8. Press the Tab key to select the Apply button, and press Enter. 9. Click OK. To disable the touch pad 1. Click Start on the Windows® taskbar, and point to All Programs. 2. Point to Sony Notebook Setup, and click Sony Notebook Setup in the submenu. The Sony Notebook Setup dialog box appears. 3. Click the Device tab. 4. In the left panel, click to cancel the Pointing Device check box. 5. Click Apply. A Sony Notebook Setup message appears. 6. Click Yes. Page 58
-
 1
1 -
2
-
3
-
4
-
5
-
6
-
7
-
8
-
9
-
10
-
11
-
12
-
13
-
14
-
15
-
16
-
17
-
18
-
19
-
20
-
21
-
22
-
23
-
24
-
25
-
26
-
27
-
28
-
29
-
30
-
31
-
32
-
33
-
34
-
35
-
36
-
37
-
38
-
39
-
40
-
41
-
42
-
43
-
44
-
45
-
46
-
47
-
48
-
49
-
50
-
51
-
52
-
 53
53 -
 54
54 -
 55
55 -
 56
56 -
 57
57 -
 58
58 -
 59
59 -
 60
60 -
 61
61 -
 62
62 -
 63
63 -
64
-
65
-
66
-
67
-
68
-
69
-
70
-
71
-
72
-
73
-
74
-
75
-
76
-
77
-
78
-
79
-
80
-
81
-
82
-
83
-
84
-
85
-
86
-
87
-
88
-
89
-
90
-
91
-
92
-
93
-
94
-
95
-
96
-
97
-
98
-
99
-
100
-
101
-
102
-
103
-
104
-
105
-
106
-
107
-
108
-
109
-
110
-
111
-
112
-
113
-
114
-
115
-
116
-
117
-
118
-
119
-
120
-
121
-
122
-
123
-
124
-
125
-
126
-
127
-
128
-
129
-
130
-
131
-
132
-
133
-
134
-
135
-
136
-
137
-
138
-
139
-
140
-
141
-
142
-
143
-
144
-
145
-
146
-
147
-
148
-
149
-
150
-
151
-
152
-
153
-
154
-
155
-
156
-
157
-
158
-
159
-
160
-
161
-
162
-
163
-
164
-
165
-
166
-
167
-
168
-
169
-
170
-
171
-
172
-
173
-
174
-
175
-
176
-
177
-
178
-
179
-
180
-
181
-
182
-
183
-
184
-
185
-
186
-
187
-
188
-
189
-
190
-
191
-
192
-
193
-
194
-
195
-
196
 |
 |