Sony PCG-TR1A VAIO User Guide - Page 91
Connecting an i.LINK Optical Drive, Safely Remove Hardware
 |
UPC - 027242629578
View all Sony PCG-TR1A manuals
Add to My Manuals
Save this manual to your list of manuals |
Page 91 highlights
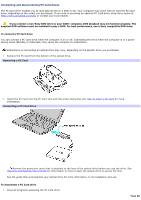
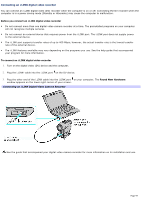
Connecting an i.LINK Optical Drive The i.LINK® optical drive draws power from the computer through a cable. You must connect the cable to both the i.LINK port and DC OUT jack on your computer.1 Do not use the i.LINK optical drive and a PC Card drive at the same time. Connecting both devices may cause the computer to malfunction. To connect an i.LINK optical drive 1. Close any active programs to prevent data loss. 2. Insert the L-shaped connector on the cable (supplied with the i.LINK® optical drive) into the matching port on the rear panel of the i.LINK optical drive. Connecting an i.LINK Optical Drive 3. Turn the LOCK device clockwise to secure the L-shaped connector. 4. Insert the two-prong cable connector into both the i.LINK port and DC OUT jack on the computer. The i.LINK drive power indicator turns on, and the computer automatically detects the connected drive. To use the i.LINK optical drive 1. Click Start, and then click My Computer. The My Computer window appears. 2. Double-click the compact disc drive icon under Devices with Removable Storage. The compact drive window appears. To disconnect the i.LINK optical drive 1. Close any active programs to prevent data loss. 2. Double-click the Safely Remove Hardware icon appears. on the taskbar. The Safely Remove Hardware window 3. Select the i.LINK® drive in the Hardware devices window, if it is not already selected. 4. Click Stop. The Stop a Hardware device window appears. Page 91
-
 1
1 -
2
-
3
-
4
-
5
-
6
-
7
-
8
-
9
-
10
-
11
-
12
-
13
-
14
-
15
-
16
-
17
-
18
-
19
-
20
-
21
-
22
-
23
-
24
-
25
-
26
-
27
-
28
-
29
-
30
-
31
-
32
-
33
-
34
-
35
-
36
-
37
-
38
-
39
-
40
-
41
-
42
-
43
-
44
-
45
-
46
-
47
-
48
-
49
-
50
-
51
-
52
-
53
-
54
-
55
-
56
-
57
-
58
-
59
-
60
-
61
-
62
-
63
-
64
-
65
-
66
-
67
-
68
-
69
-
70
-
71
-
72
-
73
-
74
-
75
-
76
-
77
-
78
-
79
-
80
-
81
-
82
-
83
-
84
-
85
-
 86
86 -
 87
87 -
 88
88 -
 89
89 -
 90
90 -
 91
91 -
 92
92 -
 93
93 -
 94
94 -
 95
95 -
 96
96 -
97
-
98
-
99
-
100
-
101
-
102
-
103
-
104
-
105
-
106
-
107
-
108
-
109
-
110
-
111
-
112
-
113
-
114
-
115
-
116
-
117
-
118
-
119
-
120
-
121
-
122
-
123
-
124
-
125
-
126
-
127
-
128
-
129
-
130
-
131
-
132
-
133
-
134
-
135
-
136
-
137
-
138
-
139
-
140
-
141
-
142
-
143
-
144
-
145
-
146
-
147
-
148
-
149
-
150
-
151
-
152
-
153
-
154
-
155
-
156
-
157
-
158
-
159
-
160
-
161
-
162
-
163
-
164
-
165
-
166
-
167
-
168
-
169
-
170
-
171
-
172
-
173
-
174
-
175
-
176
-
177
-
178
-
179
-
180
-
181
-
182
-
183
-
184
-
185
-
186
-
187
-
188
-
189
-
190
-
191
-
192
-
193
-
194
-
195
-
196
 |
 |
