Sony STR-DA4300ES Operating Instructions (Large File - 20.21 MB) - Page 17
: Connecting speakers, Getting Started
 |
UPC - 027242715127
View all Sony STR-DA4300ES manuals
Add to My Manuals
Save this manual to your list of manuals |
Page 17 highlights
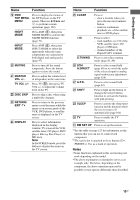
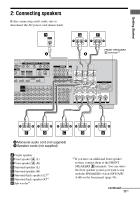
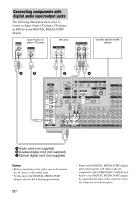
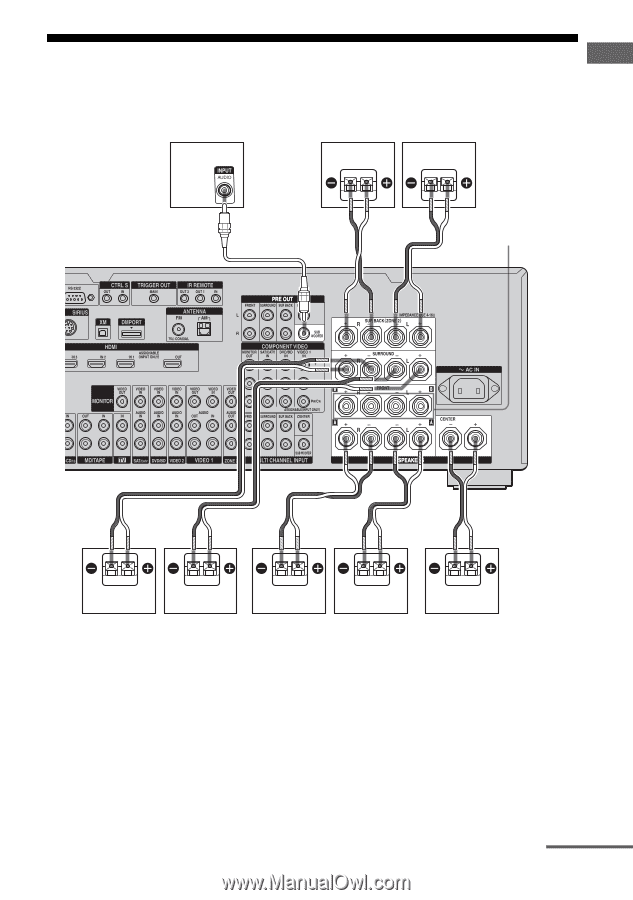
Getting Started 2: Connecting speakers Before connecting cords, make sure to disconnect the AC power cord (mains lead). H A G F FRONT SPEAKERS B B terminals a) E D C B A A Monaural audio cord (not supplied) B Speaker cords (not supplied) ACenter speaker BFront speaker A (L) CFront speaker A (R) DSurround speaker (L) ESurround speaker (R) FSurround back speaker (L)b) GSurround back speaker (R)b) HSub wooferc) a) If you have an additional front speaker system, connect them to the FRONT SPEAKERS B terminals. You can select the front speaker system you want to use with the SPEAKERS switch (OFF/A/B/ A+B) on the front panel (page 44). continued 17GB
-
 1
1 -
2
-
3
-
4
-
5
-
6
-
7
-
8
-
9
-
10
-
11
-
 12
12 -
 13
13 -
 14
14 -
 15
15 -
 16
16 -
 17
17 -
 18
18 -
 19
19 -
 20
20 -
 21
21 -
 22
22 -
23
-
24
-
25
-
26
-
27
-
28
-
29
-
30
-
31
-
32
-
33
-
34
-
35
-
36
-
37
-
38
-
39
-
40
-
41
-
42
-
43
-
44
-
45
-
46
-
47
-
48
-
49
-
50
-
51
-
52
-
53
-
54
-
55
-
56
-
57
-
58
-
59
-
60
-
61
-
62
-
63
-
64
-
65
-
66
-
67
-
68
-
69
-
70
-
71
-
72
-
73
-
74
-
75
-
76
-
77
-
78
-
79
-
80
-
81
-
82
-
83
-
84
-
85
-
86
-
87
-
88
-
89
-
90
-
91
-
92
-
93
-
94
-
95
-
96
-
97
-
98
-
99
-
100
-
101
-
102
-
103
-
104
-
105
-
106
-
107
-
108
-
109
-
110
-
111
-
112
-
113
-
114
-
115
-
116
-
117
-
118
-
119
-
120
-
121
-
122
-
123
-
124
-
125
-
126
-
127
-
128
-
129
-
130
-
131
-
132
-
133
-
134
-
135
-
136
-
137
-
138
-
139
-
140
-
141
-
142
-
143
-
144
-
145
-
146
-
147
-
148
-
149
-
150
-
151
-
152
-
153
-
154
-
155
-
156
-
157
-
158
-
159
-
160
-
161
-
162
-
163
-
164
-
165
-
166
-
167
-
168
-
169
-
170
-
171
-
172
-
173
-
174
-
175
-
176
-
177
-
178
-
179
-
180
-
181
-
182
-
183
-
184
-
185
-
186
-
187
-
188
-
189
-
190
-
191
-
192
-
193
-
194
-
195
-
196
-
197
-
198
-
199
-
200
-
201
-
202
-
203
-
204
-
205
-
206
-
207
-
208
-
209
-
210
-
211
-
212
-
213
-
214
-
215
-
216
-
217
-
218
-
219
-
220
-
221
-
222
-
223
-
224
-
225
-
226
-
227
-
228
-
229
-
230
-
231
-
232
-
233
-
234
-
235
-
236
-
237
-
238
-
239
-
240
-
241
-
242
-
243
-
244
-
245
-
246
-
247
-
248
-
249
-
250
-
251
-
252
-
253
-
254
-
255
-
256
-
257
-
258
-
259
-
260
-
261
-
262
-
263
-
264
-
265
-
266
-
267
-
268
-
269
-
270
-
271
-
272
-
273
-
274
-
275
-
276
-
277
-
278
-
279
-
280
-
281
-
282
-
283
-
284
-
285
-
286
-
287
-
288
-
289
-
290
-
291
-
292
-
293
-
294
-
295
-
296
-
297
-
298
-
299
-
300
-
301
-
302
 |
 |
17
GB
Getting Started
2: Connecting speakers
Before connecting cords, make sure to
disconnect the AC power cord (mains lead).
A
Center speaker
B
Front speaker
A
(L)
C
Front speaker
A
(R)
D
Surround speaker (L)
E
Surround speaker (R)
F
Surround back speaker (L)
b)
G
Surround back speaker (R)
b)
H
Sub woofer
c)
a)
If you have an additional front speaker
system, connect them to the FRONT
SPEAKERS
B
terminals. You can select
the front speaker system you want to use
with the SPEAKERS switch (OFF/A/B/
A+B) on the front panel (page 44).
H
G
F
B
A
D
E
C
A
B
FRONT SPEAKERS
B
terminals
a)
A
Monaural audio cord (not supplied)
B
Speaker cords (not supplied)
continued