Sony STR-DA4300ES Operating Instructions (Large File - 20.21 MB) - Page 98
Enjoying the sound/ images from other inputs, Input Assign.
 |
UPC - 027242715127
View all Sony STR-DA4300ES manuals
Add to My Manuals
Save this manual to your list of manuals |
Page 98 highlights
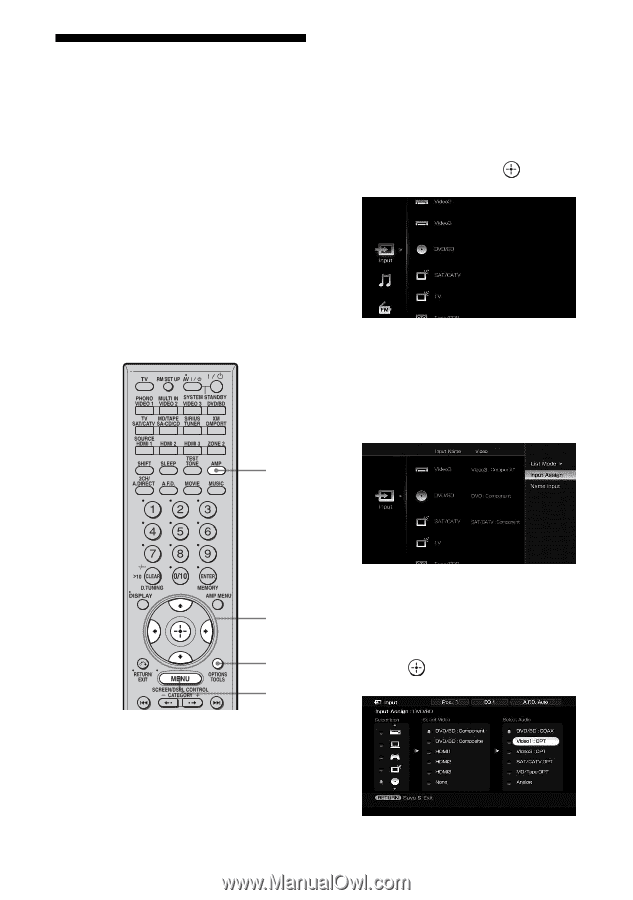
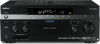
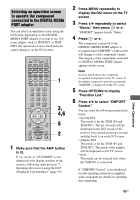
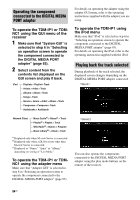
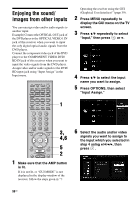
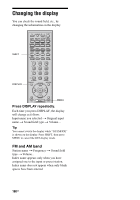
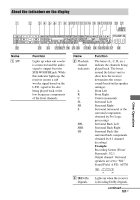
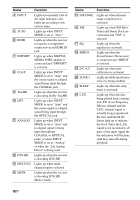
Enjoying the sound/ images from other inputs You can reassign video and/or audio signals to another input. Example) Connect the OPTICAL OUT jack of the DVD player to the OPTICAL VIDEO 1 IN jack of this receiver when you want to input the only digital optical audio signals from the DVD player. Connect the component video jack of the DVD player to the COMPONENT VIDEO DVD/ BD IN jack of this receiver when you want to input the video signals from the DVD player. Assign video and/or audio signals to the DVD/ BD input jack using "Input Assign" in the Input menu. Operating the receiver using the GUI (Graphical User Interface)" (page 39). 2 Press MENU repeatedly to display the GUI menu on the TV screen. 3 Press V/v repeatedly to select "Input," then press or b. 4 Press V/v to select the input name you want to assign. 5 Press OPTIONS, then select "Input Assign." 1 3, 4,6 5 2 1 Make sure that the AMP button is lit. If it is not lit, or "GUI MODE" is not displayed in the display window of the receiver, follow the steps given in "7: 6 Select the audio and/or video signals you want to assign to the input which you selected in step 4 using V/v/B/b, then press . 98GB
-
 1
1 -
2
-
3
-
4
-
5
-
6
-
7
-
8
-
9
-
10
-
11
-
12
-
13
-
14
-
15
-
16
-
17
-
18
-
19
-
20
-
21
-
22
-
23
-
24
-
25
-
26
-
27
-
28
-
29
-
30
-
31
-
32
-
33
-
34
-
35
-
36
-
37
-
38
-
39
-
40
-
41
-
42
-
43
-
44
-
45
-
46
-
47
-
48
-
49
-
50
-
51
-
52
-
53
-
54
-
55
-
56
-
57
-
58
-
59
-
60
-
61
-
62
-
63
-
64
-
65
-
66
-
67
-
68
-
69
-
70
-
71
-
72
-
73
-
74
-
75
-
76
-
77
-
78
-
79
-
80
-
81
-
82
-
83
-
84
-
85
-
86
-
87
-
88
-
89
-
90
-
91
-
92
-
 93
93 -
 94
94 -
 95
95 -
 96
96 -
 97
97 -
 98
98 -
 99
99 -
 100
100 -
 101
101 -
 102
102 -
 103
103 -
104
-
105
-
106
-
107
-
108
-
109
-
110
-
111
-
112
-
113
-
114
-
115
-
116
-
117
-
118
-
119
-
120
-
121
-
122
-
123
-
124
-
125
-
126
-
127
-
128
-
129
-
130
-
131
-
132
-
133
-
134
-
135
-
136
-
137
-
138
-
139
-
140
-
141
-
142
-
143
-
144
-
145
-
146
-
147
-
148
-
149
-
150
-
151
-
152
-
153
-
154
-
155
-
156
-
157
-
158
-
159
-
160
-
161
-
162
-
163
-
164
-
165
-
166
-
167
-
168
-
169
-
170
-
171
-
172
-
173
-
174
-
175
-
176
-
177
-
178
-
179
-
180
-
181
-
182
-
183
-
184
-
185
-
186
-
187
-
188
-
189
-
190
-
191
-
192
-
193
-
194
-
195
-
196
-
197
-
198
-
199
-
200
-
201
-
202
-
203
-
204
-
205
-
206
-
207
-
208
-
209
-
210
-
211
-
212
-
213
-
214
-
215
-
216
-
217
-
218
-
219
-
220
-
221
-
222
-
223
-
224
-
225
-
226
-
227
-
228
-
229
-
230
-
231
-
232
-
233
-
234
-
235
-
236
-
237
-
238
-
239
-
240
-
241
-
242
-
243
-
244
-
245
-
246
-
247
-
248
-
249
-
250
-
251
-
252
-
253
-
254
-
255
-
256
-
257
-
258
-
259
-
260
-
261
-
262
-
263
-
264
-
265
-
266
-
267
-
268
-
269
-
270
-
271
-
272
-
273
-
274
-
275
-
276
-
277
-
278
-
279
-
280
-
281
-
282
-
283
-
284
-
285
-
286
-
287
-
288
-
289
-
290
-
291
-
292
-
293
-
294
-
295
-
296
-
297
-
298
-
299
-
300
-
301
-
302
 |
 |