Toshiba 40L2200U User Guide - Page 118
CableClear® digital Noise Reduction
 |
View all Toshiba 40L2200U manuals
Add to My Manuals
Save this manual to your list of manuals |
Page 118 highlights
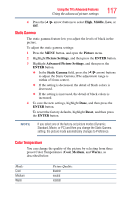
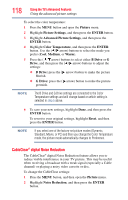
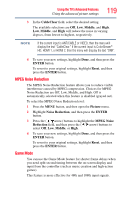
118 Using the TV's Advanced Features Using the advanced picture settings To select the color temperature: 1 Press the MENU button and open the Picture menu. 2 Highlight Picture Settings, and then press the ENTER button. 3 Highlight Advanced Picture Settings, and then press the ENTER button. 4 Highlight Color Temperature, and then press the ENTER button. Use the ( / arrow) buttons to select the mode you prefer (Cool, Medium, or Warm). 5 Press the ( / arrow) buttons to select either B Drive or G Drive, and then press the ( / arrow) buttons to adjust the settings: ❖ B Drive: press the ( arrow) button to make the picture blueish. ❖ G Drive: press the ( arrow) button to make the picture greenish. NOTE The B Drive and G Drive settings are connected to the Color Temperature settings and will change based on which setting is selected in step 5 above. 6 To save your new settings, highlight Done, and then press the ENTER button. To revert to your original settings, highlight Reset, and then press the ENTER button. NOTE If you select one of the factory-set picture modes (Dynamic, Standard, Movie, or PC) and then you change the Color Temperature mode, the picture mode automatically changes to Preference. CableClear® digital Noise Reduction The CableClear® digital Noise Reduction feature allows you to reduce visible interference in your TV picture. This may be useful when receiving a broadcast with a weak signal (especially a Cable channel) or playing a noisy video cassette or disc. To change the CableClear settings: 1 Press the MENU button, and then open the Picture menu. 2 Highlight Noise Reduction, and then press the ENTER button.
-
 1
1 -
2
-
3
-
4
-
5
-
6
-
7
-
8
-
9
-
10
-
11
-
12
-
13
-
14
-
15
-
16
-
17
-
18
-
19
-
20
-
21
-
22
-
23
-
24
-
25
-
26
-
27
-
28
-
29
-
30
-
31
-
32
-
33
-
34
-
35
-
36
-
37
-
38
-
39
-
40
-
41
-
42
-
43
-
44
-
45
-
46
-
47
-
48
-
49
-
50
-
51
-
52
-
53
-
54
-
55
-
56
-
57
-
58
-
59
-
60
-
61
-
62
-
63
-
64
-
65
-
66
-
67
-
68
-
69
-
70
-
71
-
72
-
73
-
74
-
75
-
76
-
77
-
78
-
79
-
80
-
81
-
82
-
83
-
84
-
85
-
86
-
87
-
88
-
89
-
90
-
91
-
92
-
93
-
94
-
95
-
96
-
97
-
98
-
99
-
100
-
101
-
102
-
103
-
104
-
105
-
106
-
107
-
108
-
109
-
110
-
111
-
112
-
 113
113 -
 114
114 -
 115
115 -
 116
116 -
 117
117 -
 118
118 -
 119
119 -
 120
120 -
 121
121 -
 122
122 -
 123
123 -
124
-
125
-
126
-
127
-
128
-
129
-
130
-
131
-
132
-
133
-
134
-
135
-
136
-
137
-
138
-
139
 |
 |