Toshiba 40L2200U User Guide - Page 71
Selecting the picture size, CH RTN, PIC SIZE, Picture Size
 |
View all Toshiba 40L2200U manuals
Add to My Manuals
Save this manual to your list of manuals |
Page 71 highlights
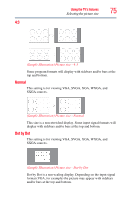
Using the TV's features 71 Selecting the picture size 2 Press and hold the CH RTN button for a few seconds until the message "Memorized" appears on the screen. The channel has been programmed to the CH RTN button. 3 You can then change channels repeatedly, and when you press the CH RTN button, the memorized channel will be tuned. The TV will return to the memorized channel one time only. Once you press the CH RTN button and then change channels again, the CH RTN memory will be cleared and the button will function as Channel Return, by switching back and forth between the last two channels that are tuned.This feature also works for external inputs. Selecting the picture size You can view many program formats in several picture sizes- Native, 4:3, Full, TheaterWide 1, TheaterWide 2, TheaterWide 3, Normal, and Dot by Dot. NOTE The picture size illustrations are examples only. The format of the image (in any of the picture sizes) depends on the format of the signal you are currently watching. Select the picture size that displays the current program in the way that looks best to you. You can save separate picture size preferences for each input on your TV. To select the picture size: 1 Press the PIC SIZE button on the remote. 2 With the Picture Size menu displayed, do one of the following: ❖ Repeatedly press the PIC SIZE button. ❖ Press the corresponding number button (0-5) while the Picture Size menu is displayed. ❖ Press the ( / arrow) buttons while the Picture Size menu is displayed. NOTE Using these functions to change the picture size (that is, changing the height/width ratio) for any purpose other than your private viewing may be prohibited under the Copyright Laws of the United States and other countries, and may subject you to civil and criminal liability.
-
 1
1 -
2
-
3
-
4
-
5
-
6
-
7
-
8
-
9
-
10
-
11
-
12
-
13
-
14
-
15
-
16
-
17
-
18
-
19
-
20
-
21
-
22
-
23
-
24
-
25
-
26
-
27
-
28
-
29
-
30
-
31
-
32
-
33
-
34
-
35
-
36
-
37
-
38
-
39
-
40
-
41
-
42
-
43
-
44
-
45
-
46
-
47
-
48
-
49
-
50
-
51
-
52
-
53
-
54
-
55
-
56
-
57
-
58
-
59
-
60
-
61
-
62
-
63
-
64
-
65
-
 66
66 -
 67
67 -
 68
68 -
 69
69 -
 70
70 -
 71
71 -
 72
72 -
 73
73 -
 74
74 -
 75
75 -
 76
76 -
77
-
78
-
79
-
80
-
81
-
82
-
83
-
84
-
85
-
86
-
87
-
88
-
89
-
90
-
91
-
92
-
93
-
94
-
95
-
96
-
97
-
98
-
99
-
100
-
101
-
102
-
103
-
104
-
105
-
106
-
107
-
108
-
109
-
110
-
111
-
112
-
113
-
114
-
115
-
116
-
117
-
118
-
119
-
120
-
121
-
122
-
123
-
124
-
125
-
126
-
127
-
128
-
129
-
130
-
131
-
132
-
133
-
134
-
135
-
136
-
137
-
138
-
139
 |
 |