Acer Aspire 6530G Aspire 6530/6530G Quick Guide - Page 107
Replacing the Mainboard, Reconnect the subwoofer cable to the mainboard.
 |
View all Acer Aspire 6530G manuals
Add to My Manuals
Save this manual to your list of manuals |
Page 107 highlights
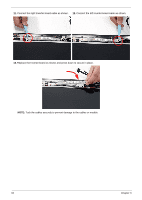
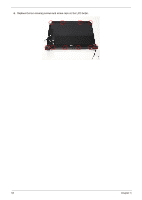
Replacing the Mainboard 1. Ensure that the Mainboard is face up. Place the 2. While holding the left side of the Lower Base, lower Mainboard in the chassis, left hand rear edge first. and pivot the mainboard in to the base. 3. Ensure the screw sockets and locating pin are aligned. Replace the three securing screws as shown. NOTE: Make sure the I/O ports are positioned correctly through the lower cover, and the screw sockets are visible through the mainboard. 4. Reconnect the subwoofer cable to the mainboard. IMPORTANT:Ensure that the cable passes through the mainboard, as shown, and is inserted into the retaining clip to avoid trapping when the upper case is replaced. Chapter 3 97
-
 1
1 -
2
-
3
-
4
-
5
-
6
-
7
-
8
-
9
-
10
-
11
-
12
-
13
-
14
-
15
-
16
-
17
-
18
-
19
-
20
-
21
-
22
-
23
-
24
-
25
-
26
-
27
-
28
-
29
-
30
-
31
-
32
-
33
-
34
-
35
-
36
-
37
-
38
-
39
-
40
-
41
-
42
-
43
-
44
-
45
-
46
-
47
-
48
-
49
-
50
-
51
-
52
-
53
-
54
-
55
-
56
-
57
-
58
-
59
-
60
-
61
-
62
-
63
-
64
-
65
-
66
-
67
-
68
-
69
-
70
-
71
-
72
-
73
-
74
-
75
-
76
-
77
-
78
-
79
-
80
-
81
-
82
-
83
-
84
-
85
-
86
-
87
-
88
-
89
-
90
-
91
-
92
-
93
-
94
-
95
-
96
-
97
-
98
-
99
-
100
-
101
-
 102
102 -
 103
103 -
 104
104 -
 105
105 -
 106
106 -
 107
107 -
 108
108 -
 109
109 -
 110
110 -
 111
111 -
 112
112 -
113
-
114
-
115
-
116
-
117
-
118
-
119
-
120
-
121
-
122
-
123
-
124
-
125
-
126
-
127
-
128
-
129
-
130
-
131
-
132
-
133
-
134
-
135
-
136
-
137
-
138
-
139
-
140
-
141
-
142
-
143
-
144
-
145
-
146
-
147
-
148
-
149
-
150
-
151
-
152
-
153
-
154
-
155
-
156
-
157
-
158
-
159
-
160
-
161
-
162
-
163
-
164
-
165
-
166
-
167
-
168
-
169
-
170
-
171
-
172
-
173
-
174
-
175
-
176
-
177
-
178
-
179
-
180
-
181
-
182
-
183
-
184
-
185
-
186
-
187
-
188
-
189
-
190
-
191
-
192
-
193
-
194
-
195
-
196
-
197
-
198
-
199
-
200
-
201
-
202
-
203
-
204
-
205
-
206
-
207
-
208
-
209
-
210
-
211
-
212
-
213
-
214
-
215
-
216
-
217
-
218
-
219
-
220
-
221
-
222
-
223
-
224
 |
 |

Chapter 3
97
Replacing the Mainboard
1.
Ensure that the Mainboard is face up. Place the
Mainboard in the chassis, left hand rear edge first.
2.
While holding the left side of the Lower Base, lower
and pivot the mainboard in to the base.
3.
Ensure the screw sockets and locating pin are aligned. Replace the three securing screws as shown.
NOTE:
Make sure the I/O ports are positioned correctly through the lower cover, and the screw sockets are
visible through the mainboard.
4.
Reconnect the subwoofer cable to the mainboard.
IMPORTANT:
Ensure that the cable passes through the mainboard, as shown, and is inserted into the
retaining clip to avoid trapping when the upper case is replaced.