Acer Aspire 6530G Aspire 6530/6530G Quick Guide - Page 63
Removing the Main Hard Disk Drive Module
 |
View all Acer Aspire 6530G manuals
Add to My Manuals
Save this manual to your list of manuals |
Page 63 highlights
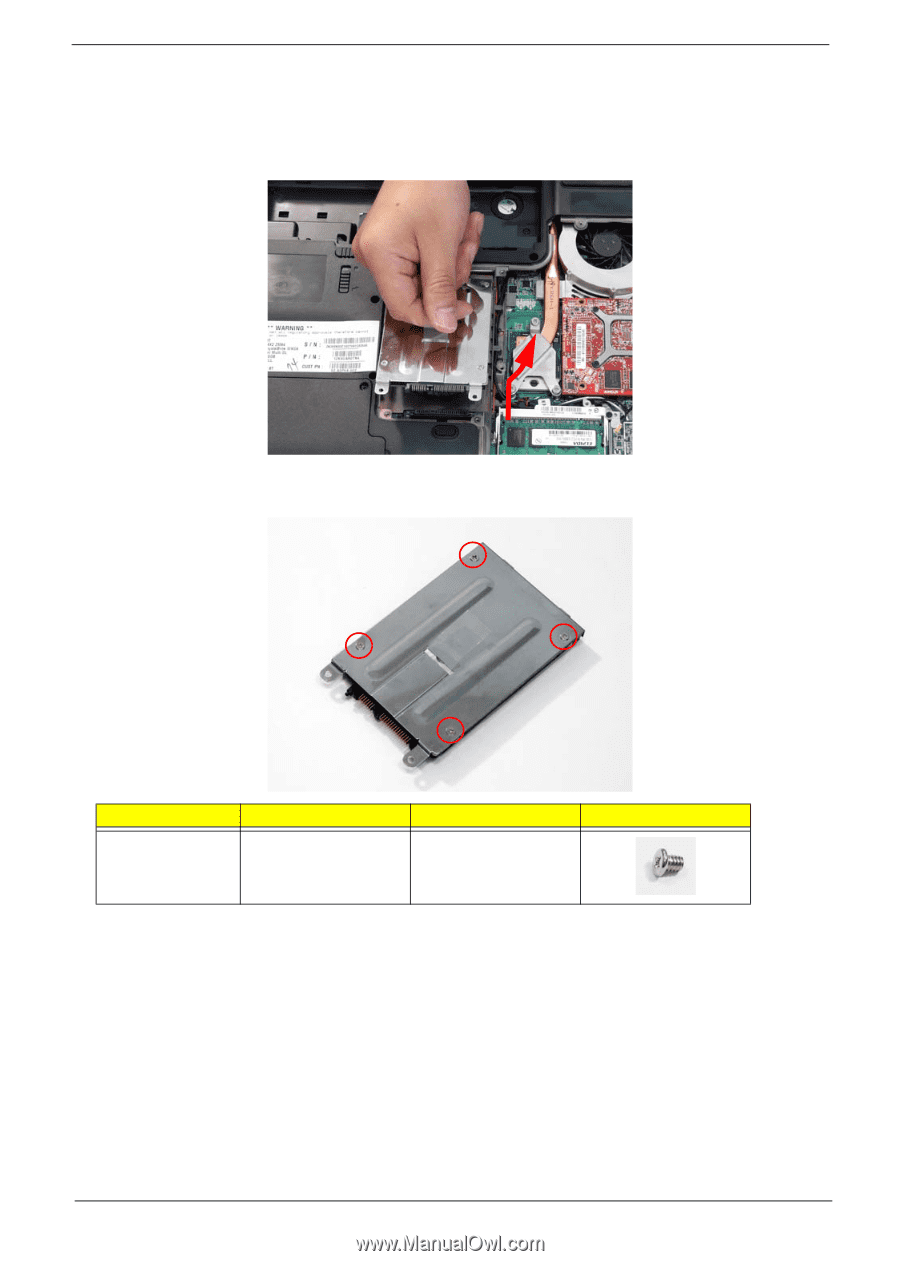
Removing the Main Hard Disk Drive Module 1. See "Removing the Battery Pack" on page 44. 2. Remove the Lower Cover. See "Removing the Lower Covers" on page 47. 3. Hold the Pull Tab and slide the HDD away from the connector. Pull the HDD up as shown to remove. NOTE: To prevent damage to HDD, avoid pressing down on it or placing heavy objects on top of it. 4. Remove the four screws securing the HDD to the carrier. Step HDD Carrier Size M3*0.5+3.5I Quantity 4 Screw Type Chapter 3 53
-
 1
1 -
2
-
3
-
4
-
5
-
6
-
7
-
8
-
9
-
10
-
11
-
12
-
13
-
14
-
15
-
16
-
17
-
18
-
19
-
20
-
21
-
22
-
23
-
24
-
25
-
26
-
27
-
28
-
29
-
30
-
31
-
32
-
33
-
34
-
35
-
36
-
37
-
38
-
39
-
40
-
41
-
42
-
43
-
44
-
45
-
46
-
47
-
48
-
49
-
50
-
51
-
52
-
53
-
54
-
55
-
56
-
57
-
 58
58 -
 59
59 -
 60
60 -
 61
61 -
 62
62 -
 63
63 -
 64
64 -
 65
65 -
 66
66 -
 67
67 -
 68
68 -
69
-
70
-
71
-
72
-
73
-
74
-
75
-
76
-
77
-
78
-
79
-
80
-
81
-
82
-
83
-
84
-
85
-
86
-
87
-
88
-
89
-
90
-
91
-
92
-
93
-
94
-
95
-
96
-
97
-
98
-
99
-
100
-
101
-
102
-
103
-
104
-
105
-
106
-
107
-
108
-
109
-
110
-
111
-
112
-
113
-
114
-
115
-
116
-
117
-
118
-
119
-
120
-
121
-
122
-
123
-
124
-
125
-
126
-
127
-
128
-
129
-
130
-
131
-
132
-
133
-
134
-
135
-
136
-
137
-
138
-
139
-
140
-
141
-
142
-
143
-
144
-
145
-
146
-
147
-
148
-
149
-
150
-
151
-
152
-
153
-
154
-
155
-
156
-
157
-
158
-
159
-
160
-
161
-
162
-
163
-
164
-
165
-
166
-
167
-
168
-
169
-
170
-
171
-
172
-
173
-
174
-
175
-
176
-
177
-
178
-
179
-
180
-
181
-
182
-
183
-
184
-
185
-
186
-
187
-
188
-
189
-
190
-
191
-
192
-
193
-
194
-
195
-
196
-
197
-
198
-
199
-
200
-
201
-
202
-
203
-
204
-
205
-
206
-
207
-
208
-
209
-
210
-
211
-
212
-
213
-
214
-
215
-
216
-
217
-
218
-
219
-
220
-
221
-
222
-
223
-
224
 |
 |
Chapter 3
53
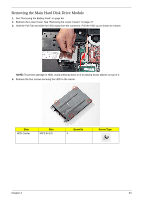
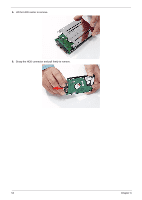
Removing the Main Hard Disk Drive Module
1.
See “Removing the Battery Pack” on page 44.
2.
Remove the Lower Cover. See “Removing the Lower Covers” on page 47.
3.
Hold the Pull Tab and slide the HDD away from the connector. Pull the HDD up as shown to remove.
NOTE:
To prevent damage to HDD, avoid pressing down on it or placing heavy objects on top of it.
4.
Remove the four screws securing the HDD to the carrier.
Step
Size
Quantity
Screw Type
HDD Carrier
M3*0.5+3.5I
4