Adaptec 3200S User Guide - Page 67
File-Set System Configuration, Disk Administrator, Partition-Extend Volume Set
 |
UPC - 760884136430
View all Adaptec 3200S manuals
Add to My Manuals
Save this manual to your list of manuals |
Page 67 highlights
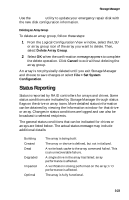
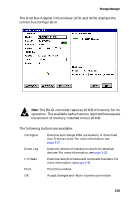
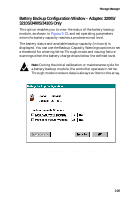
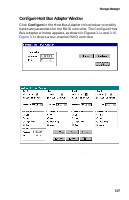
Storage Manager 8 Select File-Set System Configuration to start the array expansion. The status flag on the array group turns blue and the flags on the components turn white during the expansion process. You can perform other activity on the system while the expansion continues, because the array is fully functional during the expansion process. For large arrays, the expansion can take several hours to complete. Host I/O activity can prolong the expansion process. If you want to monitor the progress of the expansion operation, you can use Storage Manager to view the Array Group Information window. Status is Expanding during the expansion process, Optimal when it has completed. Note: If a drive fails during expansion, the expansion may complete successfully. However, the new, larger array remains in a degraded state until the problem is fixed. If there is a hot spare associated with the array, the degraded array is rebuilt using the hot spare. If there is no hot spare, replace the defective drive and rebuild the array. Reconfiguring and Array After Expansion When the array expansion is complete, you need to configure the array so that Windows recognizes the additional space. Follow these steps: 1 Shut down and restart the system. Note: When restarting, Windows runs chkdsk to verify the new space. 2 Start Disk Administrator. The new space appears as free space at the end of the existing logical drive. 3 Select both the original logical drive and the free space by highlighting both segments. 4 Select Partition-Extend Volume Set... Select Yes when prompted to save your changes and restart Windows. 3-22
-
 1
1 -
2
-
3
-
4
-
5
-
6
-
7
-
8
-
9
-
10
-
11
-
12
-
13
-
14
-
15
-
16
-
17
-
18
-
19
-
20
-
21
-
22
-
23
-
24
-
25
-
26
-
27
-
28
-
29
-
30
-
31
-
32
-
33
-
34
-
35
-
36
-
37
-
38
-
39
-
40
-
41
-
42
-
43
-
44
-
45
-
46
-
47
-
48
-
49
-
50
-
51
-
52
-
53
-
54
-
55
-
56
-
57
-
58
-
59
-
60
-
61
-
 62
62 -
 63
63 -
 64
64 -
 65
65 -
 66
66 -
 67
67 -
 68
68 -
 69
69 -
 70
70 -
 71
71 -
 72
72 -
73
-
74
-
75
-
76
-
77
-
78
-
79
-
80
-
81
-
82
-
83
-
84
-
85
-
86
-
87
-
88
-
89
-
90
-
91
-
92
-
93
-
94
-
95
-
96
-
97
-
98
-
99
-
100
-
101
-
102
-
103
-
104
-
105
-
106
-
107
-
108
-
109
-
110
-
111
-
112
-
113
-
114
-
115
-
116
-
117
-
118
-
119
-
120
-
121
-
122
-
123
-
124
-
125
-
126
-
127
-
128
-
129
-
130
-
131
-
132
-
133
-
134
-
135
 |
 |
