Asus AP1720-E1 User Guide - Page 25
ASUS AP1720-E1 barebone server
 |
View all Asus AP1720-E1 manuals
Add to My Manuals
Save this manual to your list of manuals |
Page 25 highlights
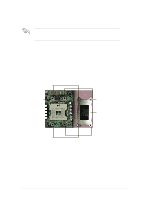
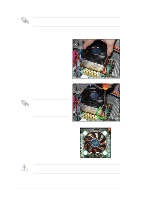
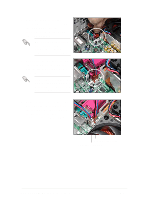
3. When the heatsink and fan assembly is in place, connect the fan cable plug to the fan connector on the motherboard labeled CPUFAN1. The fan cable plug is slotted so it fits only in one orientation. If it doesn't fit completely, try reversing it. 4. Make sure that the heatsink and fan assembly is stable in place and the fan power cable plug is properly connected. Don't forget to connect the CPU fan cable plug. Hardware monitoring errors may occur if you fail to plug the fan cable. 5. Repeat steps 1 to 2 to install the heatsink and fan assembly for the second CPU, then connect the fan cable to the fan connector labeled CPUFAN2. CPUFAN1 cable plug CPUFAN2 cable plug ASUS AP1720-E1 barebone server 2-9
-
 1
1 -
2
-
3
-
4
-
5
-
6
-
7
-
8
-
9
-
10
-
11
-
12
-
13
-
14
-
15
-
16
-
17
-
18
-
19
-
 20
20 -
 21
21 -
 22
22 -
 23
23 -
 24
24 -
 25
25 -
 26
26 -
 27
27 -
 28
28 -
 29
29 -
 30
30 -
31
-
32
-
33
-
34
-
35
-
36
-
37
-
38
-
39
-
40
-
41
-
42
-
43
-
44
-
45
-
46
-
47
-
48
-
49
-
50
-
51
-
52
-
53
-
54
-
55
-
56
-
57
-
58
-
59
-
60
-
61
-
62
-
63
-
64
-
65
-
66
-
67
-
68
-
69
-
70
-
71
-
72
-
73
-
74
-
75
-
76
-
77
-
78
 |
 |
2-9
ASUS AP1720-E1 barebone server
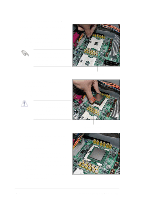
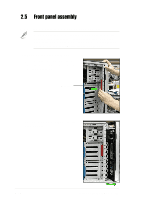
4.
Make sure that the heatsink and
fan assembly is stable in place
and the fan power cable plug is
properly connected.
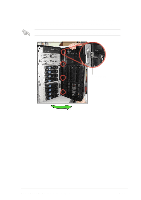
5.
Repeat steps 1 to 2 to install the
heatsink and fan assembly for
the second CPU, then connect
the fan cable to the fan
connector labeled CPUFAN2.
Don’t forget to connect the
CPU fan cable plug. Hardware
monitoring errors may occur if
you fail to plug the fan cable.
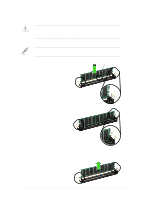
3.
When the heatsink and fan
assembly is in place, connect the
fan cable plug to the fan
connector on the motherboard
labeled CPUFAN1.
The fan cable plug is slotted
so it fits only in one
orientation. If it doesn’t fit
completely, try reversing it.
CPUFAN1 cable plug
CPUFAN2 cable plug