Asus AP1720-E1 User Guide - Page 70
Installation options
 |
View all Asus AP1720-E1 manuals
Add to My Manuals
Save this manual to your list of manuals |
Page 70 highlights
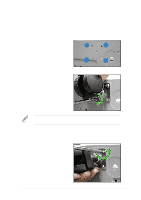
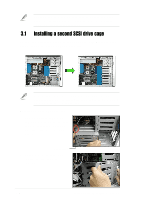
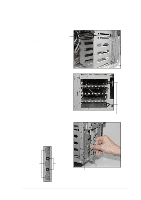
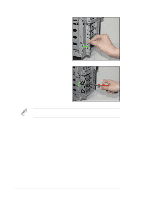
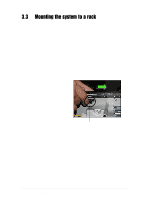
5. Insert the tabs into the holes. You may need to swing the bracket a bit from left to right and back to fully insert the tabs. 6. When the tabs are fully inserted in the holes, swing the bracket to the right until one side is flat to the chassis. 7. Secure the bracket with two screws in the holes indicated. Securing the bracket with the two screws also secures the left side of the SCSI drive cage. 3-4 Chapter 3: Installation options
-
 1
1 -
2
-
3
-
4
-
5
-
6
-
7
-
8
-
9
-
10
-
11
-
12
-
13
-
14
-
15
-
16
-
17
-
18
-
19
-
20
-
21
-
22
-
23
-
24
-
25
-
26
-
27
-
28
-
29
-
30
-
31
-
32
-
33
-
34
-
35
-
36
-
37
-
38
-
39
-
40
-
41
-
42
-
43
-
44
-
45
-
46
-
47
-
48
-
49
-
50
-
51
-
52
-
53
-
54
-
55
-
56
-
57
-
58
-
59
-
60
-
61
-
62
-
63
-
64
-
 65
65 -
 66
66 -
 67
67 -
 68
68 -
 69
69 -
 70
70 -
 71
71 -
 72
72 -
 73
73 -
 74
74 -
 75
75 -
76
-
77
-
78
 |
 |

Chapter 3:
Installation options
3-4
5.
Insert the tabs into the holes. You
may need to swing the bracket a
bit from left to right and back to
fully insert the tabs.
6.
When the tabs are fully inserted in
the holes, swing the bracket to
the right until one side is flat to
the chassis.
7.
Secure the bracket with two
screws in the holes indicated.
Securing the bracket with the two screws also secures the left side of
the SCSI drive cage.