Asus AP1720-E1 User Guide - Page 37
ASUS AP1720-E1 barebone server, Rail 2
 |
View all Asus AP1720-E1 manuals
Add to My Manuals
Save this manual to your list of manuals |
Page 37 highlights
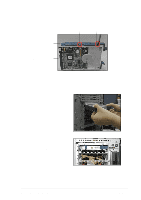
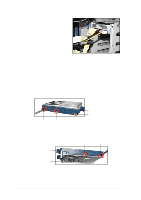
3. Attach Rail 2 to the other side of the drive as shown. The rail end should be on the side of the drive connectors. Hole 3 Hole 1 Rail end Drive connectors 4. Check the HDD jumper setting. Refer to the label pasted on the HDD for the setting description. The setting "Cable Select" is recommended. 5. Carefully insert the drive into a bay on the front panel. 6. Push the drive all the way to the depth of the bay until the rail locks clicks, indicating that the drive is securely in place. ASUS AP1720-E1 barebone server 2-21
-
 1
1 -
2
-
3
-
4
-
5
-
6
-
7
-
8
-
9
-
10
-
11
-
12
-
13
-
14
-
15
-
16
-
17
-
18
-
19
-
20
-
21
-
22
-
23
-
24
-
25
-
26
-
27
-
28
-
29
-
30
-
31
-
 32
32 -
 33
33 -
 34
34 -
 35
35 -
 36
36 -
 37
37 -
 38
38 -
 39
39 -
 40
40 -
 41
41 -
 42
42 -
43
-
44
-
45
-
46
-
47
-
48
-
49
-
50
-
51
-
52
-
53
-
54
-
55
-
56
-
57
-
58
-
59
-
60
-
61
-
62
-
63
-
64
-
65
-
66
-
67
-
68
-
69
-
70
-
71
-
72
-
73
-
74
-
75
-
76
-
77
-
78
 |
 |

2-21
ASUS AP1720-E1 barebone server
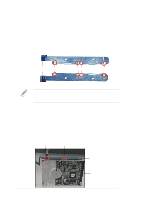
3.
Attach
Rail 2
to the other side of the drive as shown. The rail end
should be on the side of the drive connectors.
Drive connectors
Hole 1
Hole 3
Rail end
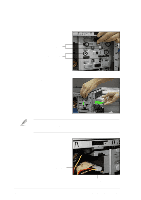
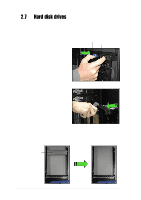
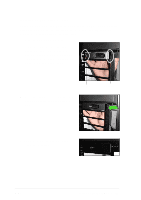
5.
Carefully insert the drive into a
bay on the front panel.
6.
Push the drive all the way to the
depth of the bay until the rail locks
clicks, indicating that the drive is
securely in place.
4.
Check the HDD jumper setting. Refer to the label pasted on the HDD
for the setting description. The setting “Cable Select” is recommended.