Brother International ™ QL-650TD Users Manual - English and Spanish - Page 14

Contents

Page 14 highlights

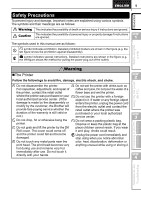
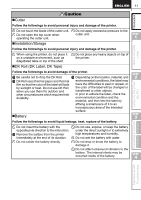
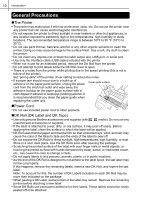
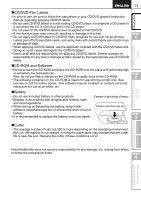
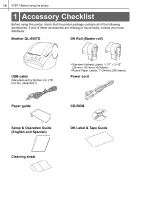
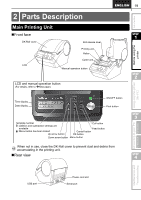
14 Introduction Contents Introduction 2 Important Information 7 Manuals 8 Symbols Used in this Manual 8 Safety Precautions 9 General Precautions 12 Contents 14 1 STEP Before using the printer 17 1 Accessory Checklist 18 2 Parts Description 19 Main Printing Unit 19 LCD 20 Manual operation button 22 3 Setting the DK Roll 23 Applicable DK Rolls 23 Setting the DK Roll 23 4 Attaching the paper guide 24 5 Connecting the power supply 25 6 Setting clock/language/unit 26 7 Procedure for creating a label 28 2 STEP Creating and printing a label using only this printer 29 Creating a label 30 1.Selecting a template 30 2.Printing a label 31 Other convenient functions 32 Editing a template: Menu 1 32 Adding/reducing/fixing the date of the template: Menu 2 33 Confirming print content prior to printing: Menu 3 34 Specifying the number (quantity) of prints: Menu 4 35 Printing labels with label numbers: Menu 5 35 Printing a list of templates: Menu 6 36 Setting the clock: Menu 7 36 Setting Daylight Saving Time: Menu 8 37 Cutting the roll automatically when printing: Menu 9 37 Setting the language: Menu 10 38 Setting the unit of measure (inch or mm): Menu 11 38 Adjusting the contrast of LCD: Menu 12 39 Locking the Menu button 39 Concerning the downloaded template 39 Concerning the download of message 39

  • 1
  • 2
  • 3
  • 4
  • 5
  • 6
  • 7
  • 8
  • 9
  • 10
  • 11
  • 12
  • 13
  • 14
  • 15
  • 16
  • 17
  • 18
  • 19
  • 20
  • 21
  • 22
  • 23
  • 24
  • 25
  • 26
  • 27
  • 28
  • 29
  • 30
  • 31
  • 32
  • 33
  • 34
  • 35
  • 36
  • 37
  • 38
  • 39
  • 40
  • 41
  • 42
  • 43
  • 44
  • 45
  • 46
  • 47
  • 48
  • 49
  • 50
  • 51
  • 52
  • 53
  • 54
  • 55
  • 56
  • 57
  • 58
  • 59
  • 60
  • 61
  • 62
  • 63
  • 64
  • 65
  • 66
  • 67
  • 68
  • 69
  • 70
  • 71
  • 72
  • 73
  • 74
  • 75
  • 76
  • 77
  • 78
  • 79
  • 80
  • 81
  • 82
  • 83
  • 84
  • 85
  • 86
  • 87
  • 88
  • 89
  • 90
  • 91
  • 92
  • 93
  • 94
  • 95
  • 96
  • 97
  • 98
  • 99
  • 100
  • 101
  • 102
  • 103
  • 104
  • 105
  • 106
  • 107
  • 108
  • 109
  • 110
  • 111
  • 112
  • 113
  • 114
  • 115
  • 116
  • 117
  • 118
  • 119
  • 120
  • 121
  • 122
  • 123
  • 124
  • 125
  • 126
  • 127
  • 128

Introduction
14
Introduction ••••••••••••••••••••••••••••••••••••••••••••••••••••••••••••••••••••• 2
Important Information••••••••••••••••••••••••••••••••••••••••••••••••••••••••••••••••••• 7
Manuals ••••••••••••••••••••••••••••••••••••••••••••••••••••••••••••••••••••••••••••••••••• 8
Symbols Used in this Manual ••••••••••••••••••••••••••••••••••••••••••••••••••••••••• 8
Safety Precautions •••••••••••••••••••••••••••••••••••••••••••••••••••••••••••••••••••••• 9
General Precautions •••••••••••••••••••••••••••••••••••••••••••••••••••••••••••••••••••• 12
Contents••••••••••••••••••••••••••••••••••••••••••••••••••••••••••••••••••••••••••••••••••• 14
Before using the printer ••••••••••••••••••••••••••••••••••••••• 17
1
Accessory Checklist••••••••••••••••••••••••••••••••••••••••••••••••••••••••••• 18
2
Parts Description••••••••••••••••••••••••••••••••••••••••••••••••••••••••••••••• 19
Main Printing Unit•••••••••••••••••••••••••••••••••••••••••••••••••••••••••••••••••••••••• 19
LCD •••••••••••••••••••••••••••••••••••••••••••••••••••••••••••••••••••••••••••••••••••••••• 20
Manual operation button ••••••••••••••••••••••••••••••••••••••••••••••••••••••••••••••• 22
3
Setting the DK Roll •••••••••••••••••••••••••••••••••••••••••••••••••••••••••••• 23
Applicable DK Rolls ••••••••••••••••••••••••••••••••••••••••••••••••••••••••••••••••••••• 23
Setting the DK Roll•••••••••••••••••••••••••••••••••••••••••••••••••••••••••••••••••••••• 23
4
Attaching the paper guide•••••••••••••••••••••••••••••••••••••••••••••••••••• 24
5
Connecting the power supply ••••••••••••••••••••••••••••••••••••••••••••••• 25
6
Setting clock/language/unit •••••••••••••••••••••••••••••••••••••••••••••••••• 26
7
Procedure for creating a label ••••••••••••••••••••••••••••••••••••••••••••••• 28
Creating and printing a label using only this printer ••••••• 29
Creating a label •••••••••••••••••••••••••••••••••••••••••••••••••••••••••••••••• 30
1.Selecting a template•••••••••••••••••••••••••••••••••••••••••••••••••••••••••••••••••• 30
2.Printing a label••••••••••••••••••••••••••••••••••••••••••••••••••••••••••••••••••••••••• 31
Other convenient functions •••••••••••••••••••••••••••••••••••••••••••••••••• 32
Editing a template: Menu 1 •••••••••••••••••••••••••••••••••••••••••••••••••••••••••••• 32
Adding/reducing/fixing the date of the template: Menu 2 •••••••••••••••••••••••• 33
Confirming print content prior to printing: Menu 3 ••••••••••••••••••••••••••••••••• 34
Specifying the number (quantity) of prints: Menu 4 ••••••••••••••••••••••••••••••• 35
Printing labels with label numbers: Menu 5 •••••••••••••••••••••••••••••••••••••••• 35
Printing a list of templates: Menu 6 •••••••••••••••••••••••••••••••••••••••••••••••••• 36
Setting the clock: Menu 7 •••••••••••••••••••••••••••••••••••••••••••••••••••••••••••••• 36
Setting Daylight Saving Time: Menu 8 •••••••••••••••••••••••••••••••••••••••••••••• 37
Cutting the roll automatically when printing: Menu 9 ••••••••••••••••••••••••••••• 37
Setting the language: Menu 10 ••••••••••••••••••••••••••••••••••••••••••••••••••••••• 38
Setting the unit of measure (inch or mm): Menu 11 •••••••••••••••••••••••••••••• 38
Adjusting the contrast of LCD: Menu 12 •••••••••••••••••••••••••••••••••••••••••••• 39
Locking the Menu button••••••••••••••••••••••••••••••••••••••••••••••••••••••••••••••• 39
Concerning the downloaded template••••••••••••••••••••••••••••••••••••••••••••••• 39
Concerning the download of message •••••••••••••••••••••••••••••••••••••••••••••• 39
Contents
STEP
1
STEP
1
STEP
2
STEP
2