Brother International ™ QL-650TD Users Manual - English and Spanish - Page 22
Manual operation button, Function
 |
View all Brother International ™ QL-650TD manuals
Add to My Manuals
Save this manual to your list of manuals |
Page 22 highlights
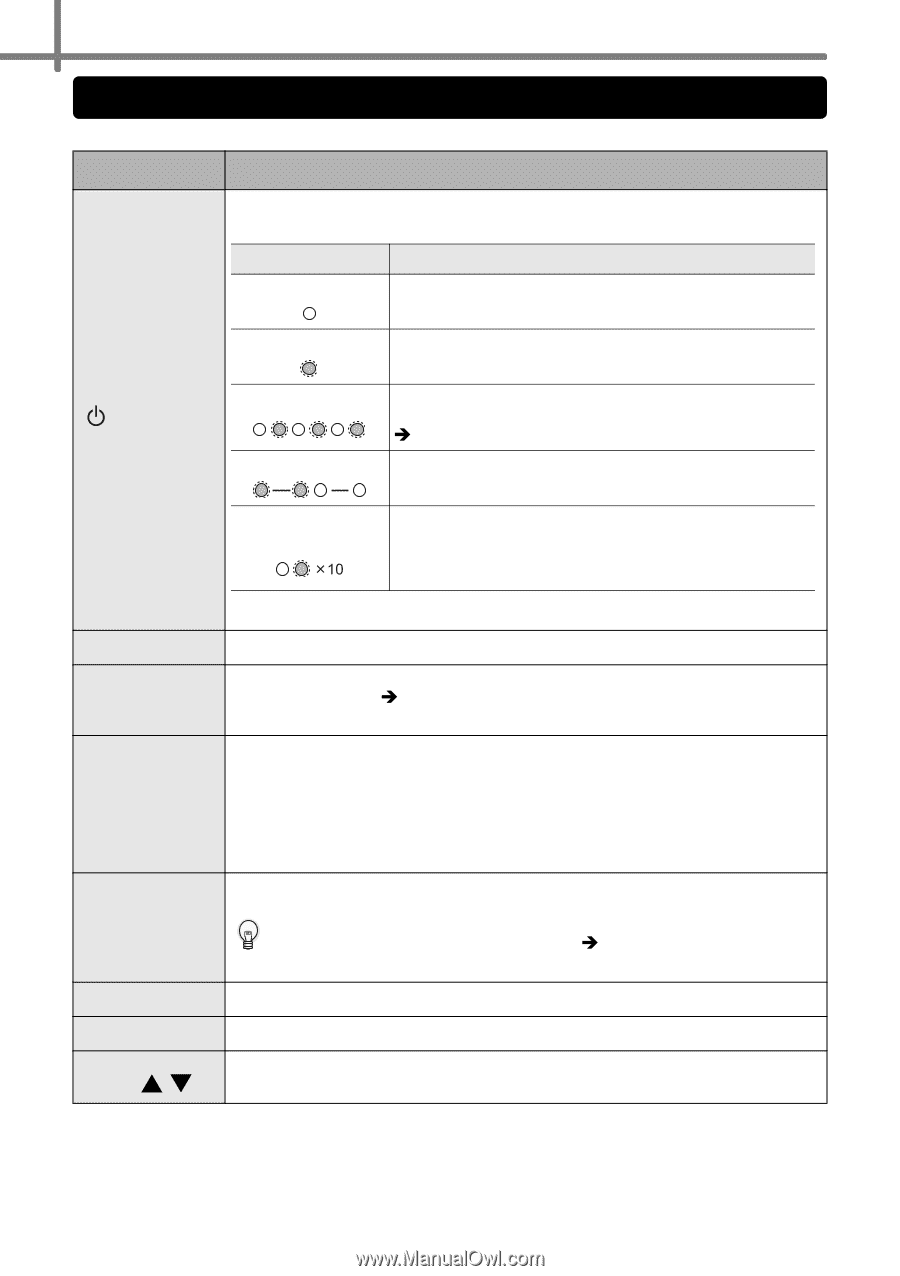
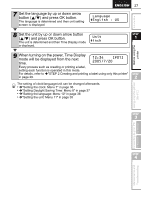
22 STEP1 Before using the printer Manual operation button The functions of each manual operation button are shown below. Name Function Turns ON/OFF the power of the printer. The LED lamp mounted on button indicates the operation status of the printer. LED lamp Turns OFF Status The power is turned OFF. Turns ON The power is turned ON. ON/OFF button () Blinks rapidly Blinks slowly Turns OFF after blinking 10 times An error occurs. For details on troubleshooting, refer to Î"Troubleshooting" in page 59. As the printer is in processing or waiting, wait for a while. A system error occurs. Turn OFF the power of the printer and turn it ON again. Nevertheless, if this error occurs again, contact your local distributor or Brother Call Center. Print button Cut button Feed button Menu button Cancel button OK button Up/down arrow button ( / ) Starts printing. Cuts the printed label. This button is used when "Auto Cut" is set to "OFF". For details, refer to Î"Cutting the roll automatically when printing: Menu 9" in page 37. • When using DK Label (pre-cut label), feeds the DK Label to the edge of label. When pressing this button more than one second, the DK Label is fed to the next label. • When using DK Tape (Continuous tape), feed DK Tape by 1" (25.4mm). • When the DK Roll is not set, this printer enters cleaning mode and the roller spins by 1/3" (8 mm). When pressing this button for more than one second, the roller spins by 4" (10 cm). Switch the Time Display mode (normal time) and Menu Selection mode (when setting). In order to avoid changing the template setting mistakenly, the Menu button can be locked. For details, refer to Î"Locking the Menu button" in page 39. The setting is canceled and the screen returns to the previous mode or screen. Decides the mode or setting value. Changes the menu or setting value.
-
 1
1 -
2
-
3
-
4
-
5
-
6
-
7
-
8
-
9
-
10
-
11
-
12
-
13
-
14
-
15
-
16
-
 17
17 -
 18
18 -
 19
19 -
 20
20 -
 21
21 -
 22
22 -
 23
23 -
 24
24 -
 25
25 -
 26
26 -
 27
27 -
28
-
29
-
30
-
31
-
32
-
33
-
34
-
35
-
36
-
37
-
38
-
39
-
40
-
41
-
42
-
43
-
44
-
45
-
46
-
47
-
48
-
49
-
50
-
51
-
52
-
53
-
54
-
55
-
56
-
57
-
58
-
59
-
60
-
61
-
62
-
63
-
64
-
65
-
66
-
67
-
68
-
69
-
70
-
71
-
72
-
73
-
74
-
75
-
76
-
77
-
78
-
79
-
80
-
81
-
82
-
83
-
84
-
85
-
86
-
87
-
88
-
89
-
90
-
91
-
92
-
93
-
94
-
95
-
96
-
97
-
98
-
99
-
100
-
101
-
102
-
103
-
104
-
105
-
106
-
107
-
108
-
109
-
110
-
111
-
112
-
113
-
114
-
115
-
116
-
117
-
118
-
119
-
120
-
121
-
122
-
123
-
124
-
125
-
126
-
127
-
128
 |
 |