Brother International ™ QL-650TD Users Manual - English and Spanish - Page 56
Replacing the cutter unit, Using a Phillips-head screwdriver, loosen
 |
View all Brother International ™ QL-650TD manuals
Add to My Manuals
Save this manual to your list of manuals |
Page 56 highlights
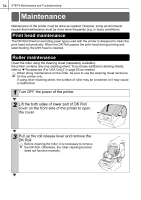
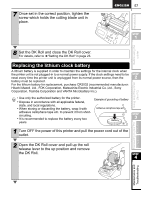
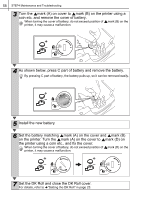
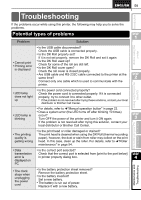
56 STEP4 Maintenance and Troubleshooting Replacing the cutter unit Eventually the cutting blade on the cutter unit will become dull and need to be replaced. At the appropriate time, purchase a new replacement cutter unit and install it according to the following procedure. For purchasing a replacement cutter unit, refer to Î"Software User's Guide (PDF Manual)". 1 Check that the cutter unit is located to the home position. 2 Turn OFF the power to this printer and pull out the power cord from the wall outlet. 3 Open the DK Roll cover and pull the roll release lever to the up position. Remove the DK Roll. 4 Using a Phillips-head screwdriver, loosen the screw which holds the cutter blade unit in-place. The screw of cutter unit cannot be removed to prevent the malfunction of the printer. 5 Hold the knob and carefully remove the cutter unit. Take care not to touch the blade of cutter. 6 Set the new cutter unit at the prescribed position.
-
 1
1 -
2
-
3
-
4
-
5
-
6
-
7
-
8
-
9
-
10
-
11
-
12
-
13
-
14
-
15
-
16
-
17
-
18
-
19
-
20
-
21
-
22
-
23
-
24
-
25
-
26
-
27
-
28
-
29
-
30
-
31
-
32
-
33
-
34
-
35
-
36
-
37
-
38
-
39
-
40
-
41
-
42
-
43
-
44
-
45
-
46
-
47
-
48
-
49
-
50
-
 51
51 -
 52
52 -
 53
53 -
 54
54 -
 55
55 -
 56
56 -
 57
57 -
 58
58 -
 59
59 -
 60
60 -
 61
61 -
62
-
63
-
64
-
65
-
66
-
67
-
68
-
69
-
70
-
71
-
72
-
73
-
74
-
75
-
76
-
77
-
78
-
79
-
80
-
81
-
82
-
83
-
84
-
85
-
86
-
87
-
88
-
89
-
90
-
91
-
92
-
93
-
94
-
95
-
96
-
97
-
98
-
99
-
100
-
101
-
102
-
103
-
104
-
105
-
106
-
107
-
108
-
109
-
110
-
111
-
112
-
113
-
114
-
115
-
116
-
117
-
118
-
119
-
120
-
121
-
122
-
123
-
124
-
125
-
126
-
127
-
128
 |
 |