Brother International ™ QL-650TD Users Manual - English and Spanish - Page 30
Creating a label, 1.Selecting a template
 |
View all Brother International ™ QL-650TD manuals
Add to My Manuals
Save this manual to your list of manuals |
Page 30 highlights
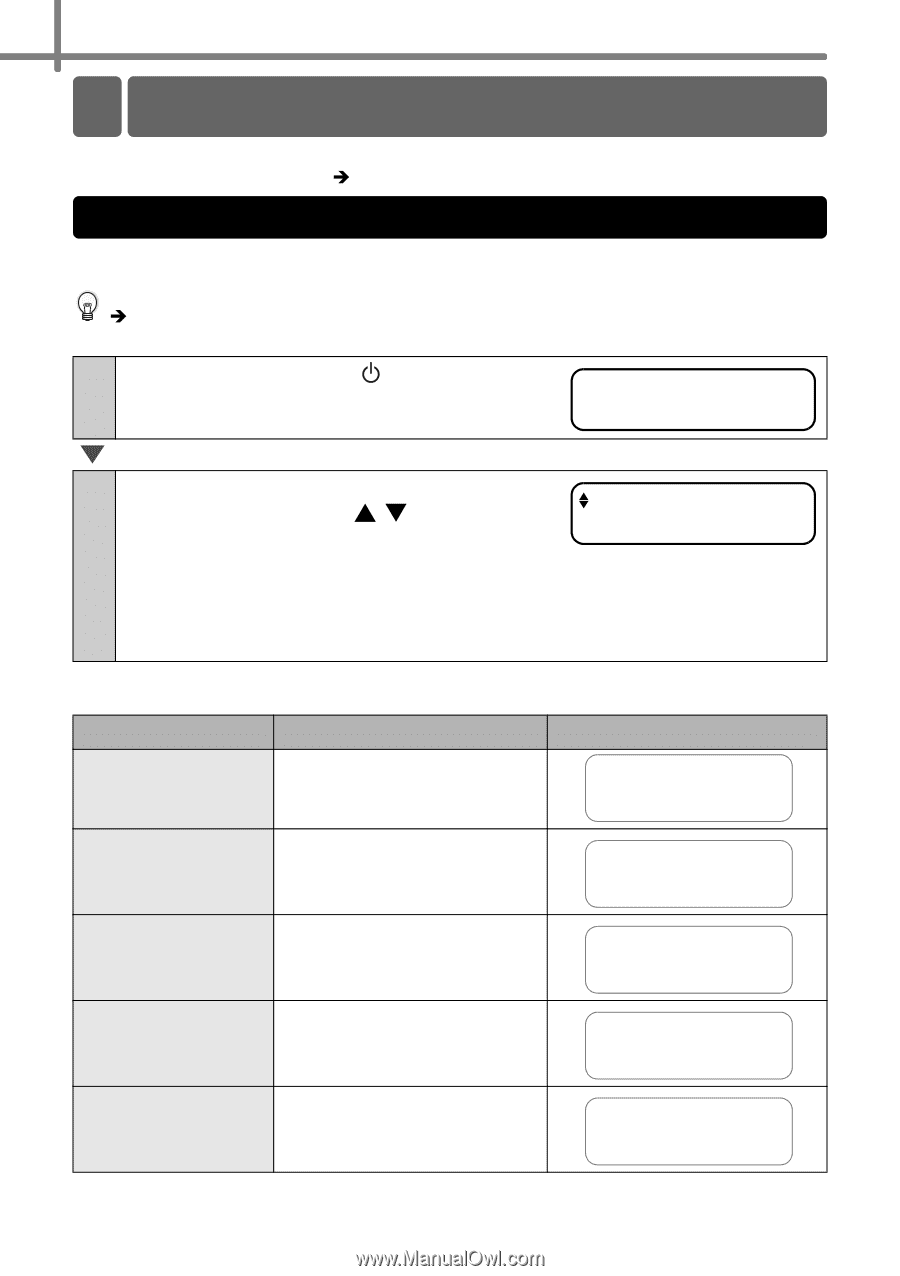
30 STEP2 Creating and printing a label using only this printer Creating a label After deciding the type of label you want to create, set the appropriate DK label to the label image you want (refer to Î"Setting the DK Roll" in page 23). 1.Selecting a template Select the template of the label you want to create. This printer has eight built-in templates available for your convenience. It is also possible to create templates with your own PC. For details, refer to Î"Software User's Guide (PDF Manual)". 1 Press ON/OFF button ( ) to turn on the power. Time Display mode is displayed. 12:34 [P01] 2005/7/20 2 Select a template by scrolling up or down with the arrow button ( / ) and press [P07]Msg+D+T the OK button to select. When selecting a template which includes a particular message (Msg), select the message and then press the OK button. The selected template is determined, and the screen returns to Time Display mode. For details on available templates, refer to "Type of template" below. Type of template Name of template Content Sample of printing [P01]Date Date 2005/7/20 [P02]Time Time 12:34 [P03]Message Message [P04]Date+Time Date + time [P05]Msg+Date Message + date Received 2005/7/20 12:34 Received 2005/7/20
-
 1
1 -
2
-
3
-
4
-
5
-
6
-
7
-
8
-
9
-
10
-
11
-
12
-
13
-
14
-
15
-
16
-
17
-
18
-
19
-
20
-
21
-
22
-
23
-
24
-
 25
25 -
 26
26 -
 27
27 -
 28
28 -
 29
29 -
 30
30 -
 31
31 -
 32
32 -
 33
33 -
 34
34 -
 35
35 -
36
-
37
-
38
-
39
-
40
-
41
-
42
-
43
-
44
-
45
-
46
-
47
-
48
-
49
-
50
-
51
-
52
-
53
-
54
-
55
-
56
-
57
-
58
-
59
-
60
-
61
-
62
-
63
-
64
-
65
-
66
-
67
-
68
-
69
-
70
-
71
-
72
-
73
-
74
-
75
-
76
-
77
-
78
-
79
-
80
-
81
-
82
-
83
-
84
-
85
-
86
-
87
-
88
-
89
-
90
-
91
-
92
-
93
-
94
-
95
-
96
-
97
-
98
-
99
-
100
-
101
-
102
-
103
-
104
-
105
-
106
-
107
-
108
-
109
-
110
-
111
-
112
-
113
-
114
-
115
-
116
-
117
-
118
-
119
-
120
-
121
-
122
-
123
-
124
-
125
-
126
-
127
-
128
 |
 |