Brother International ™ QL-650TD Users Manual - English and Spanish - Page 26
Setting clock/language/unit
 |
View all Brother International ™ QL-650TD manuals
Add to My Manuals
Save this manual to your list of manuals |
Page 26 highlights
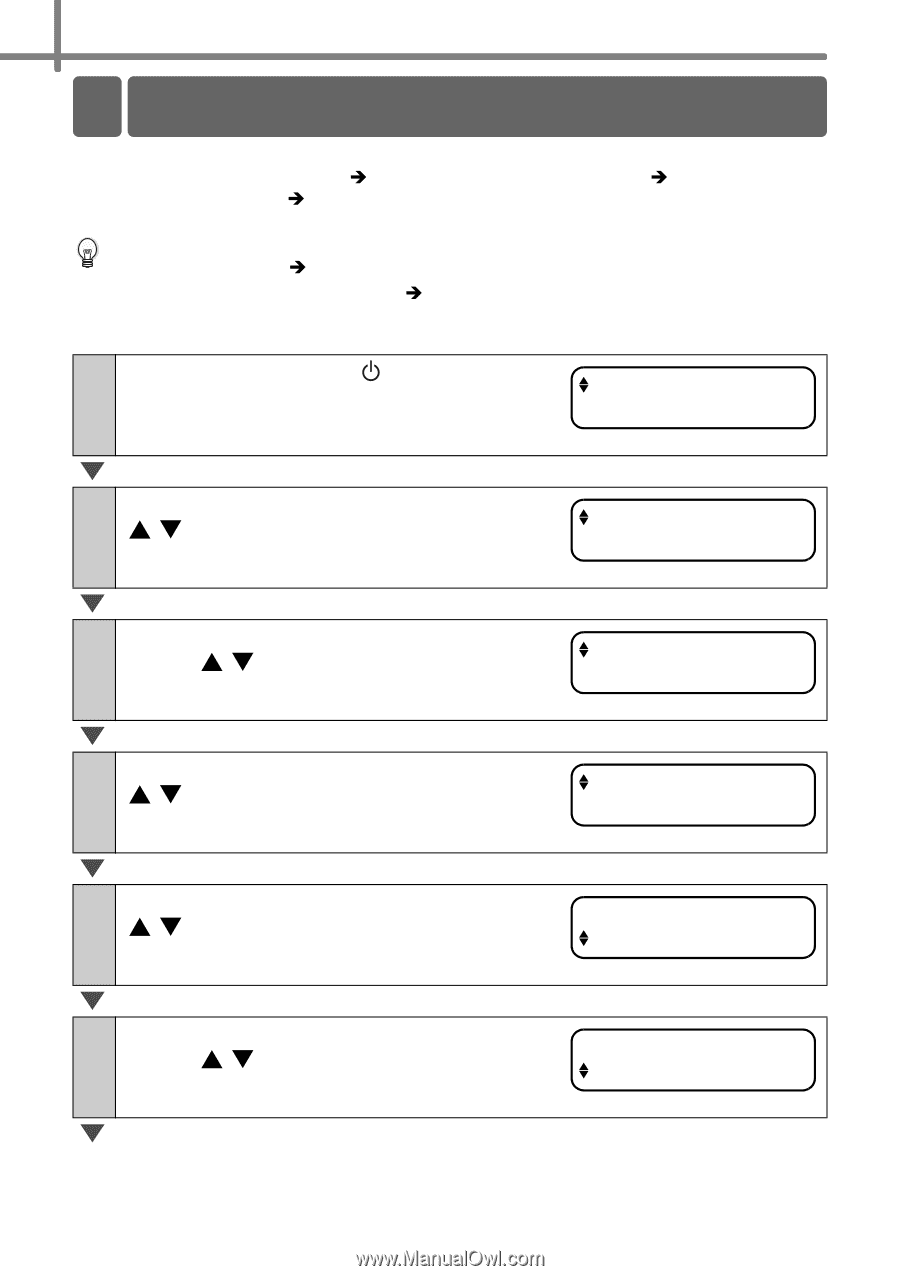
26 STEP1 Before using the printer 6 Setting clock/language/unit After purchasing the printer, it is necessary to set clock, language, and unit. Before setting the printer, check Î"Setting the DK Roll" in page 23, Î"Attaching the paper guide" in page 24, Î"Connecting the power supply" in page 25 are completed. • Removing both of battery and outlet causes reset of the clock, therefore set it again. For details, refer to Î"Setting the clock: Menu 7" in page 36. • For replacing the battery, refer to Î"Replacing the lithium battery for clock backup" in page 57. 1 Press ON/OFF button ( ) to turn on the power of the printer. Time setting screen is displayed on LCD, and then year "05" and "YY" are displayed alternately. 2005/01/01 00:00 2 Set the year by up or down arrow button ( / ) and press OK button. The year is determined and then month "01" and "MM" are displayed alternately. 20YY/01/01 00:00 3 Set the month by up or down arrow button ( / ) and press OK button. The month is determined and then date "01" and "DD" are displayed alternately. 2005/MM/01 00:00 4 Set the date by up or down arrow button ( / ) and press OK button. The date is determined and then hour "00" and "hh" are displayed alternately. 2005/07/DD 00:00 5 Set the hour by up or down arrow button ( / ) and press OK button. The hour is determined and then minute "00" and "mm" are displayed alternately. 2005/07/20 hh:00 6 Set the minute by up or down arrow button ( / ) and press OK button. The minute is determined and then language setting screen is displayed. 2005/07/20 12:mm
-
 1
1 -
2
-
3
-
4
-
5
-
6
-
7
-
8
-
9
-
10
-
11
-
12
-
13
-
14
-
15
-
16
-
17
-
18
-
19
-
20
-
 21
21 -
 22
22 -
 23
23 -
 24
24 -
 25
25 -
 26
26 -
 27
27 -
 28
28 -
 29
29 -
 30
30 -
 31
31 -
32
-
33
-
34
-
35
-
36
-
37
-
38
-
39
-
40
-
41
-
42
-
43
-
44
-
45
-
46
-
47
-
48
-
49
-
50
-
51
-
52
-
53
-
54
-
55
-
56
-
57
-
58
-
59
-
60
-
61
-
62
-
63
-
64
-
65
-
66
-
67
-
68
-
69
-
70
-
71
-
72
-
73
-
74
-
75
-
76
-
77
-
78
-
79
-
80
-
81
-
82
-
83
-
84
-
85
-
86
-
87
-
88
-
89
-
90
-
91
-
92
-
93
-
94
-
95
-
96
-
97
-
98
-
99
-
100
-
101
-
102
-
103
-
104
-
105
-
106
-
107
-
108
-
109
-
110
-
111
-
112
-
113
-
114
-
115
-
116
-
117
-
118
-
119
-
120
-
121
-
122
-
123
-
124
-
125
-
126
-
127
-
128
 |
 |