Brother International ™ QL-650TD Users Manual - English and Spanish - Page 31
Printing a label, Press the Print button while in Time
 |
View all Brother International ™ QL-650TD manuals
Add to My Manuals
Save this manual to your list of manuals |
Page 31 highlights
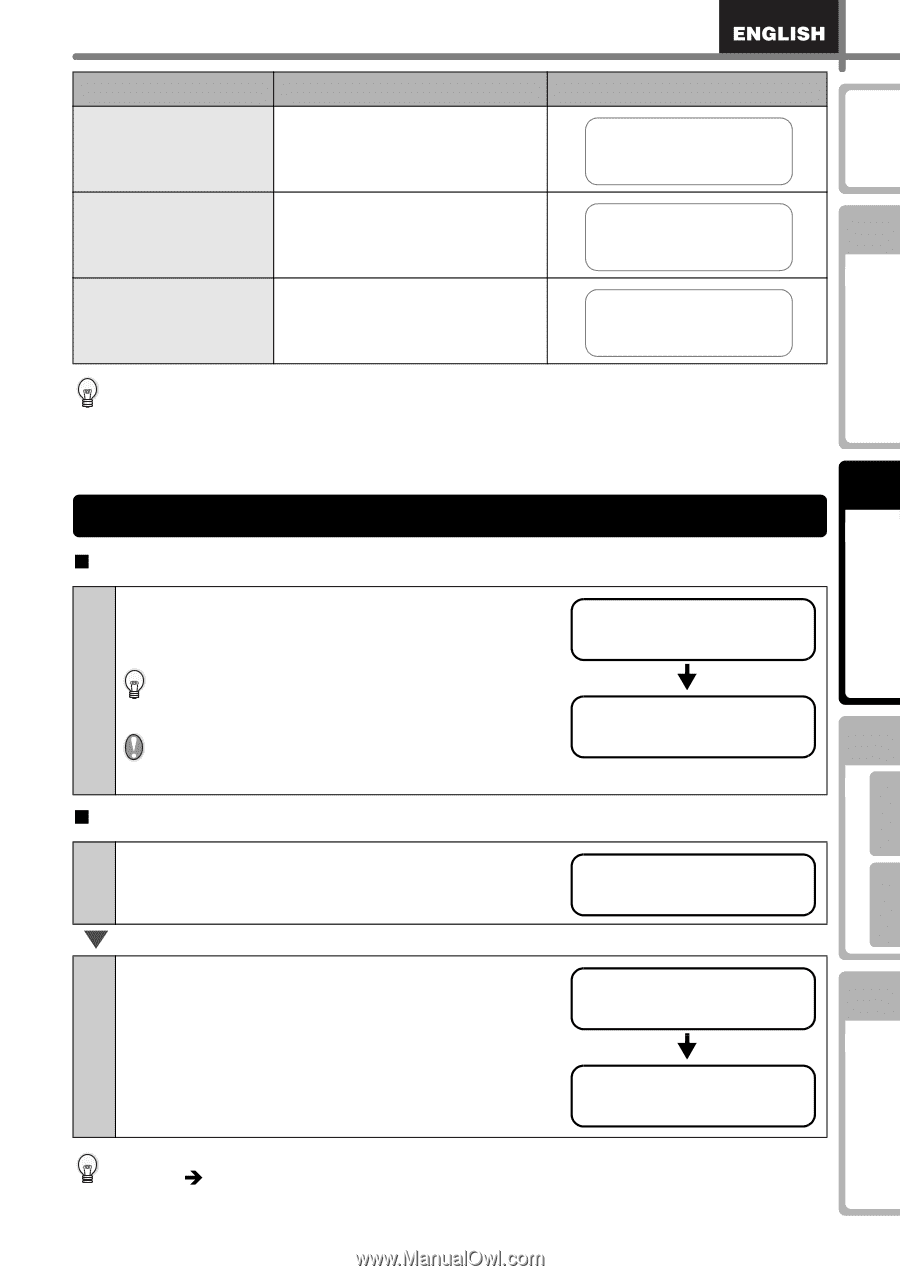
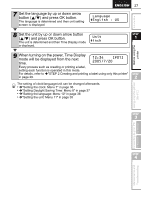
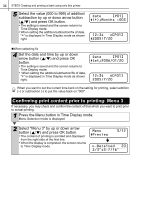
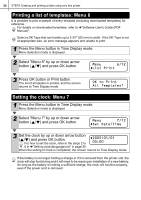
Before using the printer Using only this printer (No PC) Introduction Name of template Content [P06]Msg+Time Message + time 31 Sample of printing Received 12:34 [P07]Msg+D+T Message + date + time Received 2005/7/20 12:34 STEP 1 [P08]Msg+Num Message + numbering Received 001 When a template is downloaded from a PC, the screen is displayed as shown below. • [D01] Sample1 • [D02] Sample2 • • • STEP 2 2.Printing a label „Printing only one label 1 Press the Print button while in Time Display mode. The contents of the template are printed. 12:34 [P07] 2005/7/20 For a preset template, the content of the label is automatically adjusted for the size of the DK Roll. If the content does not fit into the print range even if the font size is minimum, an error will Printing... STEP 3 occur. „Specifying the number (quantity) of labels to be printed 1 Press and hold down the Print button. The screen shown right is displayed, and the number Copies (quantity) increases. 1 2 When the quantity (1 to 999) you want to print is displayed, release the Print button immediately. Copies STEP 34 The number of labels displayed when releasing the Print button will be printed. Printing... Connecting to your PC For Macintosh For Windows Maintenance and Troubleshooting It is also possible to select the quantity of labels to be printed from a menu. Refer to Î"Printing the labels specifying the number: Menu 4" in page 35.
-
 1
1 -
2
-
3
-
4
-
5
-
6
-
7
-
8
-
9
-
10
-
11
-
12
-
13
-
14
-
15
-
16
-
17
-
18
-
19
-
20
-
21
-
22
-
23
-
24
-
25
-
 26
26 -
 27
27 -
 28
28 -
 29
29 -
 30
30 -
 31
31 -
 32
32 -
 33
33 -
 34
34 -
 35
35 -
 36
36 -
37
-
38
-
39
-
40
-
41
-
42
-
43
-
44
-
45
-
46
-
47
-
48
-
49
-
50
-
51
-
52
-
53
-
54
-
55
-
56
-
57
-
58
-
59
-
60
-
61
-
62
-
63
-
64
-
65
-
66
-
67
-
68
-
69
-
70
-
71
-
72
-
73
-
74
-
75
-
76
-
77
-
78
-
79
-
80
-
81
-
82
-
83
-
84
-
85
-
86
-
87
-
88
-
89
-
90
-
91
-
92
-
93
-
94
-
95
-
96
-
97
-
98
-
99
-
100
-
101
-
102
-
103
-
104
-
105
-
106
-
107
-
108
-
109
-
110
-
111
-
112
-
113
-
114
-
115
-
116
-
117
-
118
-
119
-
120
-
121
-
122
-
123
-
124
-
125
-
126
-
127
-
128
 |
 |